

Learn through the super-clean Baeldung Pro experience:
>> Membership and Baeldung Pro.
No ads, dark-mode and 6 months free of IntelliJ Idea Ultimate to start with.
Learn through the super-clean Baeldung Pro experience:
>> Membership and Baeldung Pro.
No ads, dark-mode and 6 months free of IntelliJ Idea Ultimate to start with.
Unit testing is one of the most powerful techniques to help control software quality. When properly written, unit tests run quickly, can be used to determine implementation contracts, and can find regression issues. As a result, in all the programming languages multiple libraries that suit different testing styles are available.
Scala is not any different. There are many testing libraries in Scala, ScalaTest, and MUnit being the most popular ones.
In this tutorial, let’s look at MUnit and see how it makes unit testing Scala code easier.
ScalaTest is undoubtedly the most popular testing library in Scala. However, MUnit provides some additional benefits over ScalaTest:
To use MUnit, let’s add the dependency to build.sbt:
"org.scalameta" %% "munit" % "0.7.29" % TestFor sbt versions prior to 1.5.0, we need to configure MUnit explicitly in build.sbt:
testFrameworks += new TestFramework("munit.Framework")Now that we’ve added the dependency, let’s create a simple test.
Similar to JUnit, MUnit uses the method test() to declare a test case. We need to extend the test class with class FunSuite to make it a test class:
class MUnitTest extends munit.FunSuite {
  test("a simple munit test") {
    //test logic goes here
  }
}
By default, MUnit also supports test cases that return scala.concurrent.Future. That means, we can write async tests in MUnit without additional configuration.
MUnit uses the default timeout for tests as 30 seconds. We can configure a different value for timeouts by overriding the variable munitTimeout within the test:
override val munitTimeout = Duration(5, "s")MUnit provides multiple ways to verify the test results using variations of assert statements.
The assert() method fails the test if the passed boolean statement returns false. Let’s write a simple test with the assert() method:
test("test assert") {
    assert(10+2 == 12)
}
If the above assert condition fails, it fails the test with the message “assertion failed”. We can also provide a more meaningful error message for failure tests:
test("test assert with clue") {
    assert(10+2 == 12, "incorrect sum")
}The assertEquals() method compares the two values passed to it and checks if they are the same. If they aren’t the same, MUnit generates a readable diff for easier understanding:
test("test assertEquals") {
    val str1 = "a"
    val str2 = "a"
    assertEquals(str1, str2)
}We can also verify that two objects are not equal using assertNotEquals():
test("test assertNotEquals") {
    val str1 = "a"
    val str2 = "b"
    assertNotEquals(str1, str2)
}Sometimes, we need to compare the results ignoring spaces and new lines. We can do so by using assertNoDiff() method:
test("test assertNoDiff") {
    val str1 = "a  "
    val str2 = " a   "
    assertNoDiff(str1, str2)
}We can verify if a block throws a particular exception using the method intercept():
def badMethod() = {
    throw new RuntimeException("uh oh...")
}
test("verify exception is thrown") {
    intercept[RuntimeException] {
        badMethod()
    }
}
We can also verify the exception message using interceptMessage() method:
test("verify exception is thrown with correct error message") {
    interceptMessage[RuntimeException]("uh oh...") {
        badMethod()
    }
}MUnit displays the error with colored highlighting for quick and easy understanding.
Let’s see how MUnit reports a test failure:
case class Results(name: String, version: String)
test("a failing test expected"){
    val expected = Results("Baeldung", "1.0")
    val actual = Results("Baeldung", "1.1")
    assertEquals(actual, expected)
}
The above test fail since there’s a difference in the value for the field version. If we run this test, MUnit reports the error with a clear message:
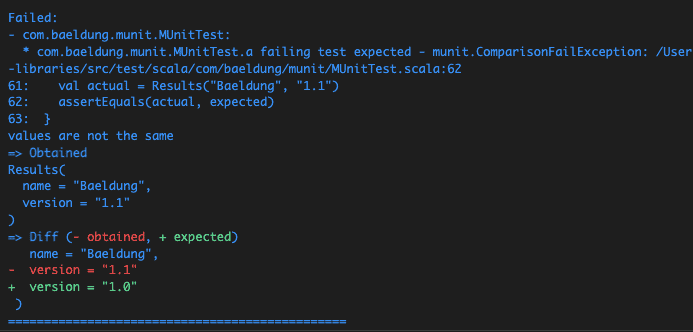
This is very helpful in quickly identifying the difference in the test results.
Sometimes, we need to ensure that a particular failure is expected. We can do so by using the method fail() on the test:
test("a failing test expected".fail){
    val expected = "1.0"
    val actual = "1"
    assertEquals(actual, expected)
}
As a result, the test fails if the program considers 1 and 1.0 as equal.
MUnit provides the ability to execute some pieces of code before and after tests. This is helpful in setting up and tearing down test data.
We can override the methods beforeAll() and afterAll() to execute the code exactly once before and after all the tests within a suite.
Similarly, we can use beforeEach() and afterEach() if we want to execute some logic before and after each test within a test suite:
override def beforeAll(): Unit = println("before all tests")
override def beforeEach(context: BeforeEach): Unit = println("before each test")
We should keep in mind that like in any other testing libraries, we don’t have control over the order of the execution of individual tests.
When we run the command test in sbt, it runs all the tests within the project. Sometimes, we need to run only a subset of them. We can do that using the command testOnly:
testOnly -- "*assert*"This runs all the tests that contain the word assert in the definition. If we remove the wildcard * from the end, then this executes all the tests with the definition ending with the word assert.
Also, we can ignore a particular test by applying the method ignore() to the test definition:
test("verify exception is thrown".ignore) {
    intercept[RuntimeException] {
        badMethod()
    }
}
Now, the above test won’t be executed, but MUnit highlights the test with an ignored message.
We can also ignore an entire test suite based on dynamic conditions. For example, we may have some tests which can be executed only on the Mac platform. We can do that by adding a dynamic condition to the test class:
class MacOnlyTest extends munit.FunSuite {
  override def munitIgnore: Boolean = !scala.util.Properties.isMac
  test("This is a mac only test") {
    println("mac only test")
    assert("mac"=="mac")
  }
}
This test executes only if it’s run on the Mac platform since we’ve overridden the property munitIgnore.
In this article, we looked at the MUnit testing library. To see MUnit in action, we can have a look at the tests in some of the popular open-source projects such as Circe, ScalaFmt, and Scala-CLI.
MUnit also has integrations with some of the popular libraries such as ScalaCheck and Cats-Effect.