Learn through the super-clean Baeldung Pro experience:
>> Membership and Baeldung Pro.
No ads, dark-mode and 6 months free of IntelliJ Idea Ultimate to start with.
Last updated: December 6, 2024

Learn through the super-clean Baeldung Pro experience:
>> Membership and Baeldung Pro.
No ads, dark-mode and 6 months free of IntelliJ Idea Ultimate to start with.
Jenkins is an open-source CICD automation tool for building and deploying projects regardless of the platform. Its main unit is the job.
In this tutorial, we’ll learn how to export and import Jenkins jobs between two different machines. While Jenkins does support a master-slave setup with automatic or rule-based job distribution, we only focus on moving jobs between separate master environments.
Initially, we’ll deploy a Jenkins server in a Docker container. Later, we’ll export a job from the source machine to the target machine using direct migration, the Job Import Plugin, and jenkins-cli.jar.
Before we start, let’s first create a setup for the demo. In this case, the setup includes two Linux VMs, a source machine, and a target machine.
Naturally, there are different ways to install Jenkins in Linux. Usually, the easiest approach is a Docker container. Of course, a Jenkins server must be running on both machines.
Also, a sample job is required to export and import. To create a job, we follow several steps:
After the above, a basic job should now exist on the source Jenkins machine.
Regardless of their type, Jenkins jobs can be moved to different servers in many ways. However, to directly migrate Jenkins jobs files from one instance to another, we should ensure proper connectivity between the source and target machines.
In addition to its interface and CLI, we can use the filesystem to manage Jenkins directly. This includes its jobs as well.
Although they have a lot of configuration options, in the end, Jenkins jobs are simply stored as files on the filesystem. Thus, we can manipulate them as such in new instances with little to no modification.
Jenkins jobs live as subdirectories with configuration files in a specific parent directory on the Jenkins instance. While the default path is usually /var/jenkins_home/jobs/, to get the current setting for a particular environment, we turn to the JENKINS_HOME shell environment variable:
$ echo $JENKINS_HOME
/var/jenkins_home
$ stat $JENKINS_HOME/jobs
  File: /var/jenkins_home/jobs
  Size: 4096            Blocks: 8          IO Block: 4096   directory
Device: 8,5     Inode: 100666      Links: 2
Access: (0755/drwxr-xr-x)  Uid: ( 1000/ jenkins)   Gid: ( 1000/ jenkins)
Access: 2024-11-11 18:06:56.666010100 +0000
Modify: 2024-11-11 18:05:56.100000666 +0000
Change: 2024-11-11 18:05:56.100000666 +0000
 Birth: 2024-11-11 18:05:56.100000666 +0000
$ ls $JENKINS_HOME/jobs
$
So, in this case, the default path should contain job directories with the respective job configuration files. Since we don’t have any, it’s still empty.
After creating sampleJob in the previous section, let’s check for related data on the filesystem within $JENKIS_HOME/jobs/:
$ cd $JENKINS_HOME/jobs
$ ls
sampleJob
$ ls sampleJob
builds  config.xml
In this case, we see a new sampleJob directory with two items:
Let’s check the contents of config.xml for sampleJob:
$ cat config.xml
<?xml version='1.1' encoding='UTF-8'?>
<project>
  <description></description>
  <keepDependencies>false</keepDependencies>
  <properties/>
  <scm class="hudson.scm.NullSCM"/>
  <canRoam>true</canRoam>
  <disabled>false</disabled>
  <blockBuildWhenDownstreamBuilding>false</blockBuildWhenDownstreamBuilding>
  <blockBuildWhenUpstreamBuilding>false</blockBuildWhenUpstreamBuilding>
  <triggers/>
  <concurrentBuild>false</concurrentBuild>
  <builders/>
  <publishers/>
  <buildWrappers/>
</project>
As we can see, the job XML outlines just minimal data, which in this case represents the whole job setup.
Considering the basic structure that holds job files, exporting and importing jobs boils down to (potentially remote) filesystem operations.
So, we can first archive the whole $JENKINS_HOME/jobs/ directory:
$ tar -cf jobs.tar $JENKINS_HOME/jobs/At this point, we can transfer the jobs.tar package to another Jenkins server and extract any of the jobs inside:
In any case, the transfer just involves copying from <SOURCE_JENKINS>:$JENKINS_HOME/jobs/ to <TARGET_JENKINS>:$JENKINS_HOME/jobs/.
As a special way of moving jobs, Jenkins also supports authenticated API-based access and a specific endpoint. To use the latter, we can follow several steps:
After we get both tokens, curl can transfer the job configuration:
$ curl --insecure --silent
  http://<USER>:<SOURCE_API_TOKEN>@<SOURCE_JENKINS>/job/<JOB>/config.xml
  curl --insecure --request POST
  https://<USER>:<TARGET_API_TOKEN>@http://<TARGET_JENKINS>/createItem?name=<JOB>
  --header "Content-Type: application/xml" --data @-
This way, we employ curl to pipe the config.xml file of JOB on the SOURCE_JENKINS server to the TARGET_JENKINS server’s createItem endpoint. We can even use a different name at that point.
Naturally, different Jenkins deployments support separate job types, configuration options for those jobs, and other extensions.
Because of this, it might be necessary to ensure the source and target Jenkins environments have the same extra setup on top of the base product.
To begin with, let’s cover job migration via the Job Import Plugin.
In Jenkins, the Job Import Plugin enables fairly automated job migration. Furthermore, all plugins can be managed and installed from the Jenkins UI.
Of course, we install the Job Import Plugin on the target machine.
So, to import jobs from other Jenkins servers, we make changes in the configuration of the target Jenkins machine by first adding a remote location:
Now, the add remote Jenkins should be available:

Here, we’ll add the URL and credentials of the source Jenkins machine.
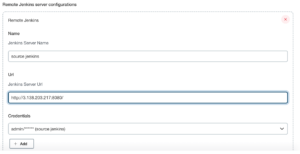
Here, we fill in all relevant values, then save and apply the changes.
Finally, we get a Job Import Plugin item in the left navigation bar of the Jenkins dashboard.
Clicking on it, we can see the options the plugin provides:
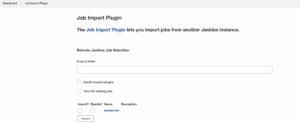
Henceforth, we can get all the jobs of the source machine by clicking the query button. Critically, when we use the Import checkbox, the job from the source machine should be imported to the target machine.
Furthermore, we can also migrate Jenkins jobs using the jenkins-cli.jar file.
To download jenkins-cli.jar, we can go use its URL on the deployment:
http://JENKINS_IP:JENKINS_PORT/jnlpJars/jenkins-cli.jarNow, we should have the jar file available.
Moreover, to export a job from the source machine, we require the password of the source machine Jenkins user. When using Docker for the deployment, the password should be in the stdout logs of the Docker container.
In addition to the user data, the machine that runs the JAR file should also have Java installed and the java command available.
Let’s now look at the command to export the configuration file of the sampleJob from the source machine:
$ java -jar jenkins-cli.jar -s http://JENKINS_USER:JENKINS_PASSWORD@JENKINS_IP:JENKINS_PORT get-job sampleJob > sampleJob.xmlHere, we have several pieces of information, which we need to update with their appropriate values from the source machine:
Of course, we should run the command from the directory where jenkins-cli.jar resides. Also, using the get-job option, we get the job dump in an XML format.
Now, let’s check out the command to import the sampleJob.xml into the target machine:
$ java -jar jenkins-cli.jar -s http://JENKINS_USER:JENKINS_PASSWORD@JENKINS_IP:JENKINS_PORT create-job sampleJob < sampleJob.xmlAgain, the values should be replaced, but this time according to the target machine.
Finally, the above command reads the sampleJob.xml file and imports the new job on the target machine.
In this article, we demonstrated how to export and import Jenkins jobs on different Jenkins servers. First, we used direct XML file migration and setup. Then, we learned to migrate via the Job Import Plugin on the target machine. After that, we did the same with the jenkins-cli.jar tool.