


Learn through the super-clean Baeldung Pro experience:
>> Membership and Baeldung Pro.
No ads, dark-mode and 6 months free of IntelliJ Idea Ultimate to start with.
Last updated: November 21, 2024
Learn through the super-clean Baeldung Pro experience:
>> Membership and Baeldung Pro.
No ads, dark-mode and 6 months free of IntelliJ Idea Ultimate to start with.
GitLab, a leading DevOps platform, offers more than Git version control, integrating features to streamline the entire software development lifecycle. Among these features, the GitLab Container Registry stands out as a powerful solution for managing Container images directly within GitLab projects. This integration, alongside GitLab CI, makes GitLab a unified platform for automating and accelerating DevOps processes.
In this tutorial, we’ll explore the steps required to enable the GitLab Container Registry on self-managed instances, with activation handled by an administrator in Omnibus GitLab installations. We’ll also demonstrate how to interact with the registry for self-managed and SaaS environments.
GitLab 8.8 introduced the GitLab Container Registry, a fully integrated, secure, and private container registry. It enables teams to store and manage container images directly within GitLab’s infrastructure. Key features of the GitLab Container Registry are:
The GitLab Container Registry is accessible through both the GitLab user interface and API. This makes it an ideal choice for teams that rely on GitLab for version control and CI/CD automation. It helps keep everything centralized within a single platform.
The GitLab Container Registry integrates fully with GitLab. Nevertheless, using it with a self-managed instance installed via the Linux Package (Omnibus) can require additional configuration. In contrast, GitLab.com (SaaS) has the registry pre-configured by default, with the registry domain set to registry.gitlab.com.
GitLab allows easy activation of the Container Registry by simply configuring the domain under which it’ll listen. We first confirm that no previous changes have been made to the registry before proceeding effectively. It’s helpful to compare the current configuration file at /etc/gitlab/gitlab.rb with the default template located at /opt/gitlab/etc/gitlab.rb.template for the installed version:
$ sudo gitlab-ctl diff-configThis command displays any differences between the two files, which can help verify that default registry parameters remain unchanged.
We can configure the GitLab Container Registry under an existing GitLab domain with a unique port or its own domain. In /etc/gitlab/gitlab.rb, we can locate and uncomment the registry_external_url parameter, setting its value based on the desired configuration:
We can set up the Container Registry on a GitLab domain with a different port to reuse the existing GitLab TLS certificate. For example, if the GitLab domain is gitlab.example.com, we configure registry_external_url in /etc/gitlab/gitlab.rb as follows:
registry_external_url 'https://gitlab.example.com:5050'Additionally, we configure firewall settings to allow traffic on the specified registry port, ensuring that port 5000 is avoided. Port 5000 is GitLab’s default port and is reserved for internal registry communications with other GitLab components.
Alternatively, we can configure the registry with a dedicated domain by setting the registry_external_url as follows:
registry_external_url 'https://registry.gitlab.example.com'GitLab strongly recommends using HTTPS by default, although HTTP is also an option. If the TLS certificate and key aren’t in /etc/gitlab/ssl/ we can uncomment and set the correct paths as follows:
registry_nginx['ssl_certificate'] = "/path/to/certificate.pem"
registry_nginx['ssl_certificate_key'] = "/path/to/certificate.key"
Then, we ensure the certificates have the correct permissions:
$ chmod 600 /etc/gitlab/ssl/registry.domain.com.*Generally, values specified in the configuration file are commented to indicate default settings. For example, there’s no need to explicitly enable the Container Registry service by uncommenting the registry explicitly [‘enable’] = true, as it’s enabled by default.
At this stage, these configurations are sufficient to enable quick use of the registry. However, additional settings can provide more control. For instance, it’s possible to specify a custom storage path if the default path (/var/opt/gitlab/gitlab-rails/shared/registry) doesn’t meet specific needs. To set a new path, we can edit the configuration as follows:
gitlab_rails['registry_path'] = "/path/to/registry/storage"This specifies where images are stored, using a file storage system by default. Alternatively, GitLab also supports object storage, with drivers for options like S3, Azure, and GCS. Further configuration options are available in GitLab’s official documentation.
Finally, let’s apply the changes:
$ sudo gitlab-ctl reconfigureThis command accounts for the changes made to the file /etc/gitlab/gitlab.rb, thereby enabling the transition to using the registry.
Once the GitLab Container Registry is enabled, we can begin using it to manage Docker images.
To push Docker images to the GitLab Container Registry, users first authenticate with the registry using their GitLab credentials:
$ docker login registry.gitlab.example.comThe Container Registry is enabled by default for each project and can be accessed within the project interface.
In recent GitLab versions, we can access the registry by selecting Deploy > Container Registry in the left sidebar:
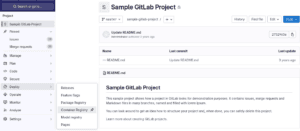
For earlier versions, we access it via Packages and registries > Container Registry.
Next, we tag the Docker image according to the GitLab registry naming convention. This structure ensures GitLab correctly recognizes the image. The format is as follows:
<registry server>/<namespace>/<project>[/<optional path>]For example, if the project is registry.gitlab.example.com/mynamespace/myproject, we can build and tag the image using the following command:
$ docker build -t registry.gitlab.example.com/mynamespace/myproject/myimage:latest .Finally, we can push the tagged image to the GitLab registry:
$ docker push registry.gitlab.example.com/mynamespace/myproject/myimage:latestThis makes the image accessible for deployment and sharing within GitLab.
One of GitLab Container Registry’s most powerful features is its integration with CI/CD pipelines. By using GitLab’s predefined CI variables like CI_REGISTRY, CI_REGISTRY_USER, and CI_REGISTRY_PASSWORD, we can automate authentication and interaction with the registry:
build:
  image: $CI_REGISTRY/mynamespace/myproject/ubuntu:20.10.16
  stage: build
  services:
    - $CI_REGISTRY/mynamespace/myproject/docker:20.10.16-dind
    - alias: docker
  script:
    - echo "$CI_REGISTRY_PASSWORD" | docker login $CI_REGISTRY -u $CI_REGISTRY_USER --password-stdin
    - docker build -t $CI_REGISTRY_IMAGE:$CI_COMMIT_REF_SLUG .
    - docker push $CI_REGISTRY_IMAGE:$CI_COMMIT_REF_SLUG
In this example, we use $CI_REGISTRY to reference the GitLab registry URL and $CI_REGISTRY_IMAGE to set the image path, tagging it with the commit reference $CI_COMMIT_REF_SLUG. The script logs into the registry, builds the Docker image, and pushes it to the GitLab Container Registry. Additionally, it employs Docker-in-Docker (dind) to enable the use of Docker within the CI environment, ensuring a consistent and isolated build process.
In this article, we explored the GitLab Container Registry, highlighting its seamless integration with GitLab for storing and managing Docker images.
By enabling the registry, configuring storage, and integrating it with GitLab’s CI/CD pipelines, we can simplify container management. Whether handling a few containers or many images across projects, GitLab’s Container Registry provides a secure, scalable solution for container needs.