

Yes, we're now running our only Summer Sale. All Courses are 30% off until 20th July, 2026:
Discussing “Enable Auto-Assign Public IPV4 Address” Option in AWS
Last updated: October 12, 2024
Learn through the super-clean Baeldung Pro experience:
>> Membership and Baeldung Pro.
No ads, dark-mode and 6 months free of IntelliJ Idea Ultimate to start with.
1. Overview
In today’s cloud-centric environment, managing networking in AWS (Amazon Web Services) is a very important task. Among the many networking features available in AWS, the ability to automatically assign public IPv4 addresses to instances stands out as a noteworthy feature. Specifically, this feature simplifies connectivity for instances that need to be accessible from the Internet without the need for manual IP assignments.
In this tutorial, we’ll explore the “Auto-assign Public IPv4 Address” feature and its theoretical underpinnings. We’ll also explore practical examples of enabling and managing this feature.
2. Understanding the Auto-Assign Public IPv4 Addresses Feature
The “Auto-assign Public IPv4 Address” feature in AWS is crucial for instances that should be reachable from the Internet. For instance, when we enable this feature for a subnet, any new EC2 instance launched within that subnet automatically receives a public IPv4 address. Moreover, this IP address allows the instance to access the Internet directly without needing additional configuration.
However, we ought to be careful while enabling this option. Ideally, we should base the decision to enable or disable this feature on the specific requirements of our environment. Essentially, there are a couple of consequences that might affect our environment if we opt for enabling or disabling this feature in AWS:
- Security implications: Assigning a public IP opens the instance to the broader Internet, increasing its attack surface; therefore, proper security groups and network ACLs should be in place to mitigate risks
- Network configuration complexity: Disabling this feature necessitates additional configuration to ensure instances still meet connectivity requirements, such as through a NAT gateway for Internet-bound traffic
Accordingly, enabling this feature is particularly useful for instances serving as public-facing web servers, load balancers, or bastion hosts. Conversely, if this feature is disabled, instances will not receive a public IP unless explicitly assigned one, such as through an Elastic IP. This is ideal for instances we don’t intend to be reachable from the Internet, such as those within a private subnet or backend servers.
3. Methods to Enable Auto-Assign Public IPv4 Addresses
Fortunately, AWS offers multiple methods to manage the auto-assignment of public IPv4 addresses:
- AWS Management Console: This is the most straightforward method, suitable for users who prefer a graphical interface
- AWS CLI (Command Line Interface): This is a powerful method for automation and scripting, allowing more complex setups
- Infrastructure as Code (IaC) with Terraform: ideal for managing large-scale environments with consistent, repeatable configurations
3.1. AWS Management Console
To begin with, we’ll use the AWS Management Console to enable Auto-assign Public IPv4 addresses. This is generally the most basic way to manage AWS configurations.
We can enable automatic public IPV4 addresses by following these steps:
- Navigate to the VPC Dashboard
- Click on Subnets and select the specific subnet
- Choose Actions > Edit subnet settings
- Check the box for Auto-assign Public IPv4 Address
- Save the changes
After navigating to the appropriate section in the AWS Console, we can check or edit the option to assign a public IP address:
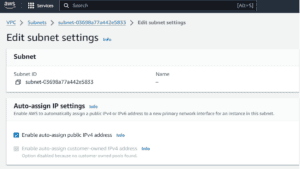
While easy, this method can be time-consuming for managing multiple subnets or environments.
3.2. Using AWS Command Line Interface
We can also use the AWS CLI to enable this feature directly :
$ aws ec2 modify-subnet-attribute \
    --subnet-id subnet-0bb1c79de3EXAMPLE \
    --map-public-ip-on-launch
In the command above, we configure our subnet so that any EC2 instance launched as part of it will automatically receive a public IPv4 address. This is useful for subnets in public-facing environments (like a public subnet) where instances need to be reachable from the Internet. Here, the aws ec2 modify-subnet-attribute modifies the attributes of a specified subnet in Amazon EC2.
Now, let’s understand what each option does when associated with the command above:
- –subnet-id subnet-0bb1c79de3EXAMPLE: this option specifies the ID of the subnet we want to modify. In this case, the subnet ID is subnet-0bb1c79de3EXAMPLE.
- –map-public-ip-on-launch: this flag modifies the subnet’s attribute to enable the automatic assignment of public IP addresses to instances launched in this subnet; when we enable the attribute, any new EC2 instance launched in this subnet will automatically be assigned a public IPv4 address.
This command does not have an output. However, if we want to verify that the changes have been applied successfully, we can use the following command to query the settings of our subnet:
$ aws ec2 describe-subnets \
    --subnet-ids subnet-0bb1c79de3EXAMPLE \
    --query 'Subnets[*].MapPublicIpOnLaunch'
Ideally, we’ll be expecting an output returning the word “true“:
[ true ]Generally, the output will be a JSON array (since the query targets a list of subnets) with a single boolean value per subnet, depending on whether the subnet has MapPublicIpOnLaunch enabled or disabled.
3.3. Using Terraform Configuration
We can also enable this feature through infrastructure as a code (IaaS). Terraform provides an excellent way to automate this configuration across multiple environments:
resource "aws_subnet" "public_subnet" {
  vpc_id     = var.vpc_id
  cidr_block = "10.0.1.0/24"

  map_public_ip_on_launch = true

  tags = {
    Name = "public_subnet"
  }
}
Specifically, map_public_ip_on_launch = true ensures that instances in this subnet automatically receive a public IPv4 address. At the same time, the vpc_id and cidr_block define the VPC and the subnet’s IP range.
Notably, if we are dealing with many subnets, it’s better to opt for IaC tools. Tools such as Terraform or other network automation tools can significantly reduce configuration time compared to other methods.
4. Misconfigurations and Best Practices
Now let’s look at some of the consequences of misconfiguring this feature and the best practices to protect your environment.
4.1. Consequences of Misconfigurations
Misconfiguring this feature can lead to several issues, particularly around security and cost management:
Regarding security risks, if public IPs are auto-assigned to instances that should not be publicly accessible, it can expose critical services to potential attacks. Hence, we need to always ensure proper security group configurations and consider using private subnets for sensitive instances.
Shifting to cost management, instances with public IPs might inadvertently consume Internet bandwidth, leading to higher costs. Additionally, if instances are unintentionally exposed to the Internet, there could be unplanned data transfer costs.
4.2. Best Practices for Managing Public IP Addresses
To avoid the pitfalls of misconfiguration, there are some best practices that we can follow:
- Different environments
- Elastic IPs and auto-assign public IPs
- Monitoring and auditing
First, it’s always recommended to have different environments; one for testing and another for production.
For development and test environments, it’s better to use private IP addresses along with NAT gateways to allow instances to be reachable from the internet. Moreover, this setup minimizes exposure to the Internet and helps reduce costs.
While in production environments, we should only enable auto-assign public IP addresses for instances that genuinely need them. Good candidates for this setting are web servers or public-facing APIs, to limit unnecessary exposure and optimize resource use.
Second, we must understand when to use elastic IPs and when to enable the auto-assign public IPs feature. For example, elastic IPs offer greater control because they are static and can be reassigned between instances, making them ideal for critical services that require a consistent IP address.
In particular, manual IP assignment is ideal when we need more control over specific instances, such as for critical services, while auto-assign public IPs are better suited for groups of services that need to be automatically reachable from the Internet, offering a simpler and more automated approach.
Finally, we should regularly audit our subnets to ensure public IP assignments comply with security policies. In addition, we can utilize AWS Config rules to monitor subnet configurations and receive alerts for any non-compliant changes.
5. Conclusion
In this article, we’ve explained how to effectively manage public IPv4 addresses in AWS. It’s a key part of securing and optimizing our cloud infrastructure.
By understanding the “Auto-assign Public IPv4 Address” feature, and knowing when and how to enable or disable it, we can better control our instances’ exposure to the Internet.
Whether using the AWS Management Console for quick changes, the AWS CLI for automation, or Terraform for managing complex environments, it’s crucial to implement best practices that align with our organization’s security and cost management goals.