
1. Overview
In this lesson, we’ll look at the testing support in the Spring framework. Up to this point, we’ve implemented functionality into our application, but we haven’t focused on testing yet. Testing gives us confidence that our application is working the way it’s supposed to.
We’ll start by briefly discussing the difference between unit testing and integration testing. Then, we’ll set up the test dependency and write our first integration test.
The relevant module we need to import when starting this lesson is: spring-testing-framework-start.
If we want to reference the fully implemented lesson, we can import: spring-testing-framework-end.
2. Unit Testing vs Integration Testing
Before we start writing tests, let’s briefly frame the two main categories of testing we’ll be working with.
Integration tests load the full or partial Spring application context and test components working together. They provide the most direct confidence that the application works correctly, because they exercise the real wiring between beans. The trade-off is that they’re slower, since starting the Spring context takes time. This is where Spring’s testing framework is most useful, since it provides the infrastructure to bootstrap and manage that context during tests.
Unit tests test a single class in isolation by mocking all of its dependencies. They’re fast, since no Spring context is needed, and they also serve as a design tool: if a class is difficult to unit test, that’s often a signal that its design could be improved.
We’ll explore both styles in this lesson, starting with integration tests and then moving on to unit tests.
3. Adding the Test Dependency
Let’s start by adding the test support to our project. We’ll open the pom.xml and add the spring-boot-starter-test dependency with test scope:
<dependency>
    <groupId>org.springframework.boot</groupId>
    <artifactId>spring-boot-starter-test</artifactId>
    <scope>test</scope>
</dependency>
This starter brings in everything we need for testing: JUnit, Spring Test, AssertJ, Mockito, and several other testing utilities. We don’t need to add any additional dependencies.
Next, let’s create the test source folder src/test/java and the package com.baeldung.ls.service inside it. This is where our test classes will live.
4. Context Integration Test with @SpringJUnitConfig
Let’s start with the simplest kind of test: a context integration test. This is a test that bootstraps the Spring context and verifies that the entire process works, without checking any specific functionality.
Let’s create a new class called ContextIntegrationTest in the com.baeldung.ls.service package under the test source folder:
@SpringJUnitConfig
public class ContextIntegrationTest {

    @Test
    public void whenContextIsLoaded1_thenNoExceptions() {
        System.out.println();
    }

}
At first glance, this looks like an empty test that doesn’t do anything. However, because we’ve annotated the class with @SpringJUnitConfig, this is a Spring-enabled test. When we run it, the framework bootstraps the entire Spring context.
So what are we actually testing here? We’re verifying that the Spring context bootstraps correctly, which isn’t a guarantee. Especially when we’re working on configuration, it’s critical to have a quick and simple way to test that our changes don’t break the context startup. The very first thing to check is that it bootstraps; then we can move on to verifying functionality.
Notice we’re using the IntegrationTest suffix in the class name. This is a useful naming convention that communicates the test’s purpose at a glance.
5. Caching the Application Context
A core aspect of the Spring test framework is how it manages the application context. Bootstrapping a full context is an expensive operation, and we want to avoid doing that for each and every test. This is especially important in mature applications with hundreds or thousands of tests.
The framework caches the context by default, so it doesn’t need to be recreated between test methods. Let’s see this in action by injecting the ApplicationContext and adding a second test to our ContextIntegrationTest:
@SpringJUnitConfig
public class ContextIntegrationTest {

    @Autowired
    private ApplicationContext applicationContext;

    @Test
    public void whenContextIsLoaded1_thenNoExceptions() {
        System.out.println();
    }

    @Test
    public void whenContextIsLoaded_thenNoExceptions2() {
        System.out.println();
    }

}
We’ve injected the ApplicationContext using @Autowired and added a second test. If we run both tests and inspect the applicationContext variable, we’ll find that it’s the exact same object instance in both test methods:
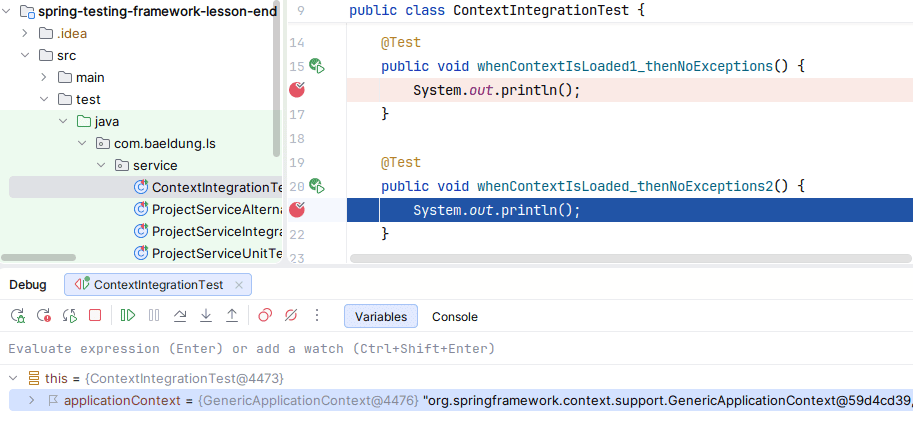
This proves the context is being cached and reused between tests, rather than being bootstrapped from scratch each time.
6. Integration Test with Service Injection
Now let’s write an actual integration test that verifies some logic. We’ll create a test for our ProjectService that checks whether the save() operation works correctly.
Let’s create a new class called ProjectServiceIntegrationTest in the com.baeldung.ls.service package:
@SpringJUnitConfig
public class ProjectServiceIntegrationTest {

    @Autowired
    private IProjectService projectService;

    @Test
    public void whenSavingProject_thenOK() {
        Project savedProject = projectService.save(new Project("name", LocalDate.now()));
        assertNotNull(savedProject);
    }

}
If we try to run this test now, it’ll fail. We’ll get an error saying “no qualifying bean of type IProjectService available.” This means Spring can’t find and inject the service bean.
The reason is that @SpringJUnitConfig alone doesn’t know what packages to scan. It needs to be told explicitly what to scan. So let’s create a simple configuration class.
We’ll add a TestConfig class in the com.baeldung.ls.spring package under the test source folder:
@ComponentScan("com.baeldung.ls")
public class TestConfig {

}
This config class uses @ComponentScan to scan the entire com.baeldung.ls package structure, which is where all our beans live.
Now let’s update our test to reference this configuration. We do this by passing TestConfig.class to the @SpringJUnitConfig annotation:
@SpringJUnitConfig(value = TestConfig.class)
public class ProjectServiceIntegrationTest {

    @Autowired
    private IProjectService projectService;

    @Test
    public void whenSavingProject_thenOK() {
        Project savedProject = projectService.save(new Project("name", LocalDate.now()));
        assertNotNull(savedProject);
    }

}
This is actually using the @ContextConfiguration annotation under the hood, which is composed inside @SpringJUnitConfig. It tells the Spring context where to find the bean definitions.
Now the test passes, because Spring can scan and find our service bean.
Let’s verify everything is working by running all tests. We should have 3 passing tests at this point: two in ContextIntegrationTest and one in ProjectServiceIntegrationTest.
7. @DirtiesContext
As we saw earlier, the Spring framework caches the context so it doesn’t get reloaded for every test. However, some tests may modify the application context, which could lead to side effects on other tests.
In such cases, we can notify the framework to close and recreate the context for later tests. We do this using the @DirtiesContext annotation, which can be applied at either the class level or the method level.
This is useful when a test changes a bean’s internal state or modifies the context in a way that could affect other tests. The trade-off is that we lose the performance benefit of context caching for the affected tests.
8. @ActiveProfiles
Spring provides the @ActiveProfiles annotation that we can apply at the class level to specify the active profiles during the execution of the tests. This is useful for loading test-specific configuration, such as an in-memory database or mock services:
@SpringJUnitConfig
@ActiveProfiles("test")
public class ProjectServiceIntegrationTest {
    //...
}
9. Writing a Unit Test with Mockito
So far, we’ve been writing integration tests where the Spring framework initializes the application context and injects all the dependencies. But what if we want to test a class in isolation, without spinning up the entire context?
If we want to write unit tests for a certain class, we need to mock its dependencies. We can do this using Mockito, a mocking framework that’s already included in the spring-boot-starter-test dependency.
9.1. Setting Up the Test Class
Let’s create a ProjectServiceUnitTest class in the com.baeldung.ls.service package:
public class ProjectServiceUnitTest {

    @Mock
    IProjectRepository projectRepository;

    @InjectMocks
    ProjectServiceImpl projectService;

    private AutoCloseable closeable;

    @BeforeEach
    public void openMocks() {
        closeable = MockitoAnnotations.openMocks(this);
    }

    @AfterEach
    public void releaseMocks() throws Exception {
        closeable.close();
    }

}
Notice we haven’t annotated this test with @SpringJUnitConfig because we don’t want the application context to be initialized. We’re managing the dependencies using Mockito instead.
Let’s walk through the setup:
- The @Mock annotation creates a mock object for IProjectRepository, which is the only dependency of ProjectServiceImpl.
- The @InjectMocks annotation creates the target ProjectServiceImpl object and injects the mock repository into it.
- In the @BeforeEach method, we call MockitoAnnotations.openMocks(this) to initialize all the annotated mocks before each test. This returns an AutoCloseable that we store for cleanup.
- In the @AfterEach method, we close the AutoCloseable to properly release mock resources.
9.2. Adding the Test
Now let’s add the test:
@Test
public void whenSavingProject_thenOK() {
    Project project = new Project("name", LocalDate.now());
    when(projectRepository.save(project)).thenReturn(project);

    Project savedProject = projectService.save(project);

    assertNotNull(savedProject);
}
The when(…).thenReturn(…) pattern tells Mockito what to return when a certain method is called on the mock. Here, we’re telling the framework to return the project object when projectRepository.save(project) is invoked from the ProjectServiceImpl class. This is how we isolate our test by mocking the repository’s behavior rather than actually calling it.
10. @MockBean
We can also mock beans in integration tests by supplying mock objects to the application context. This is done using Spring’s @MockBean annotation:
@SpringJUnitConfig(value = TestConfig.class)
public class ProjectServiceIntegrationTest {

    @MockBean
    IProjectRepository projectRepository;

    // ...
}
Since this is an integration test, we’re still using the @SpringJUnitConfig annotation. However, the @MockBean annotation tells Spring to replace the actual projectRepository bean in the context with a Mockito mock.
This is different from @Mock, which operates outside of the Spring context. @MockBean is useful in integration tests where a particular bean, such as an external service, needs to be mocked while keeping the rest of the context intact.
It’s worth noting that using @MockBean invalidates context caching, since the context has to be recreated with the mock bean in place.
11. Mockito with the JUnit Extension Model
We can simplify the mock initialization and injection process by using JUnit’s extension model with the MockitoExtension class. Let’s create an alternative version of our unit test:
@ExtendWith(MockitoExtension.class)
public class ProjectServiceAlternativeUnitTest {

    @Mock
    IProjectRepository projectRepository;

    @InjectMocks
    ProjectServiceImpl projectService;

    @Test
    public void whenSavingProject_thenOK() {
        Project project = new Project("name", LocalDate.now());
        when(projectRepository.save(project)).thenReturn(project);

        Project savedProject = projectService.save(project);

        assertNotNull(savedProject);
    }
}
By using @ExtendWith(MockitoExtension.class), we don’t need the @BeforeEach and @AfterEach methods anymore. The extension handles the entire mock lifecycle automatically, including initialization and cleanup. This results in cleaner, more concise test code.
The @Mock and @InjectMocks annotations work exactly the same as before, and the test logic is identical. The only difference is how the mocks are initialized.
12. Conclusion
In this lesson, we’ve explored different approaches to testing in Spring, from integration tests to unit tests.
We started by creating a context integration test with @SpringJUnitConfig to verify the Spring context bootstraps correctly, and we saw how the framework caches the application context between tests to avoid expensive re-initialization.
We also looked at @DirtiesContext for controlling context caching when tests modify shared state, and @ActiveProfiles for activating specific profiles during testing. On the unit testing side, we explored how to use Mockito’s @Mock and @InjectMocks annotations with MockitoAnnotations.openMocks(), as well as the cleaner MockitoExtension approach. Finally, we looked at @MockBean for replacing beans in the Spring context with mocks during integration tests.