Yes, we're now running our Black Friday Sale. All Access and Pro are 33% off until 2nd December, 2025:
Using Vim Registers
Last updated: March 18, 2024
1. Overview
Vim is a popular and powerful text editor. It supports many great features that help us efficiently perform different sorts of text editing operations.
In this tutorial, we’ll take a closer look at the Vim registers.
2. Introduction to Vim Registers
2.1. What Are Vim Registers?
As a normal Vim user, we may not have heard about the term “Vim registers”. However, very likely, we have already used registers many times, but we just didn’t realize it.
Let’s take a look at an example of register usages we have already used many times: copy and paste.
We know in Vim we can copy/yank (y) some text and paste (p) it at other places. After we perform the copy/yank command, the copied text is stored in a register (unnamed register “”). Later, when we perform the paste command, the unnamed register’s content will be read and pasted.
Vim registers are spaces in memory that Vim uses to store some text or operation details. Each of these spaces has an identifier so that it can be accessed later.
When we want to reference a Vim register, we use a double quote followed by the register’s name. For instance, “a means the Vim register a and “: means the Vim register :.
In fact, registers are used everywhere in Vim. Let’s see some examples of common usages of Vim registers:
- When we remove texts – for example, using the x command – the deleted text is stored in the unnamed register “”
- Once we execute an Ex command (:Command) in Vim, the register “: holds the command
- When we search text by /somePattern, the search pattern is stored in the “/ register
2.2. Get the Content of Vim Registers in Normal Mode
In Vim Normal mode, we can paste the content of the register x using “xp. If we don’t give the register, the content of the unnamed register “” will be pasted. Let’s see a quick example to understand how to paste the content of a register.
Let’s open Vim editor and type a line of text:
Vim is a powerful editor.
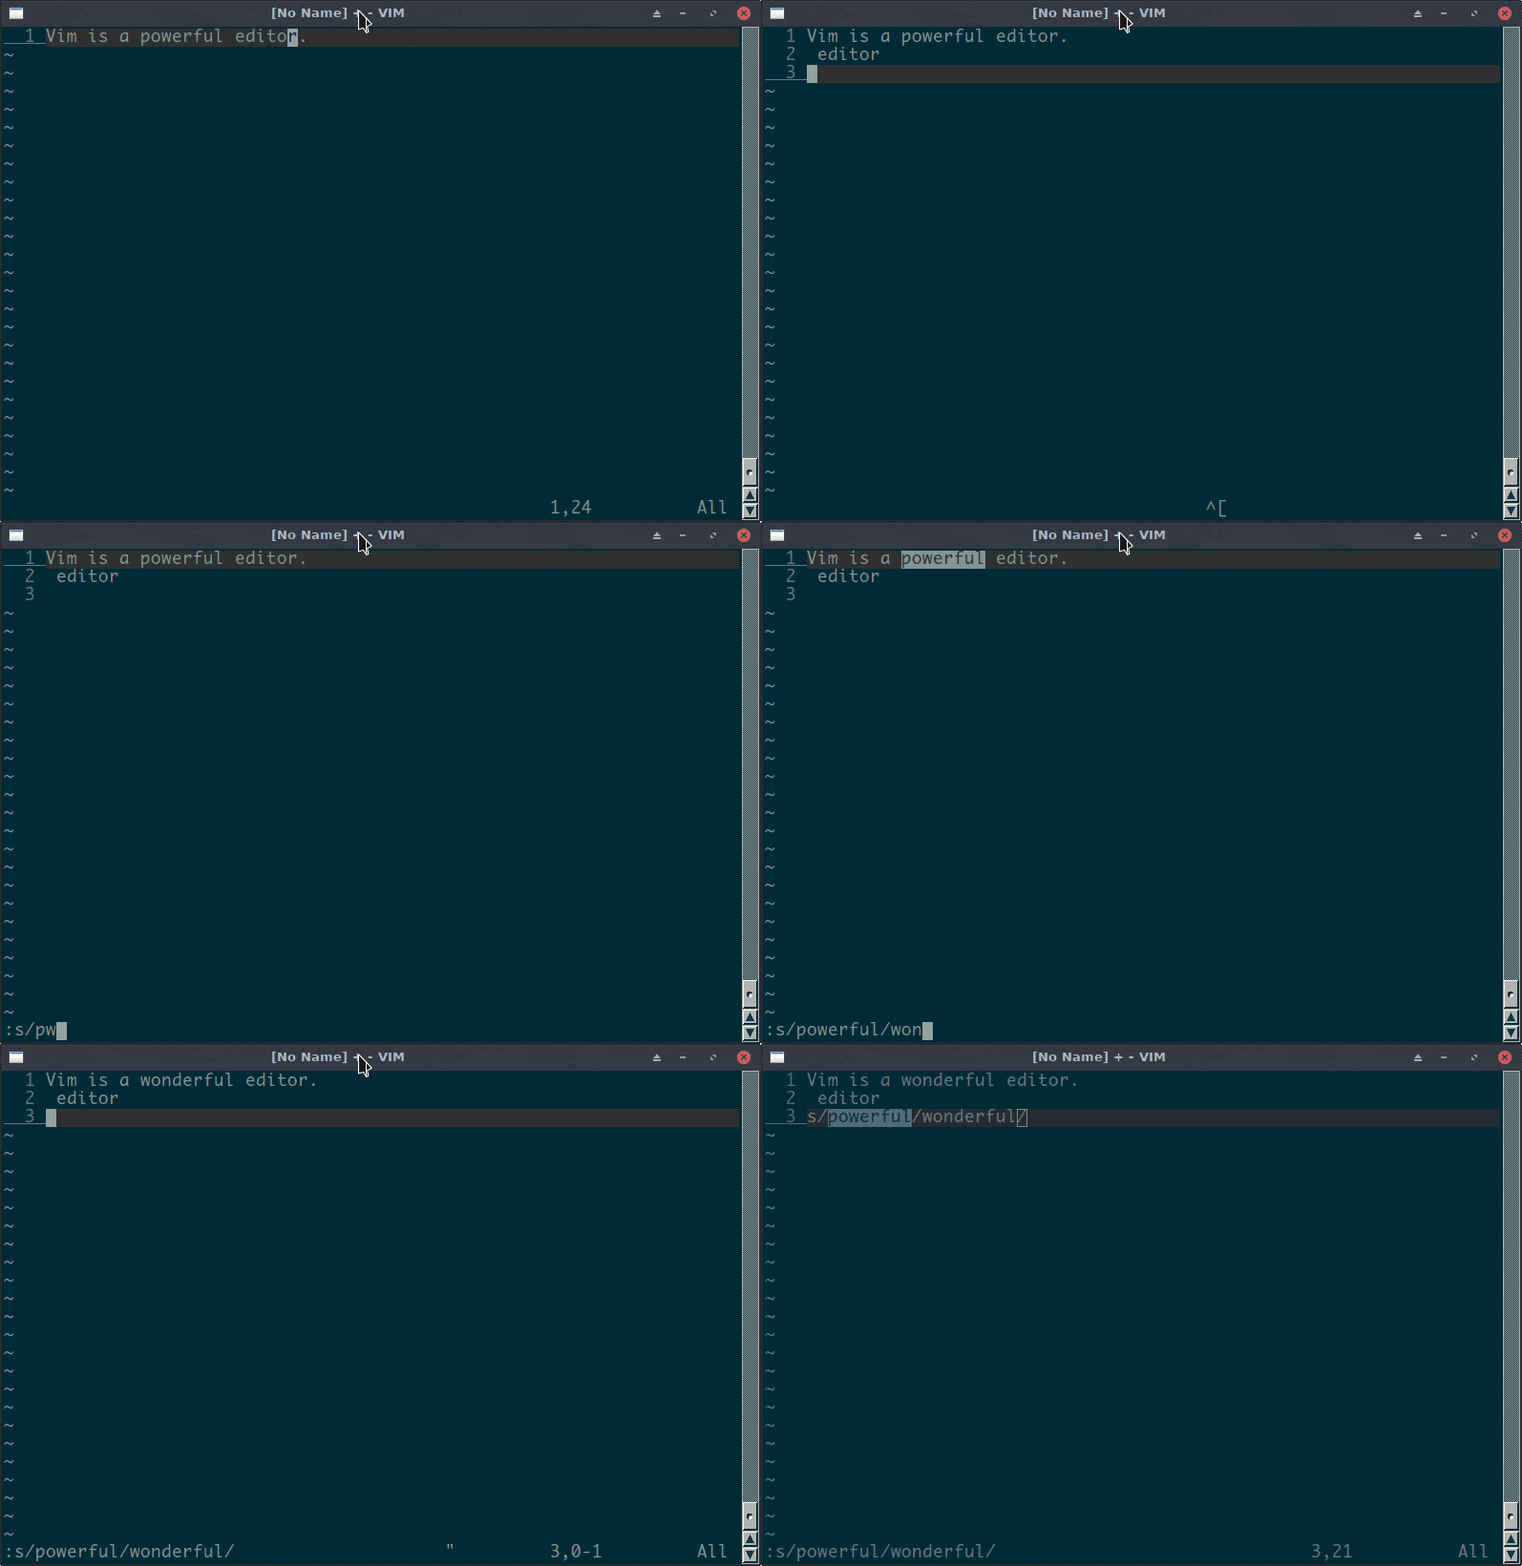
First, in the Normal mode, we move our cursor on the last word “editor” and press yaw to yank the word editor into the unnamed register “”.
Next, we move the cursor to an empty line and press p without giving a register name. We’ll see the yanked text “editor” is pasted.
Then, we execute a command to replace “powerful” with “wonderful” by typing :s/powerful/wonderful/[enter]. After that, the command is stored in the “: register.
Therefore, we can use “:p to paste the content of this register.
Let’s see the usage of the p command through a quick demo:
2.3. Get the Content of Vim Registers in Insert Mode
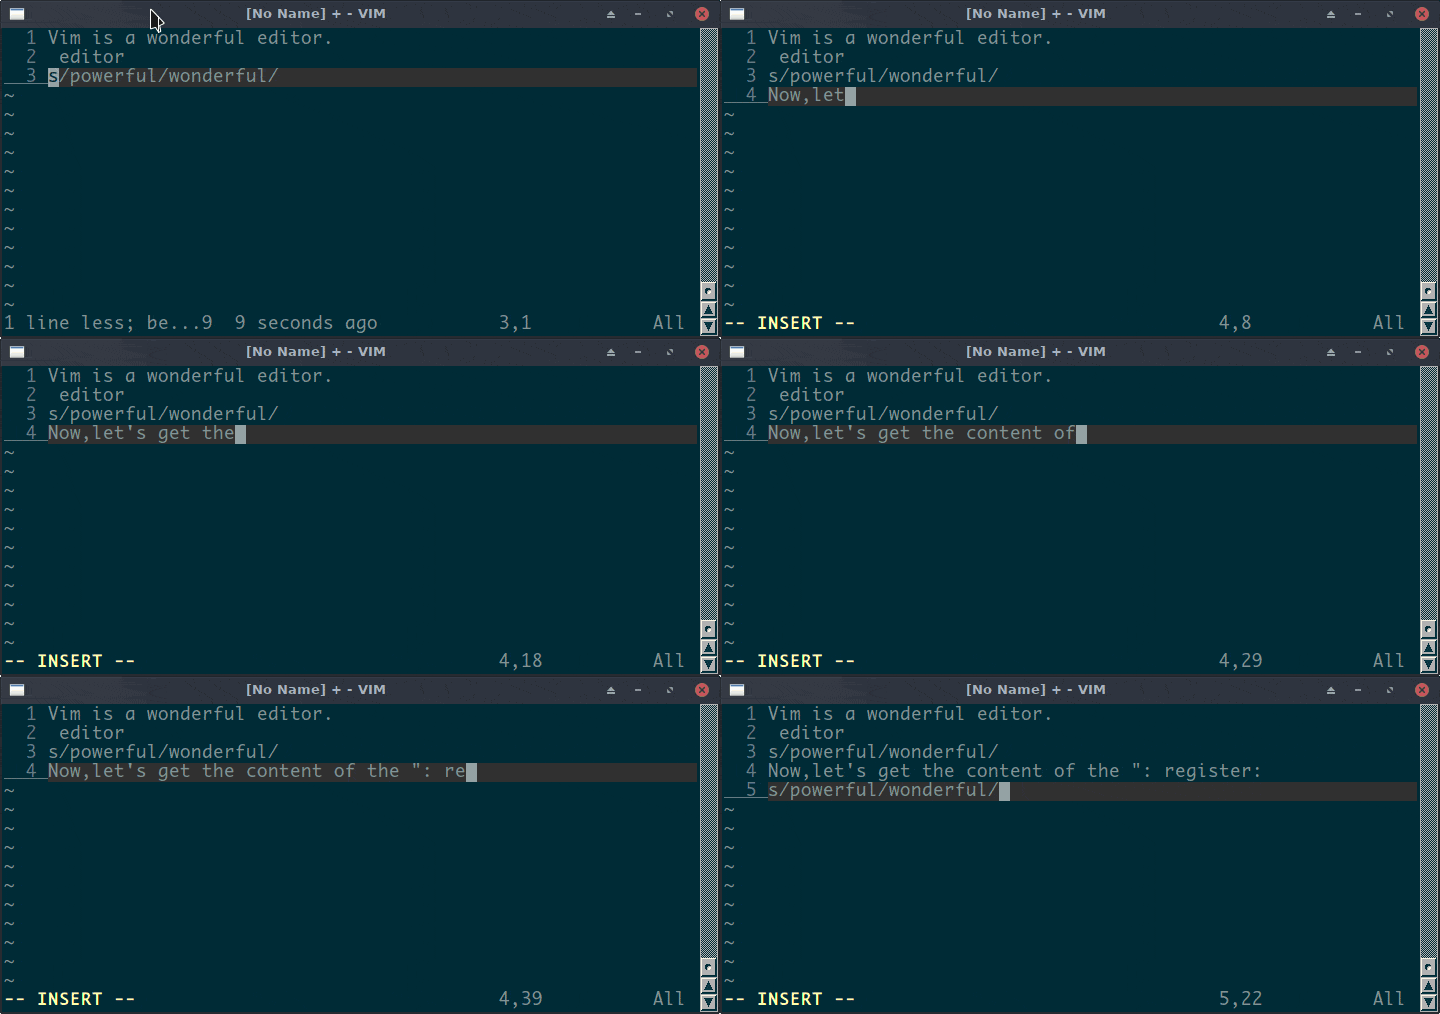
If we want to get the content of a register in Insert mode, we can press the “Ctrl-r” followed by the register’s name.
For example, we want to have the content of “: register in the Insert mode, we press “Ctrl-r” and “:“.
Again, let’s see how to do it in a demo:
2.4. Get the Content of Vim Registers in Command Mode
Further, we can use the :registers (or the short form :reg) command to check a Vim register’s value.
If we don’t provide any register name, the :reg command will list all registers with their content and the type of the content if a register has been written:
:reg
Type Name Content
  c  ""    editor
  c  "0    editor
  l  "1   ...
  b  "2   ...
  b  "3    ^J ^J ^J
  b  "4   3. ^J7. ^J9. ^J10.
...
  c  ":   s/powerful/wonderful/
In the output above, the Type column means the type of the content. It may contain three different values:
- c – characterwise text
- l – linewise text
- b – blockwise text
It references the three text selection types in Vim. When we paste the content of a register, line breaks will be controlled differently depending on the content type.
We can also pass register names to the :reg command and tell it to list certain registers:
:reg 0 : "
Type Name Content
  c  ""    editor
  c  "0    editor
  c  ":   s/powerful/wonderful/
2.5. Types of Vim Registers
So far, we’ve seen examples of the unnamed register “” and the register “: holding the last executed command. They are two different register types.
Vim has ten different types of registers:
- The unnamed register “”
- 26 Named registers “a to “z (or “A to“Z)
- The small delete register “-
- 10 numbered registers “0 to “9
- The selection and drop registers “*, “+, and “~
- Three read-only registers “:, “., and “%
- The alternate file register “#
- The expression register “=
- Last search pattern register “/
- The black hole register “_
In this tutorial, we’ll explain all of them in detail.
Moreover, we’ll learn how to use those registers through examples.
3. The Unnamed Register “”
Vim will fill the unnamed register when we delete text using the commands d, D, x, X, s, S, c, C, or yank text by y or Y.
The unnamed register is used quite often. A common scenario would be a quick copy and paste operation like we use the normal system clipboard.
However, there is a big difference between the clipboard and the unnamed register. The clipboard won’t save deleted text automatically, but the Vim unnamed register does. Sometimes, this could be a problem.
An example can help us to understand the problem quickly. Let’s say we have some text in a Vim buffer:
correct: (right-text)
wrong: (wrong-text)
wrong: (another wrong text)
wrong: (wrong again)
What we attempt to do is replace all the “(….)“s in lines beginning with “wrong:” with “(right-text)“.
It looks like an easy copy-paste task. We can just yank “(right-text)” by the Normal mode ya( command, then remove each “(…)” we want to replace by da( and paste the yanked text using p.
Next, let’s see if it can be done in this way through a little demo. In the demo, we’ll execute the :reg ” command after yanking and deleting text to monitor the content:
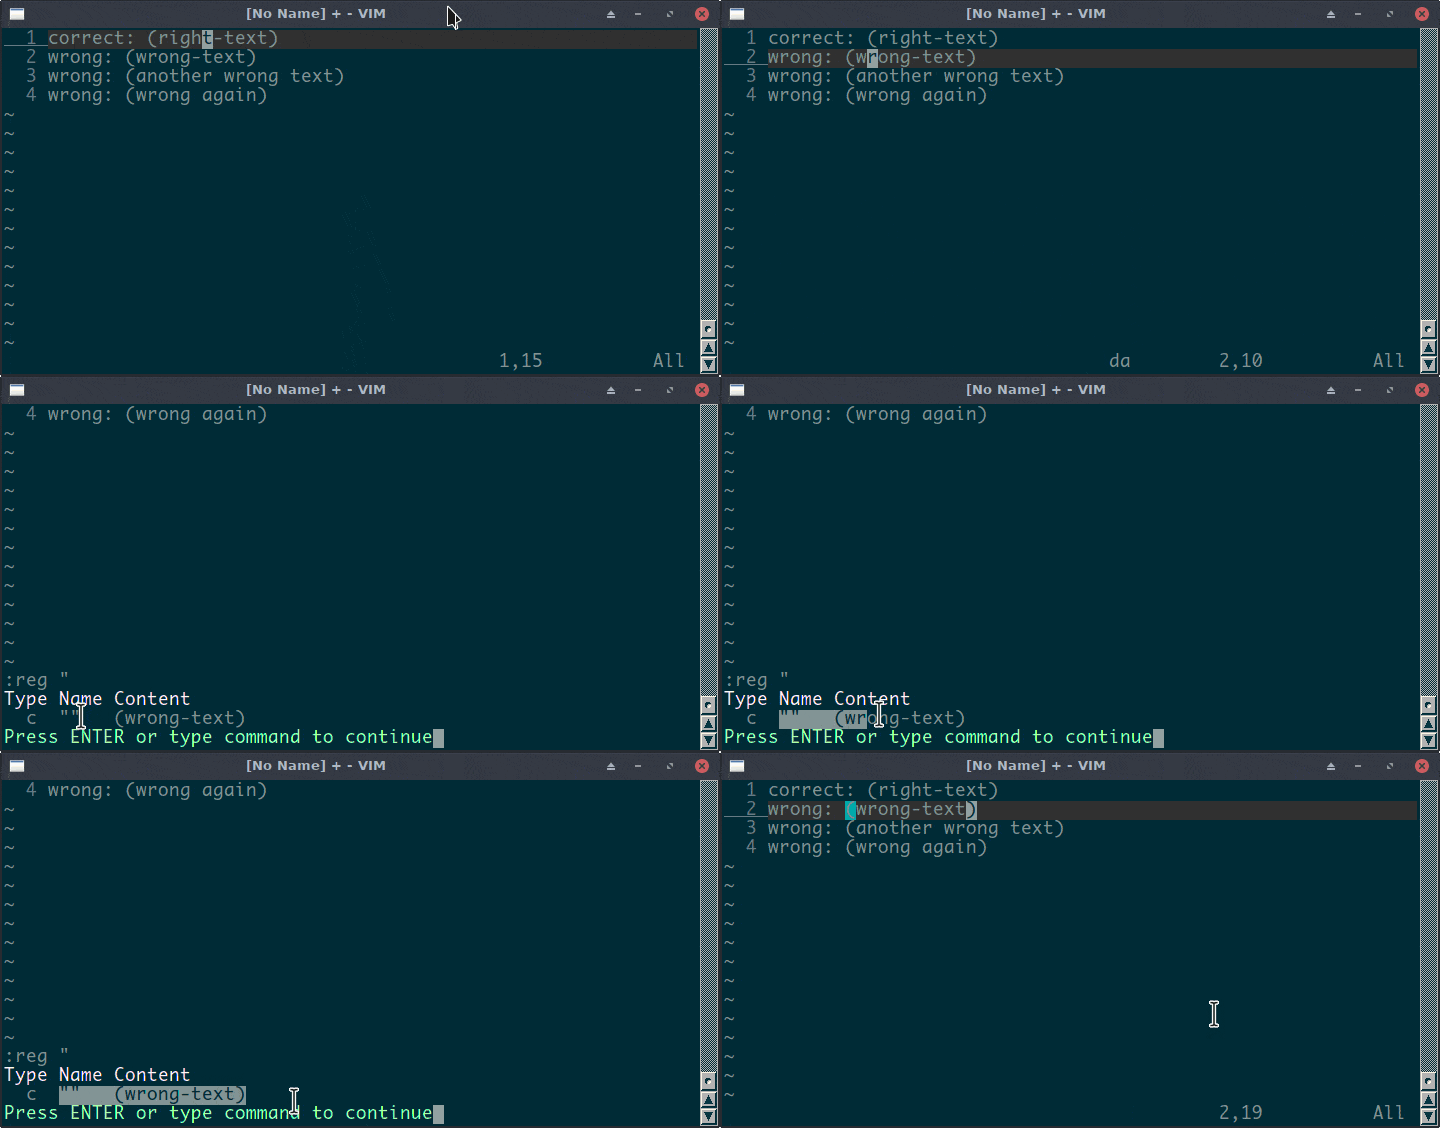
As the demo shows, after we executed da(, the content of the unnamed register has been changed into the deleted text “(wrong-text)“. Therefore, we’ve lost the yanked value.
We may think it would be good if a register’s content is not updated automatically so that we can always get the yanked text, just like we work with normal clipboards.
Actually, Vim registers can do more than that. It’s time to have a look at the 26 named registers now.
4. Named Registers
Vim has 26 named registers “a/A to “z/Z. Vim fills or updates the content of these registers only when we tell it to do so. That is to say, we have 26 clipboards in Vim!
4.1. The 26 Clipboards
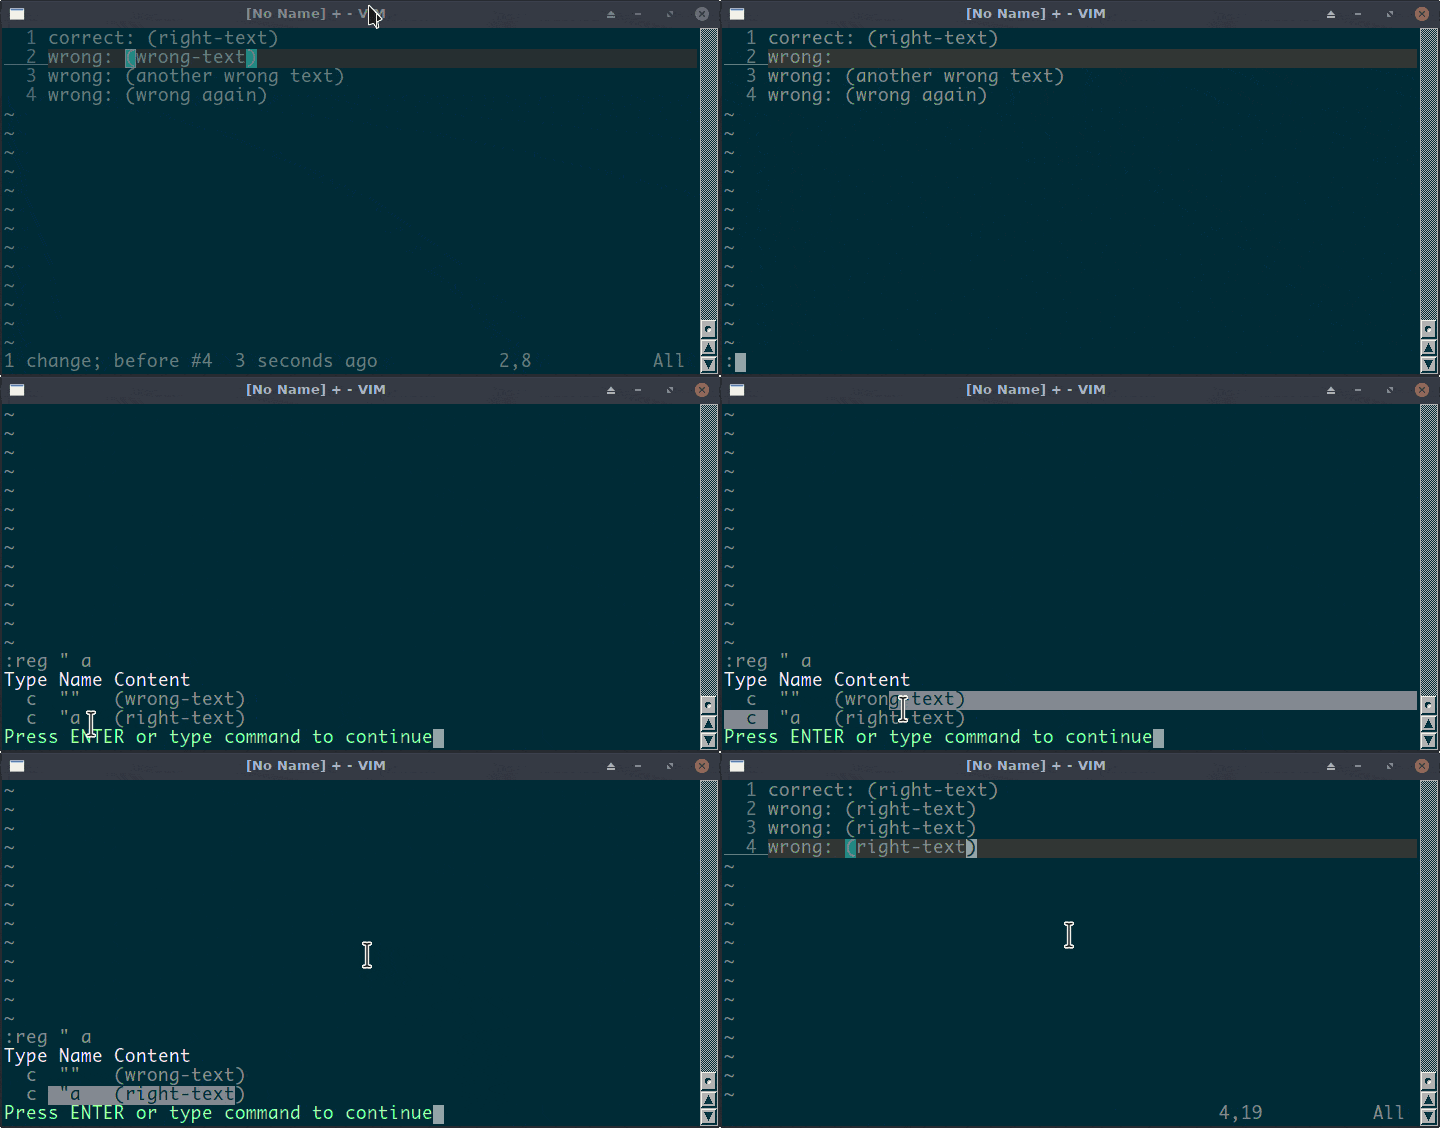
Now, we can solve the problem in the previous section easily with a named register. What we can do is, when we yank the text, we press “aya( to save the text in register “a. Similarly, when we want to paste after the deletion, we tell Vim to paste the content of the “a register using “ap.
Let’s see how it gets done:
Moreover, we can yank different texts in different named registers and paste from the register we want:
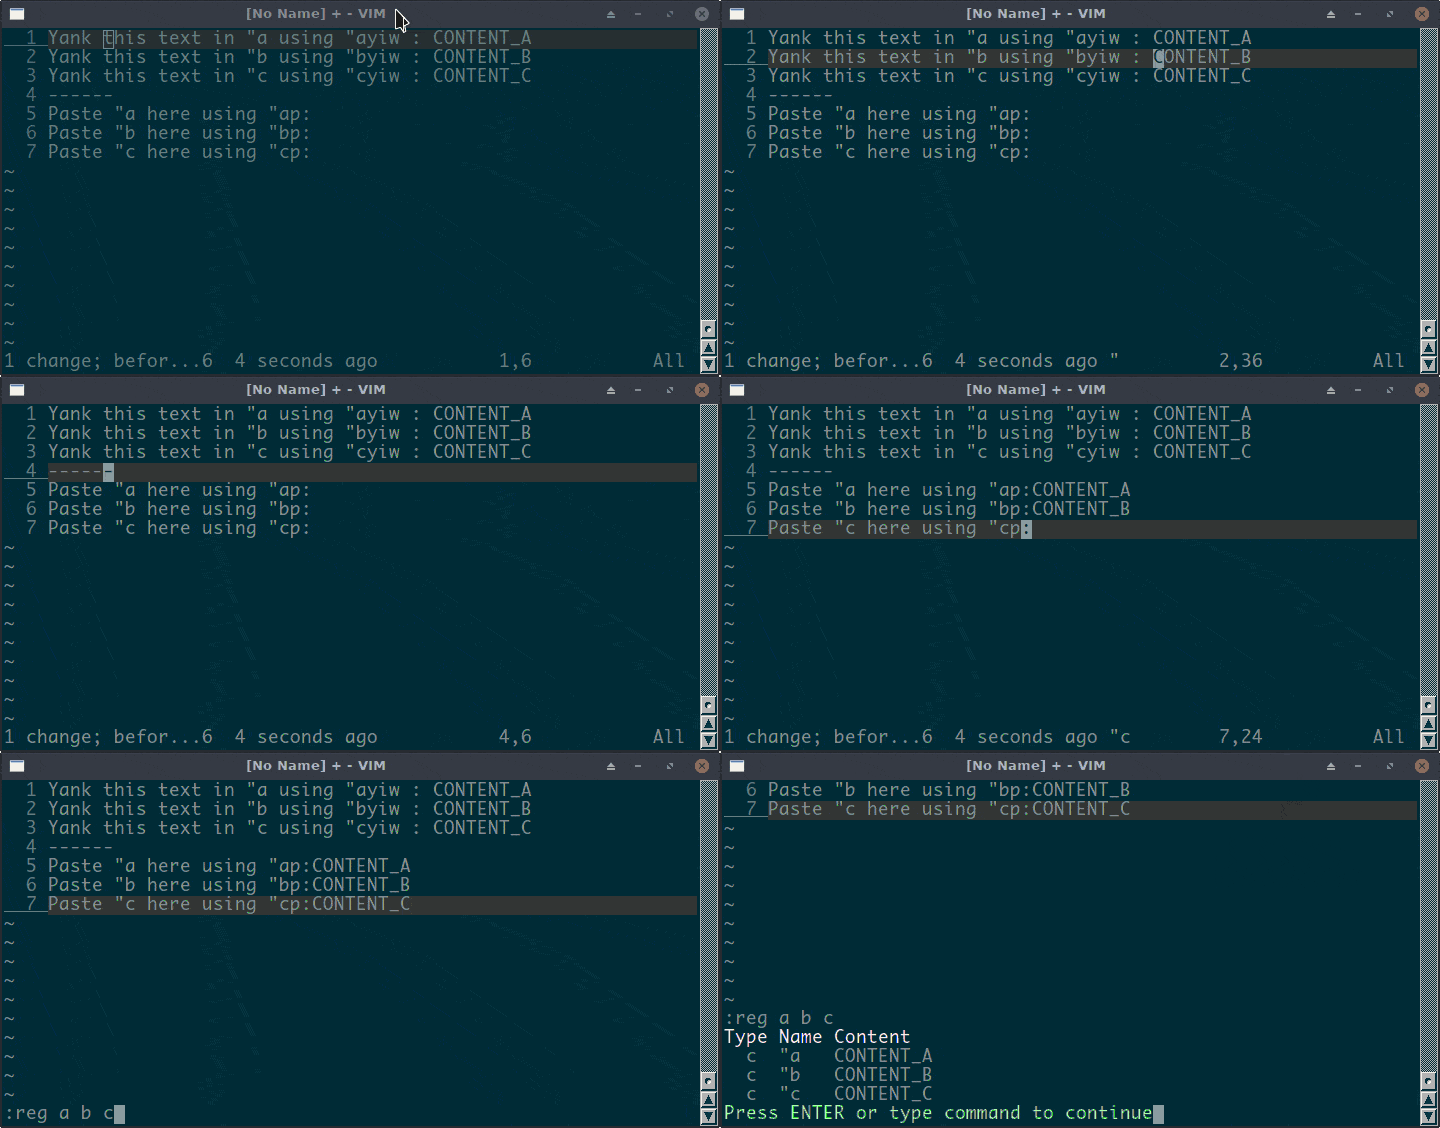
As the demo above shows, it’s pretty convenient, just like we work with multiple clipboards. We don’t have to back and forth to copy different texts.
4.2. “a – “Z vs “a – “Z
We can reference a named register using a lowercase or uppercase letter. For example, “a and “A refer to the same register. Therefore, we have 26 named registers instead of 52.
However, even though a lowercase letter and its corresponding uppercase letter refer to the same register, they behave differently when used. When we write text to a named register using a lowercase register name, Vim will overwrite the existing content in that register. However, if we use an uppercase register name, Vim will append the new content to the given register instead.
Let’s see the difference between using lowercase and uppercase registers through a demo:
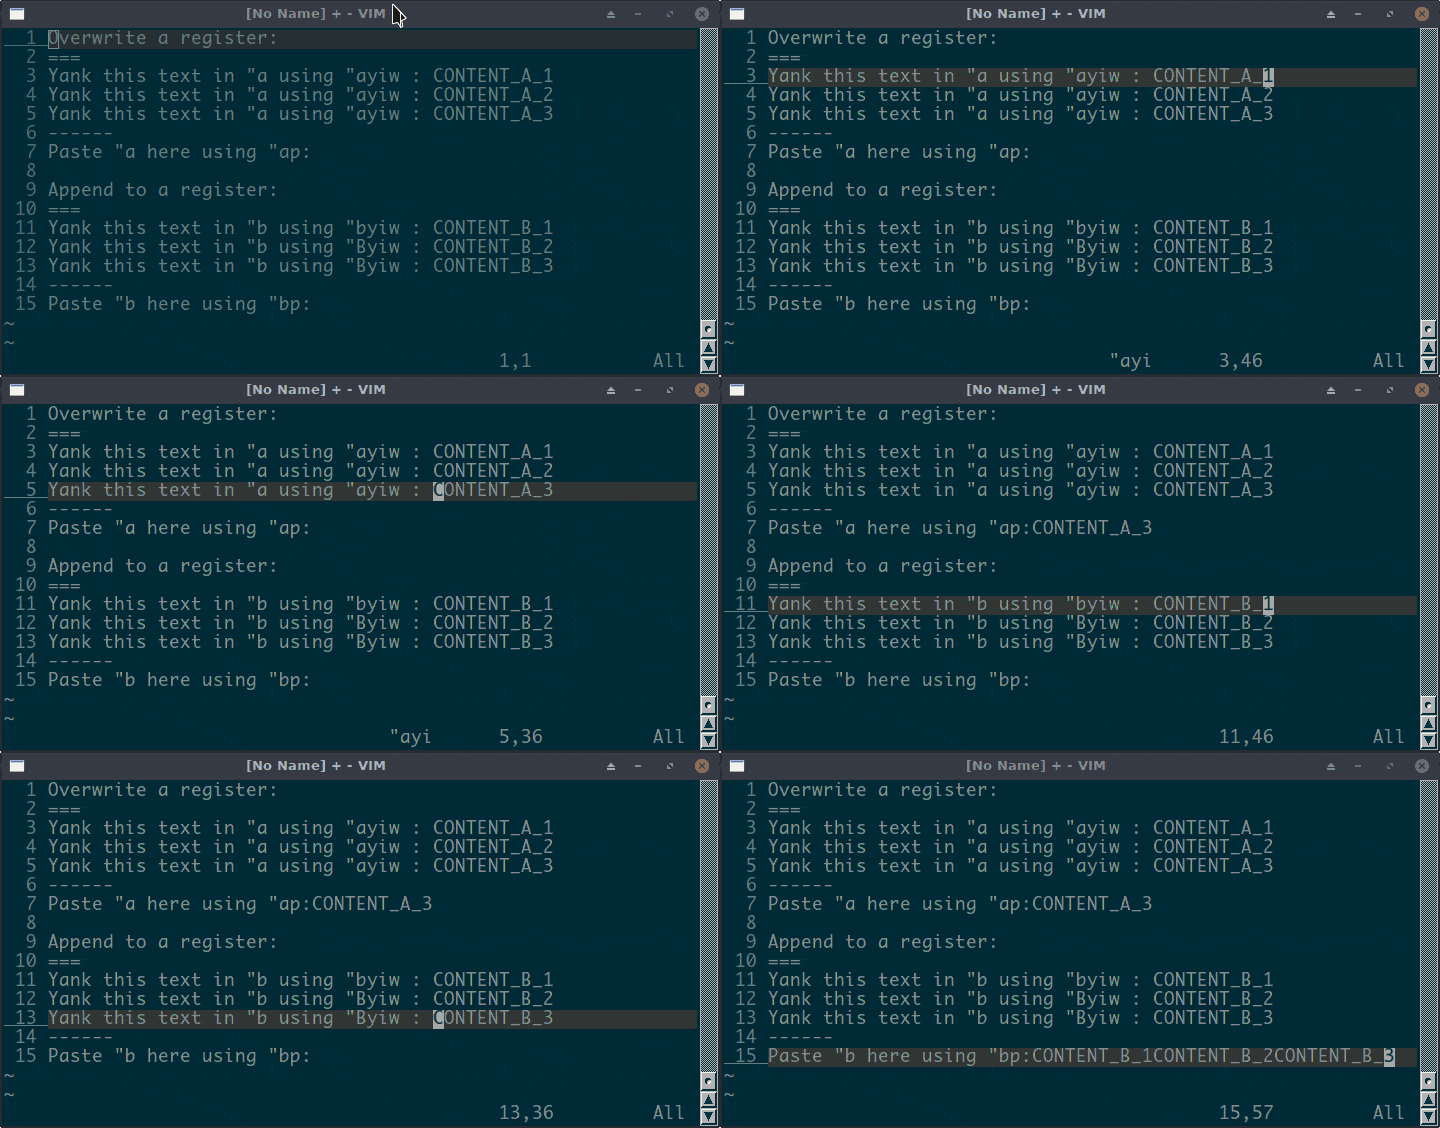
As we can see in the demo, if we yank texts with the uppercase register, for example, “Byiw, the word is appended to “b.
Named registers are pretty handy. However, we should keep in mind that even if we use a named register to hold the deleted or yanked text – for example,“adiw or “ayiw – the unnamed register will be filled, too. That is, the unnamed register will have the same content as the named register.
5. The Small Delete Register “-
We’ve learned that the unnamed register will be filled by deleted and yanked text automatically, no matter if we specify a named register or not.
Vim has another register that is similar to the unnamed register: small delete register “-. As the name implies, the small delete register will save “small deletions” automatically. If the deleted text is less than one line, Vim considers it as a small delete.
Unlike the unnamed register, the “- register won’t be filled by yanked text.
Further, if we specify a named register to the delete command, the deleted text won’t be saved in the “- register either, even if it is a small delete.
As usual, let’s see a demo to understand the small delete register quickly:
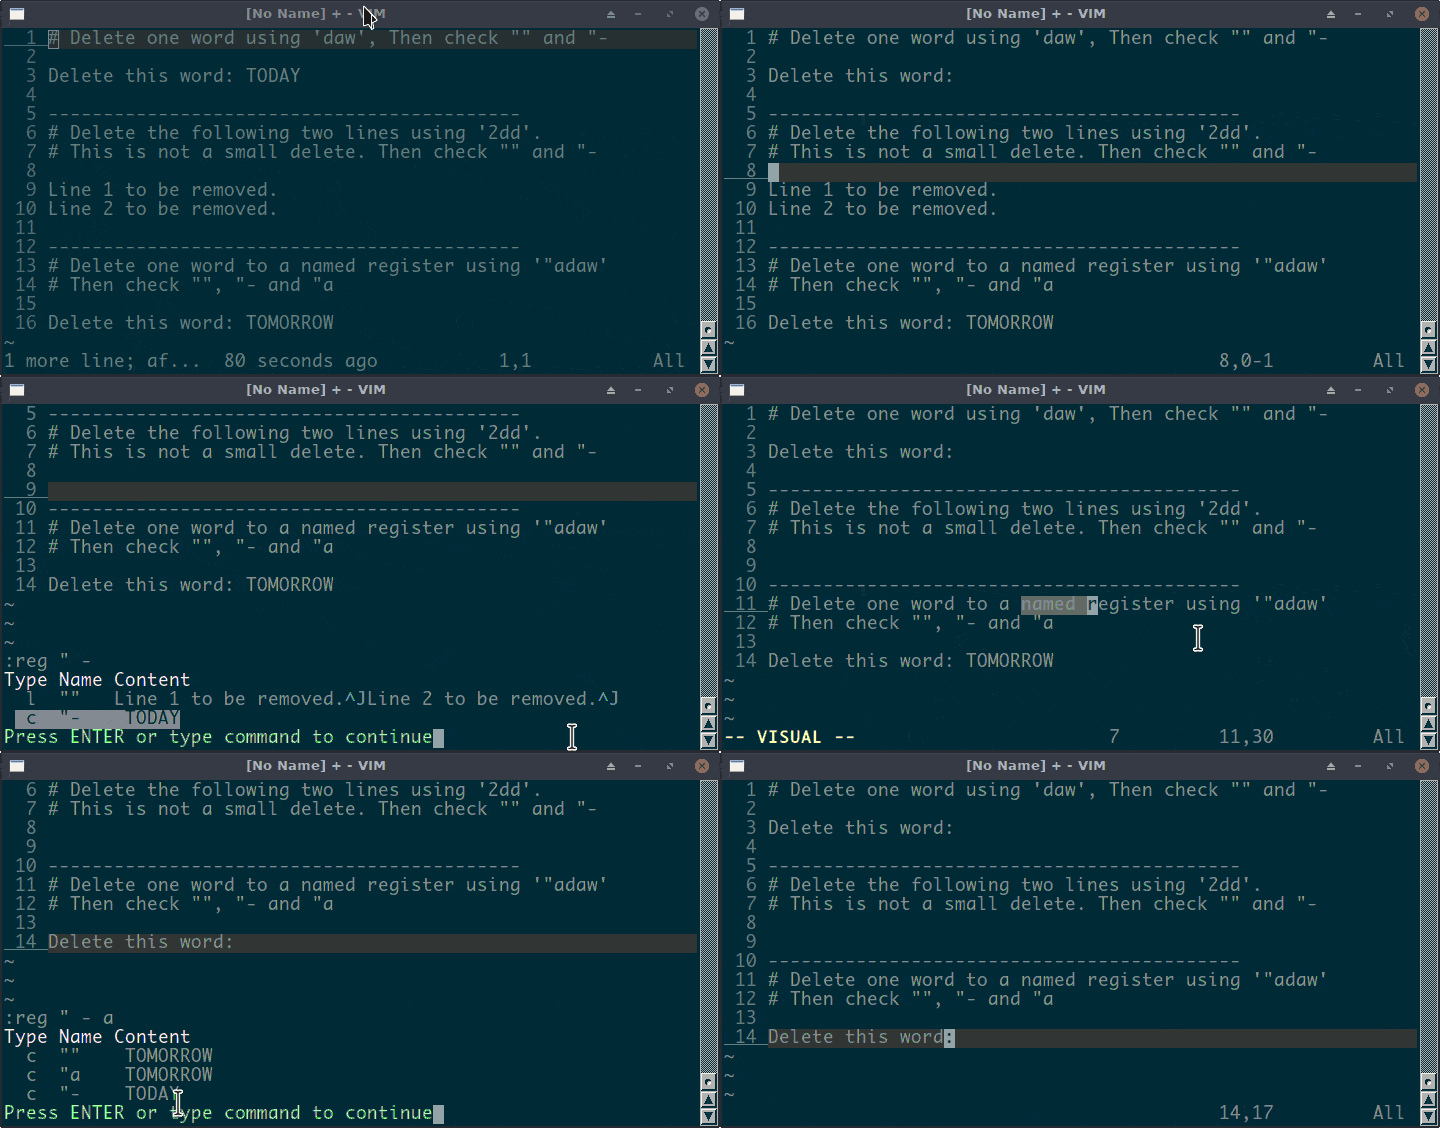
As the demo shows, the “- register is filled by the deleted text only if we delete less than one line and do so without specifying a named register. However, the unnamed register “” is always filled.
6. Numbered Registers
Vim also provides ten numbered registers “0 – “9, and it fills these numbered registers from yank and delete commands.
The most recently yanked text will fill the “0 register, unless we specify another register in the yank command, for example: “ayaw.
However, the numbered register “1 contains the text deleted by the most recent delete or change command.
The “1 register gets filled automatically only when two requirements are met:
- The delete command must not specify another register. For example, the word deleted by the command“adaw doesn’t go to the “1 register
- The changed or deleted text is not less than one line (the “- register will be used otherwise)
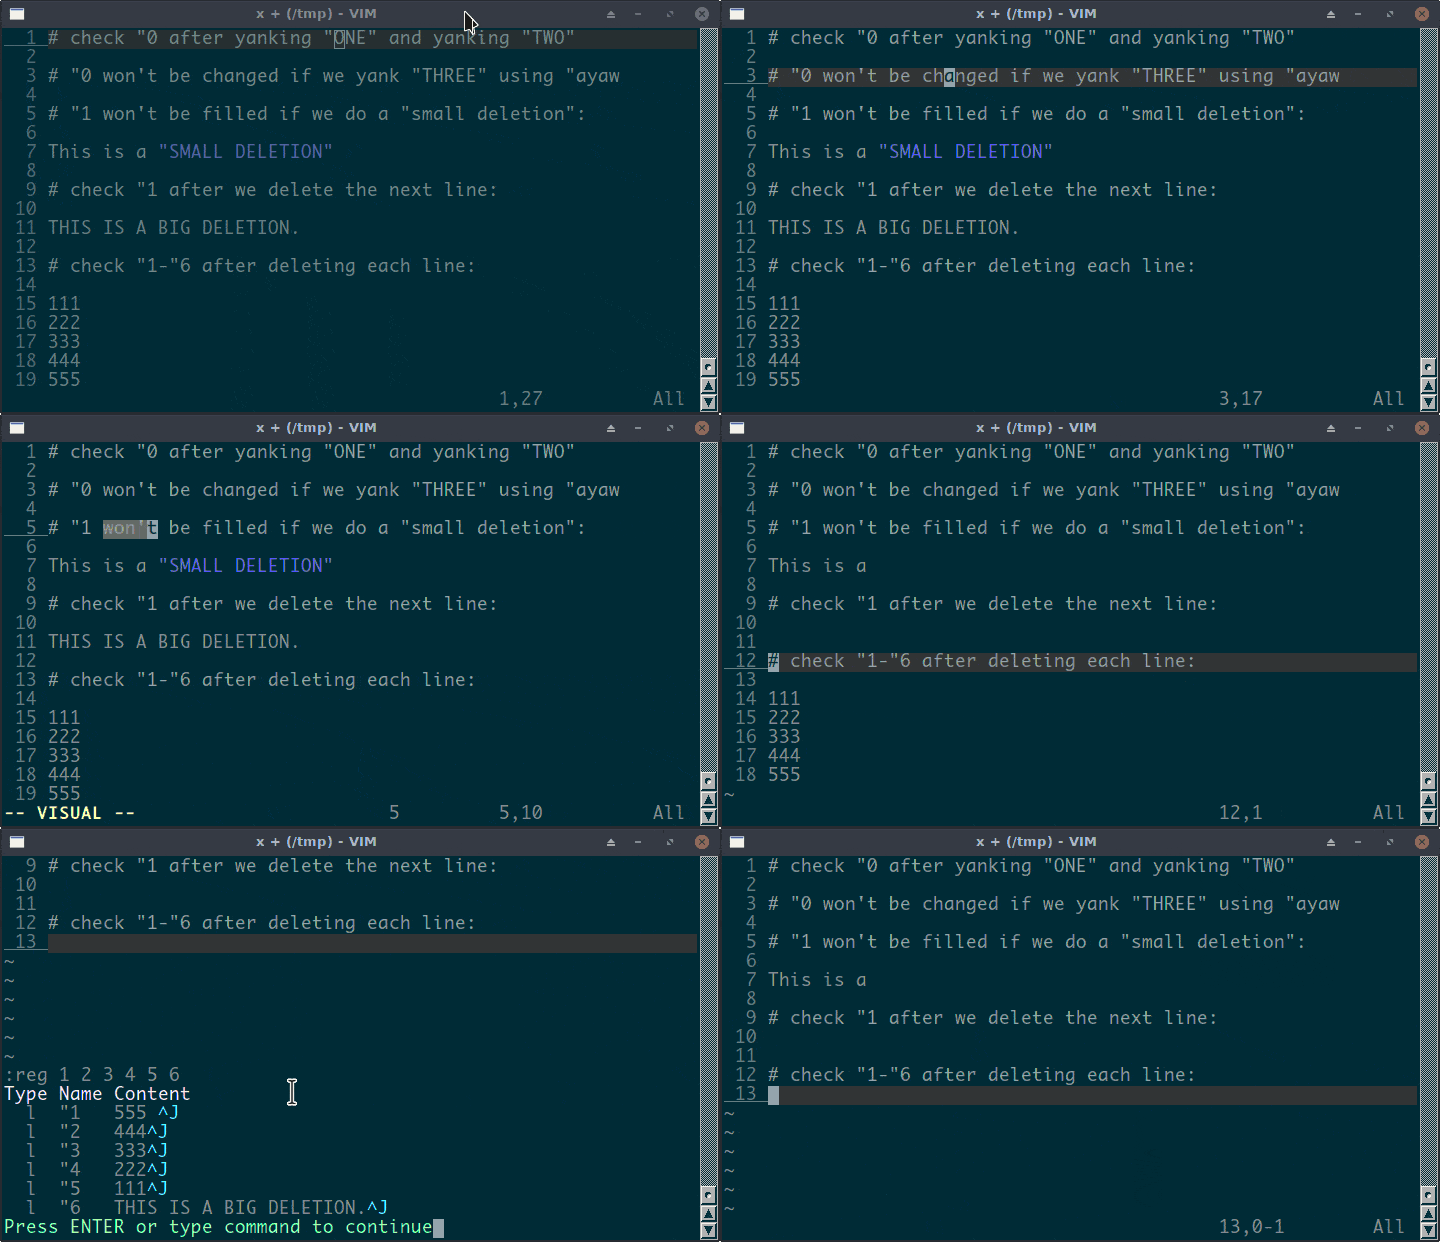
So far, we’ve talked about “0 and “1, and we still have “2 – “9. These eight registers maintain a deletion history. With each successful change or deletion, Vim shifts the previous content of register “1 into register “2, “2 into “3, and so forth, and the previous content of register “9 will be discarded.
As always, let’s see how the numbered registers are filled through a demo:
7. The Selection and Drop Registers
7.1. The Selection Registers: “* and “+
So far, we’ve discussed quite a few types of Vim registers. We know that we can copy and paste text using Vim registers. Moreover, Vim registers provide the possibility of using multiple clipboards. It’s pretty handy when we edit text.
However, there’s still one big difference between the Vim registers we’ve learned so far and the regular system clipboard: using those Vim registers, we can only copy and paste within Vim.
Sometimes, we do want Vim to talk to the system clipboard. For example, we may want to copy text from a web page and paste it into Vim to edit, or we may need to copy some text in Vim and paste it into another application.
It’s also a pretty basic feature of a text editor. As a powerful editor, Vim can certainly talk to the system clipboard as well. The selection registers are the bridge to connect Vim and the system clipboard. Vim has two selection registers: “* and “+.
7.2. Operating Systems and Selection Registers
If we’re running Vim on a Windows system, there is no difference between “* and “+ registers. Both registers will communicate to the system clipboard.
For example, Normal mode command “+yaw (or “*yaw) will copy the word under the cursor to the system clipboard, while “+p (or “*p) will paste the value from the system clipboard to Vim.
However, when our Vim runs on a *nix system with X11, “+ and “* are different.
When we use the “+ register, Vim will still communicate to the system clipboard, similar to how it works under the Windows system. However, the “* register will talk to the X Window primary selection, which is usually stored by mouse selection and read by mouse middle click.
Next, let’s see a demo to understand how the Vim selection registers read and write system clipboard and X Window selection:
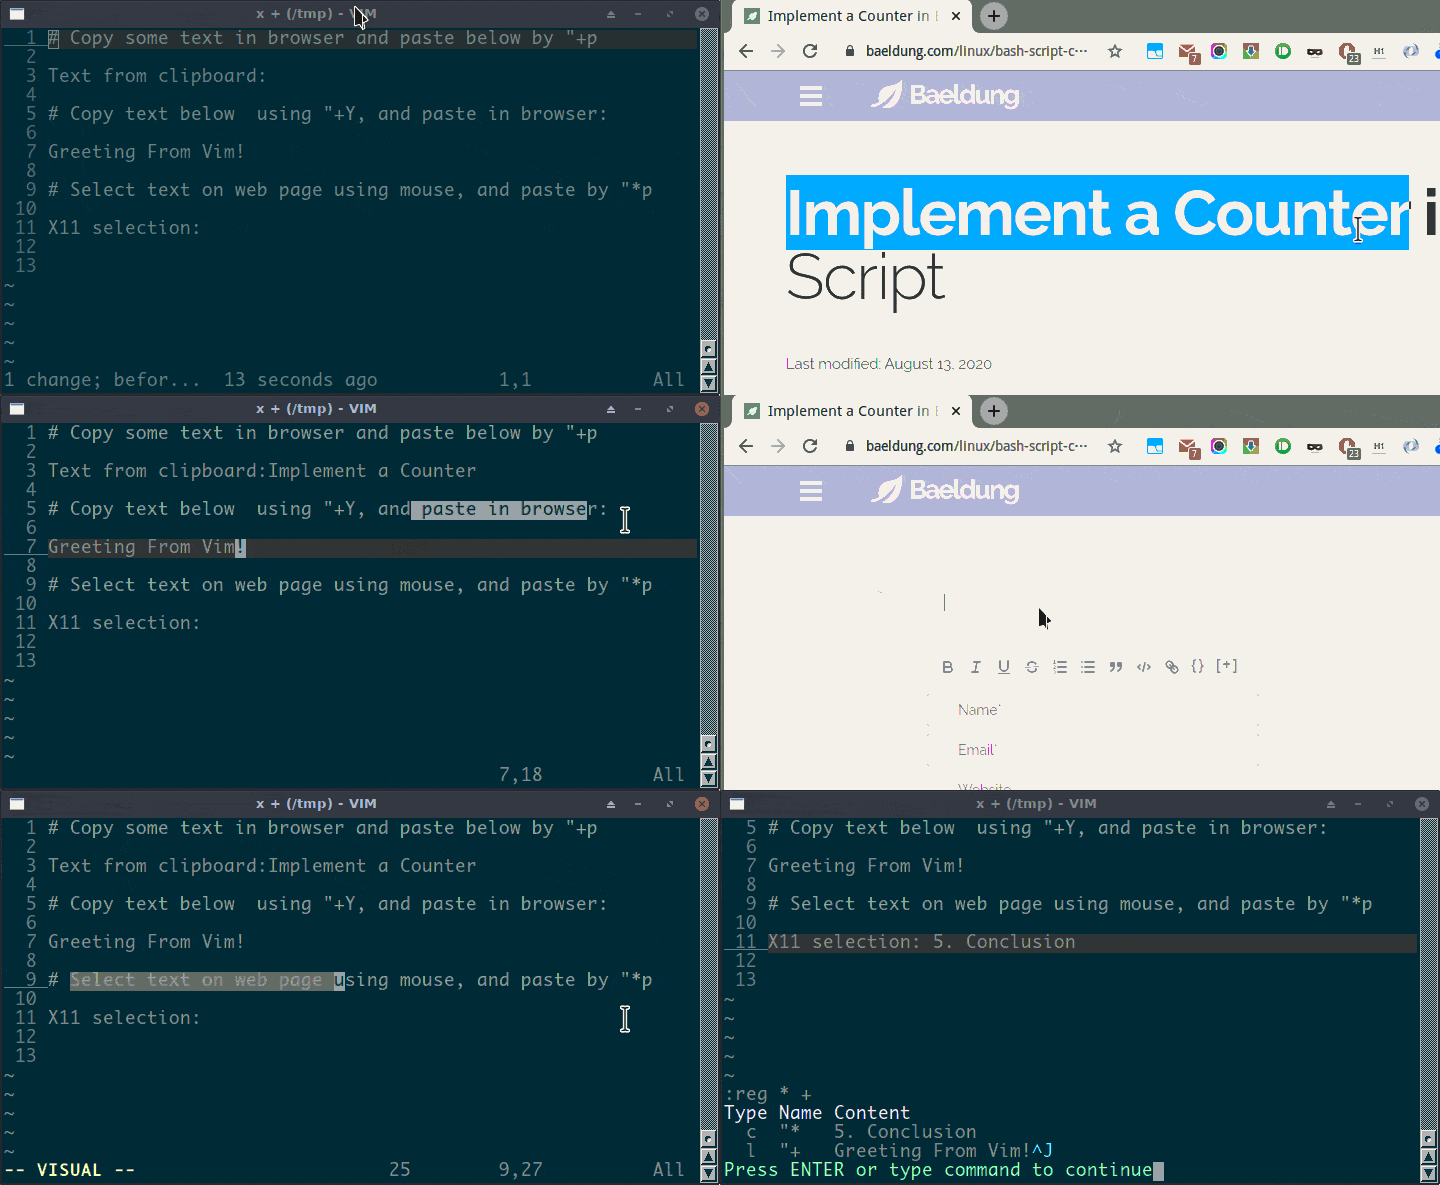
Finally, we should keep in mind that Vim must be compiled with a +clipboard feature to support system clipboard access. Also, in order to use “* to talk to the X Windows selection, the +x11-selection feature should be enabled.
Vim has enabled the mentioned features above in most modern distributions’ package repositories. Therefore, very likely, our Vim has those features enabled as well.
After all, we can execute the :version command in Vim to check if the required features are enabled in the current Vim.
7.3. The Drop Register “~
The drop register “~ stores the dropped text from the last drag and drop operation. This register is only available with GVim.
A short demo will explain this register straightforwardly:
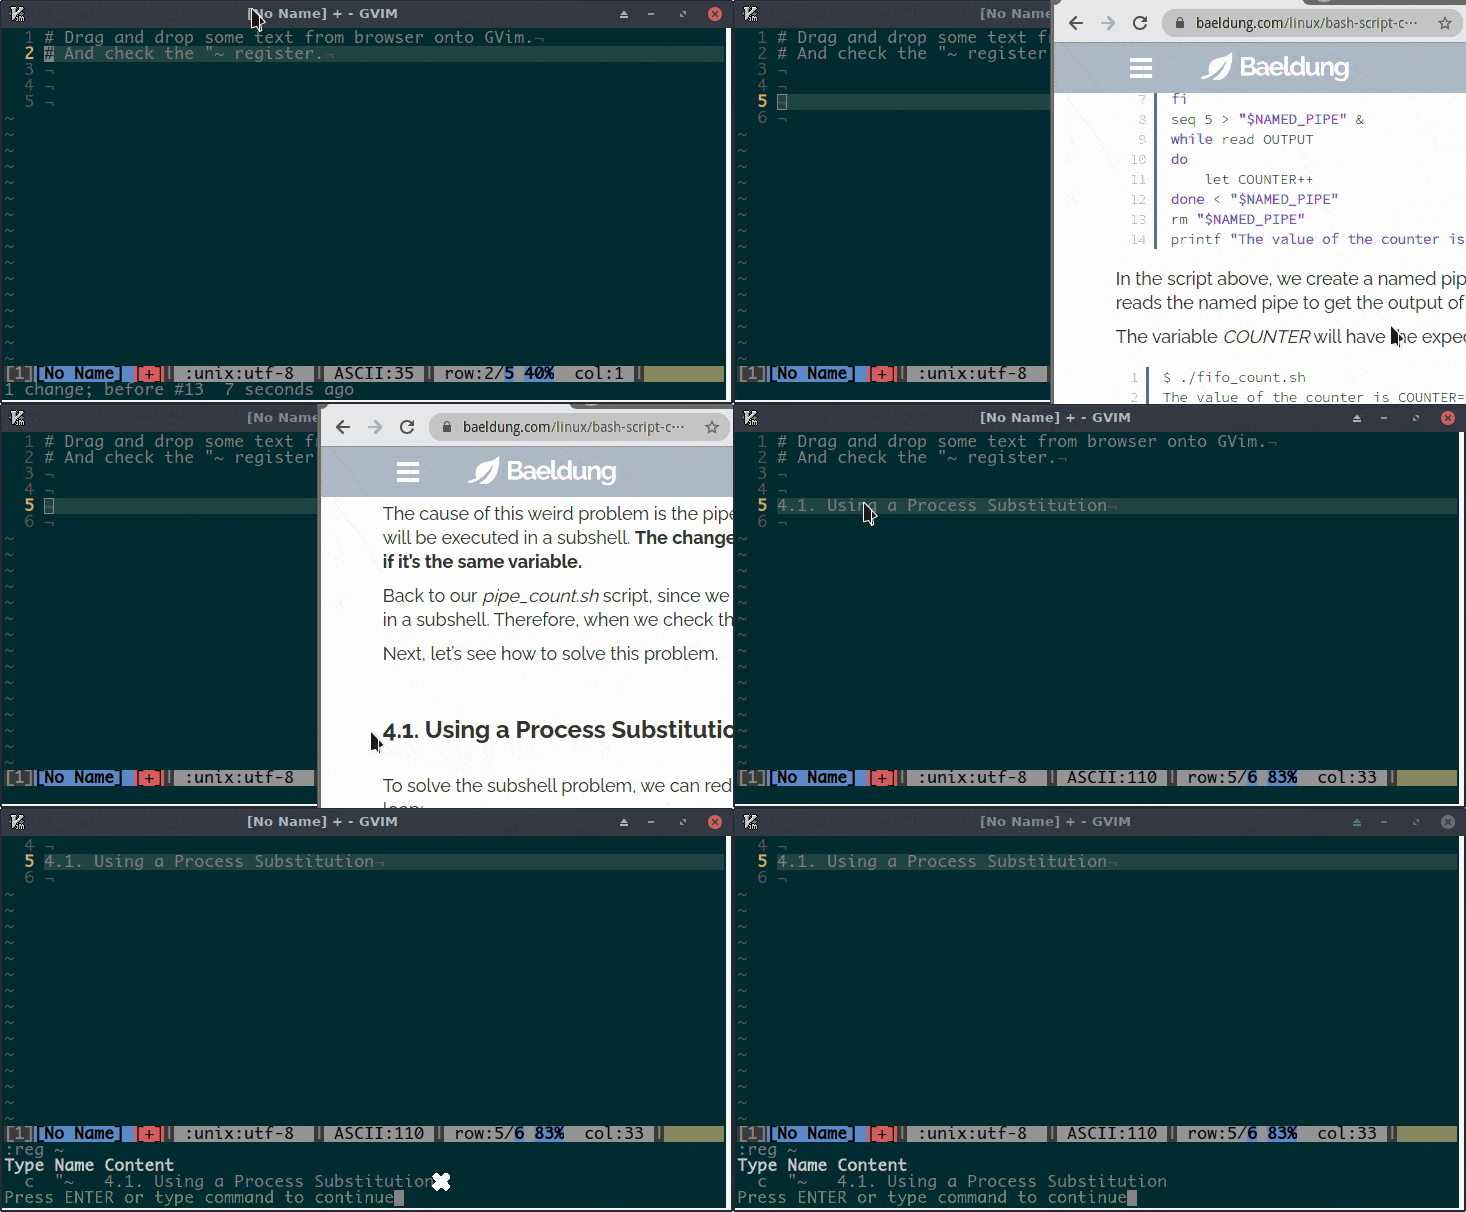
To use the drop register, the GVim must be compiled with the +dnd feature.
8. Three Read-Only Registers “:, “., and “%
Actually, the “: is not new for us. It contains the most recently executed command. We’ve seen a demo to paste the last executed command in a previous demo.
The “% register contains the name of the current file, while the “. register holds the last inserted text.
Let’s show the usage of these three registers through a demo:
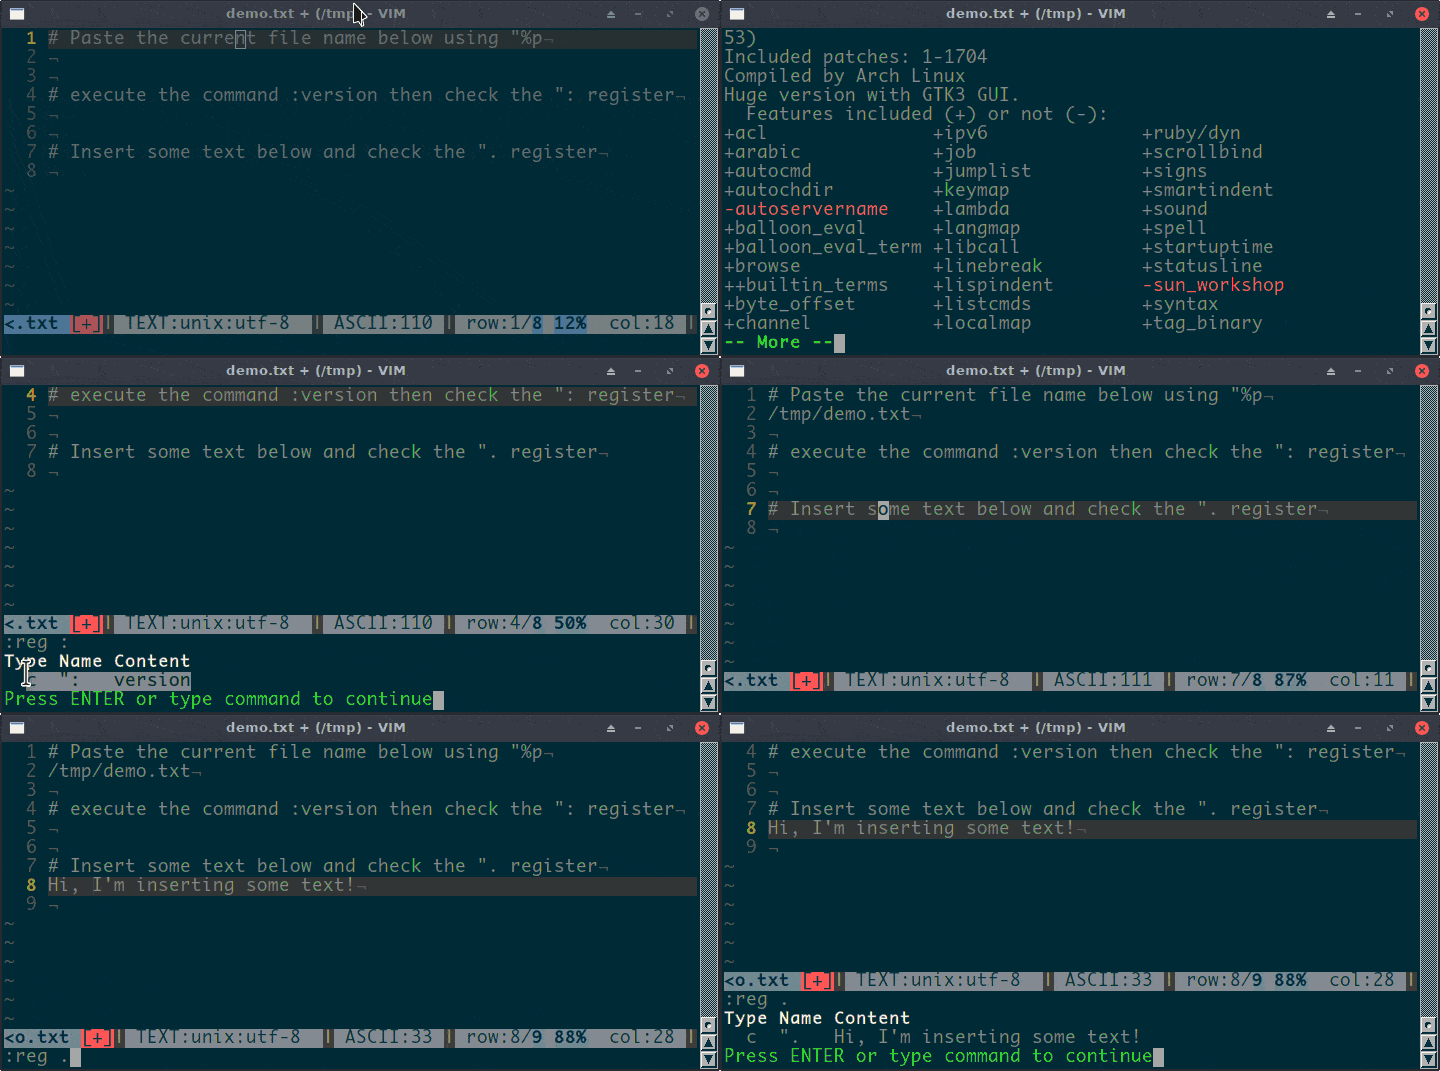
“:, “., and “% are read-only Vim registers. Their contents are set by Vim automatically. We can only read their values.
9. The Alternate File Register “#
First, we need to understand what is an alternate file in Vim before we talk about the alternate file register.
We can open multiple files in Vim. Each file is opened in a Vim buffer. The :ls command will list all the buffers in the current window.
Let’s say we open two files, file1 and file2, in Vim and start editing file1. Later, we want to make some changes in file2, so we switch to the file2 buffer.
At this moment, the current file is file2, while the last edited file in the same Vim window is file1.
We call the last edited file or buffer in the same Vim window the alternate file or buffer. Therefore, in this example, file1 is the alternate file.
If we switch from file2 back to file1, then file1 becomes the current file again and file2 becomes the alternate file.
The “# register stores the alternate file.
As always, let’s understand Vim alternate file and the “# register through a demo.
In the demo, we’ll open two files in a single Vim window and switch between them, then list the content of “% and “# registers:
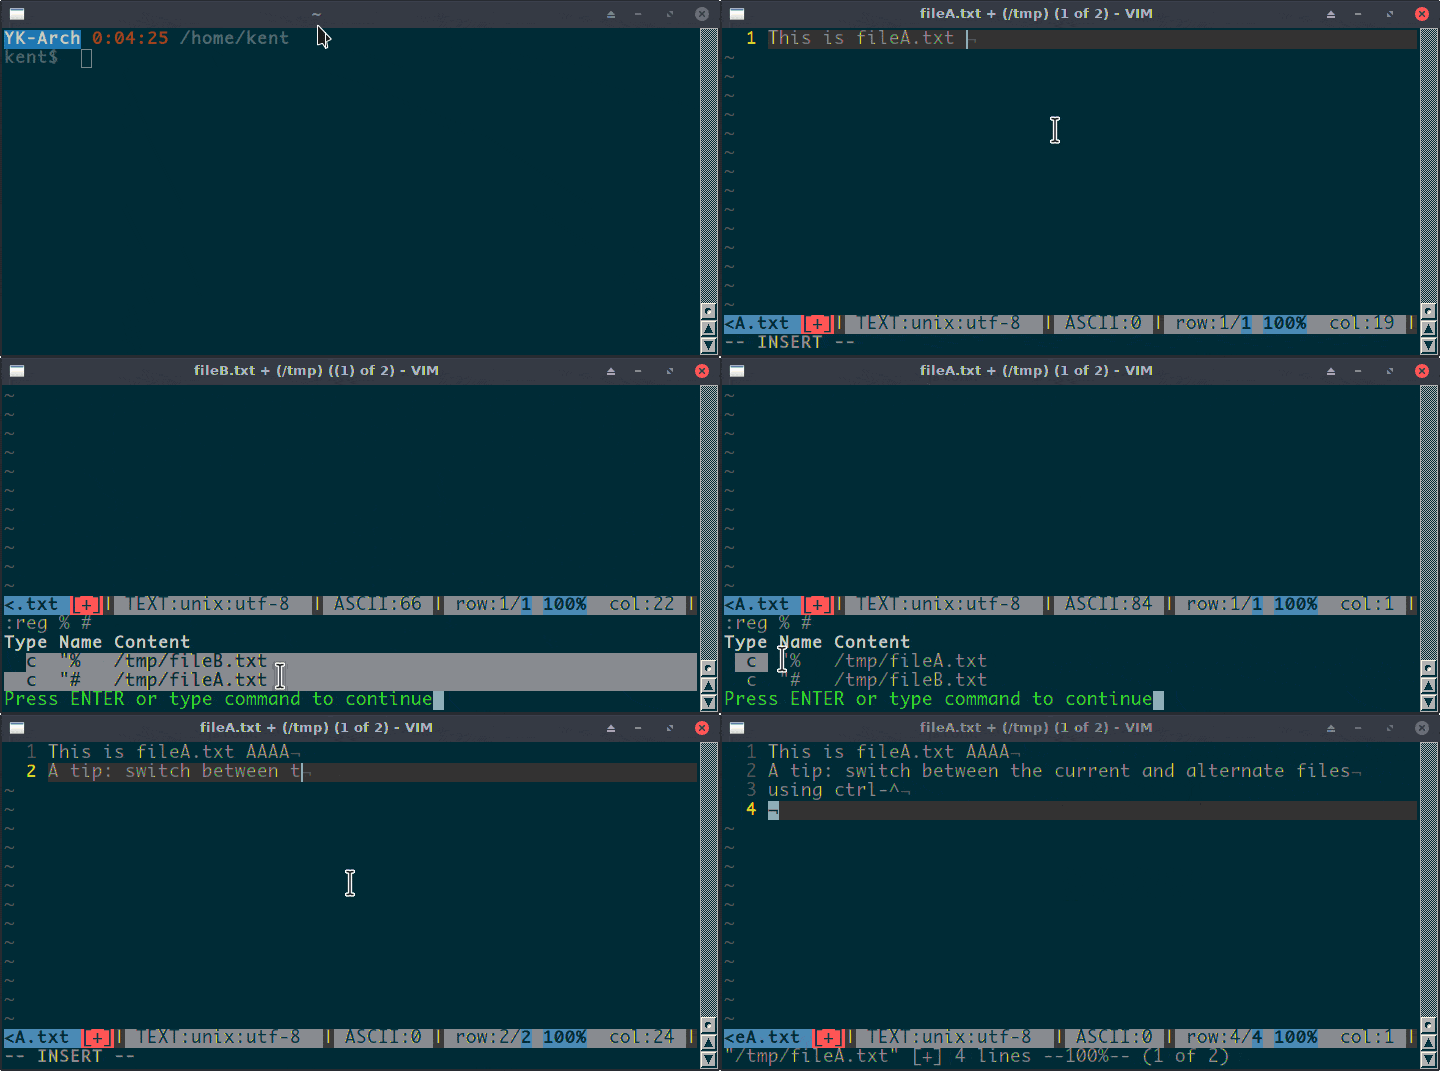
In the demo, we switched between buffers using the command :buf [buferNo]. If we want to switch between the current file and the alternate file quickly in Normal mode, we can press Ctrl-^.
10. The Expression Register “=
We’ve seen different types of Vim registers. Usually, a register stores some text. However, the next register we’re going to look at is a special one. It’s the expression register “=.
“= stores a Vim expression. Vim can compute the expression and return us the result. It’s pretty handy when we want to evaluate some expression while editing.
The common usages of “= are:
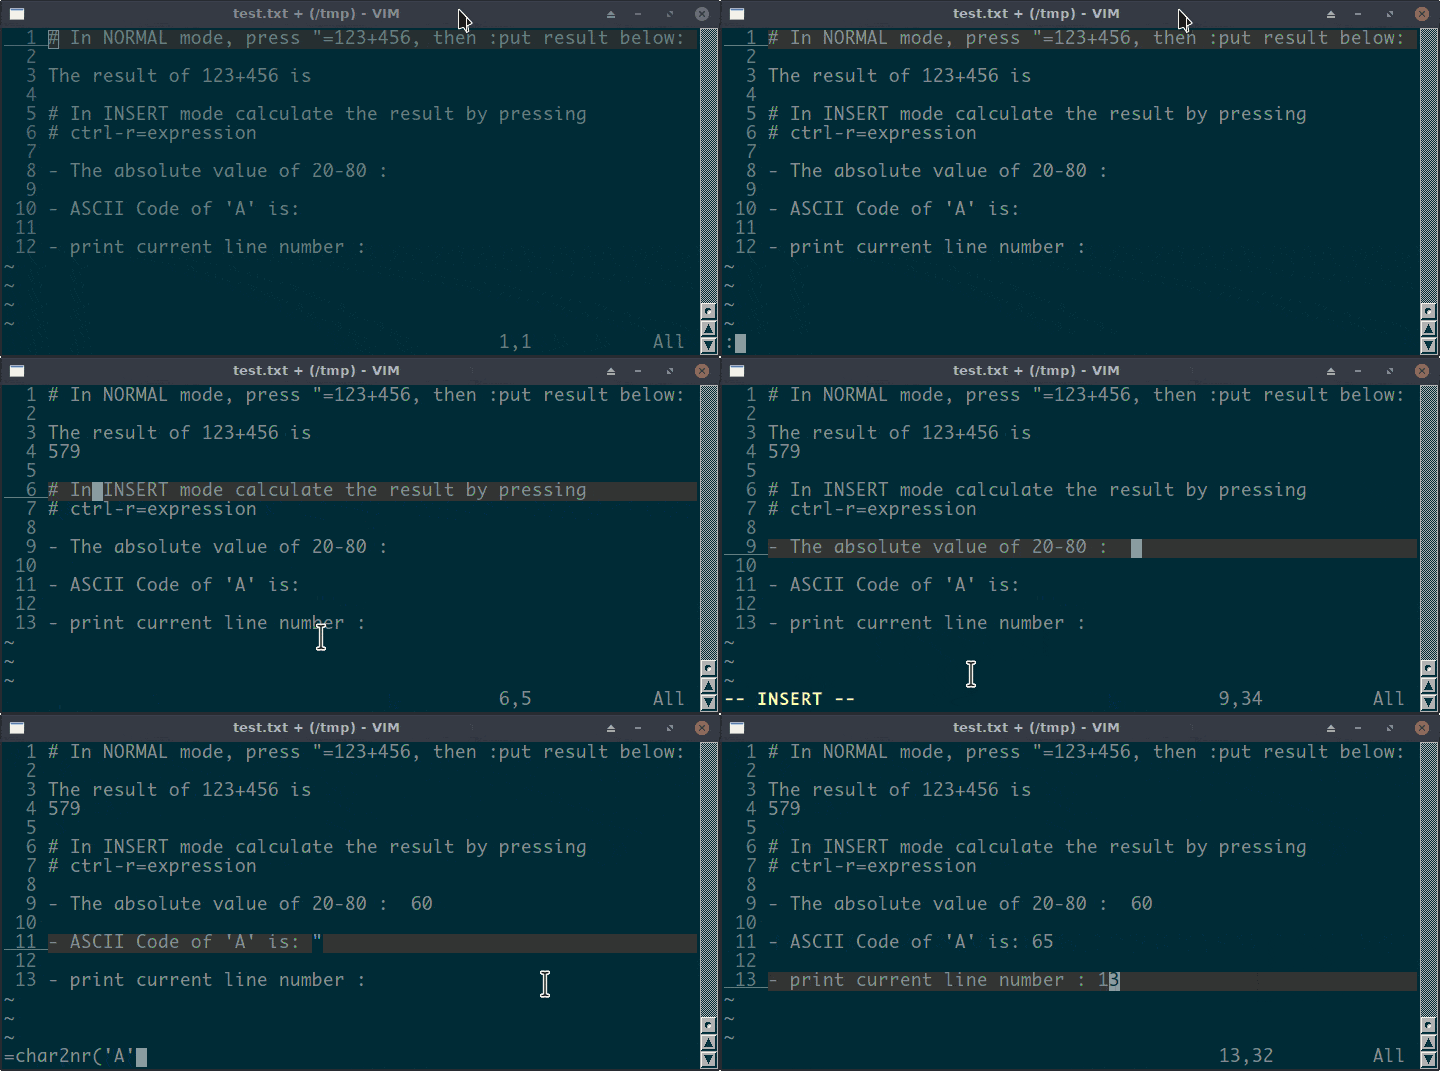
- In Normal mode, we can press “=AnExpression to set the register and use the command :put = to print the result
- In Insert mode, we can press Ctrl-R=AnExpression, and after we press enter, the result of AnExpression will be inserted at the cursor position
Let’s see these usages in action:
11. Last Search Pattern Register “/
In Vim, we can search for text in various ways. For example, we can use /pattern command to apply a forward search, ?pattern to do a backward search, or press * and # to search the current word forward and backward.
Vim stores the most recent search pattern in the search pattern register “/. When we press n or N to navigate to the next or previous occurrence, the content of “/ will be used:
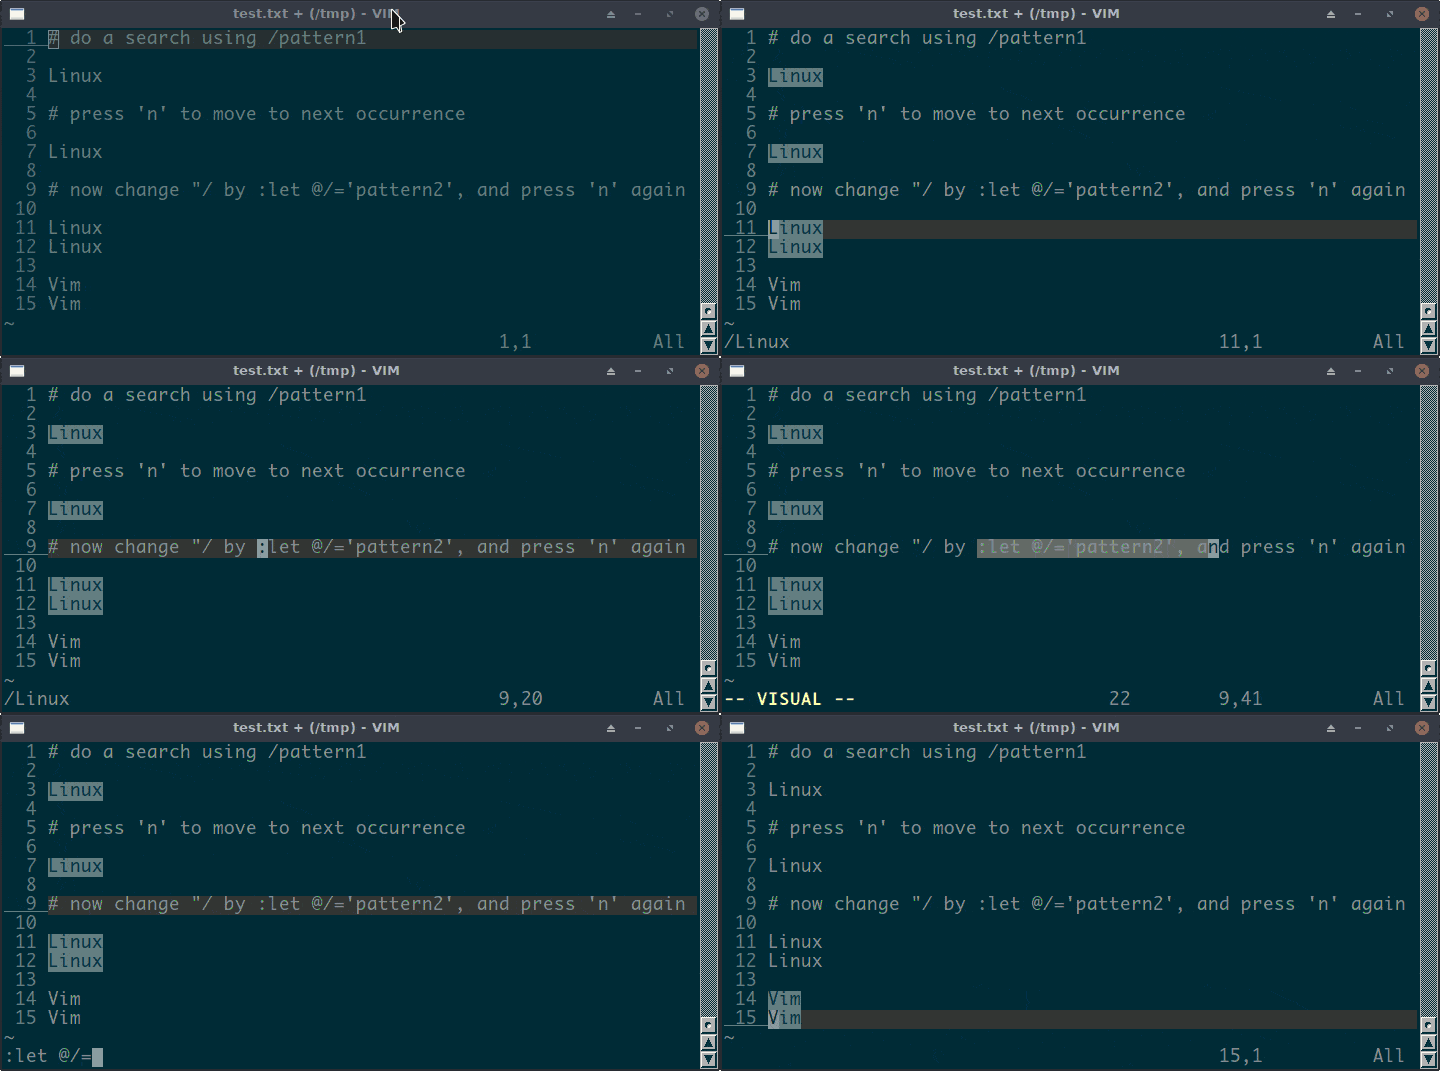
“/ is a not read-only register. However, we cannot yank or delete text and save it into the “/ register. It is set automatically when we apply a search. If we want to change its content manually, as shown in the demo, we can use the command :let @/=’newPattern’.
12. The Black Hole Register “_
So far, we’ve discussed most types of Vim registers. We’ve learned that when we change, delete, or yank text, some registers will be automatically updated — for example, the unnamed register “”. However, sometimes, we want to change or delete text without changing any register, including “”.
The black hole register “_ is the key to achieve that. As its name implies, when writing text to the black hole register, nothing happens. If we read the content of this register, nothing is returned.
Therefore, we can specify this register in the delete or change command to ask the “black hole” to swallow the changed or deleted text. For example, to remove the current word with the black hole register, we can use “_daw.
Let’s see a demo to understand the difference between deletion with and without the black hole register:
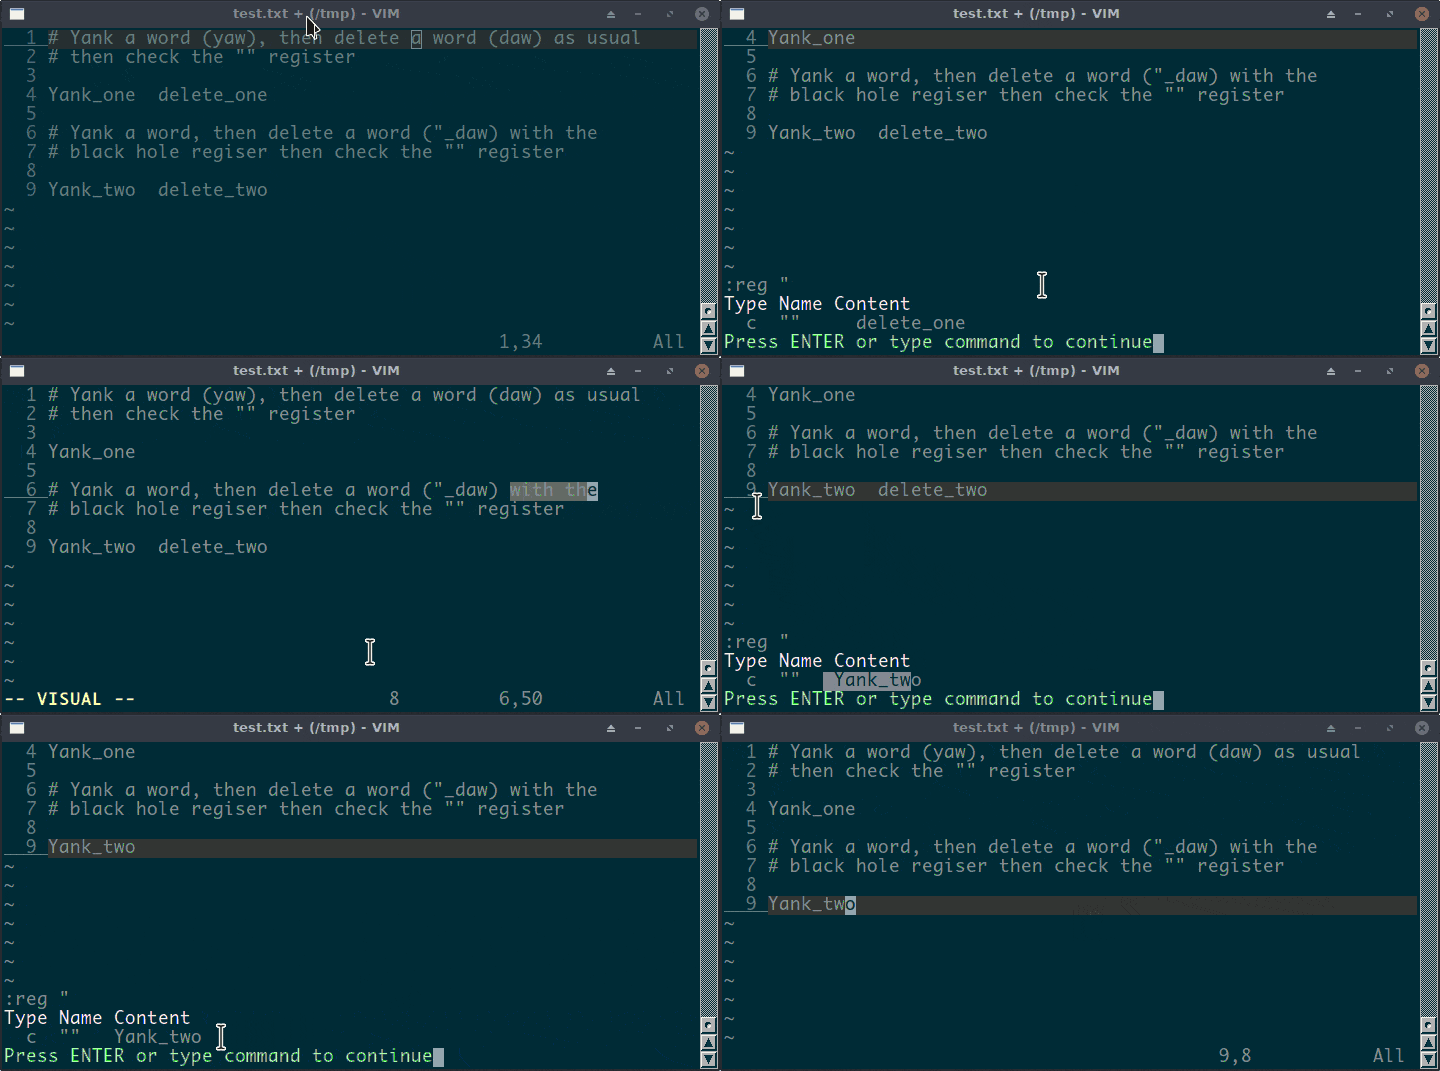
As the demo shows, “_ is a good choice when we want to change or delete text without interfering with normal registers.
13. Conclusion
In this article, we’ve learned what Vim registers are and how to use them.
Further, we’ve discussed each type of Vim register and demonstrated them through examples.
When we edit files in Vim, the proper usage of Vim registers will boost our productivity.