

Yes, we're now running our only Summer Sale. All Courses are 30% off until 20th July, 2026:
Learn through the super-clean Baeldung Pro experience:
>> Membership and Baeldung Pro.
No ads, dark-mode and 6 months free of IntelliJ Idea Ultimate to start with.
1. Introduction
Linux systems have standard predefined settings for mounting. However, we can specify or alter these settings to suit our needs when mounting a particular device.
In this tutorial, we’ll learn how to mount a device with specific user rights. Also, we’ll talk about umask and its relevance.
2. Mounting a Device
We can mount a device in Linux using the default mount options and permissions. Notably, there are some common mount flags:
- rw: mounts the device as read-write (the default option when none is specified)
- ro: mounts the device as read-only
- auto: mounts the device automatically at boot time
- noauto: doesn’t mount the device automatically at boot time
- user: allows any user to mount the device
- nouser: only allows root to mount the device
Significantly, the choice of mount options affects the accessibility and protection of the device and its data.
In addition, the umask settings determine the initial permission set for the device mount point. Let’s now see more about umask and how it sets the default permissions on a system.
3. umask
The umask command determines the default permissions given to a file or directory on creation. It uses octal notation to express a mask of bits to be removed from a file’s mode attributes:
$ umask
0002
Here, we ran the umask command without an argument to see the current value. It responded with the value 0002, which is the octal representation of our mask.
Next, let’s create a new file and observe its permissions:
$ touch file.txt
$ ls -l file.txt
-rw-rw-r-- 1 me me 0 2023-02-06 14:53 file.txt
We can see that the owner user and group both get read and write permissions, while everyone else only gets read permission. This is because of the mask value.
Let’s repeat our example, this time setting the mask ourselves beforehand:
$ umask 0000
$ touch foo.txt
$ ls -l foo.txt
-rw-rw-rw- 1 baeldung baeldung 0 2023-02-06 14:58 foo.txt
First, we set the mask to 0000, turning it off. Now, we can see that everyone else can write to the file foo.txt.
To understand how this works, let’s look at the octal numbers of the mask and expand it into binary. Then, we’ll compare it to the attributes to see the effects:
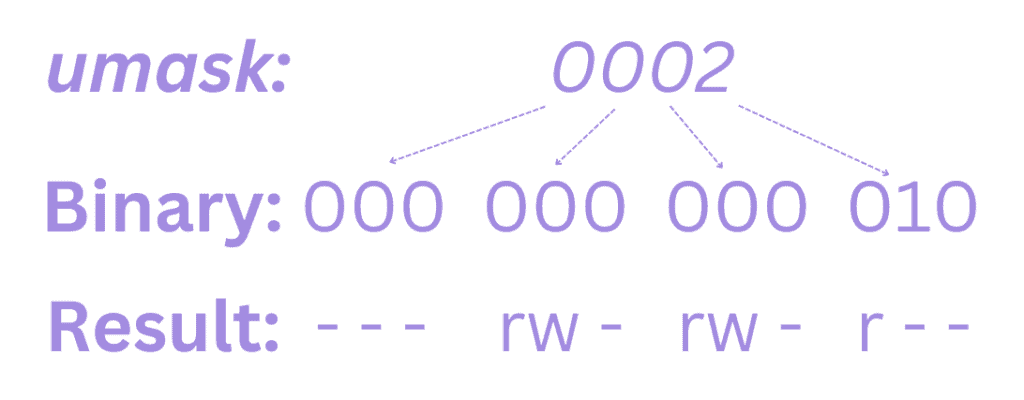
An attribute is unset anywhere a 1 appears in the binary value of the mask. Consequently, if we look at a mask value of 0022, we can see what it does:
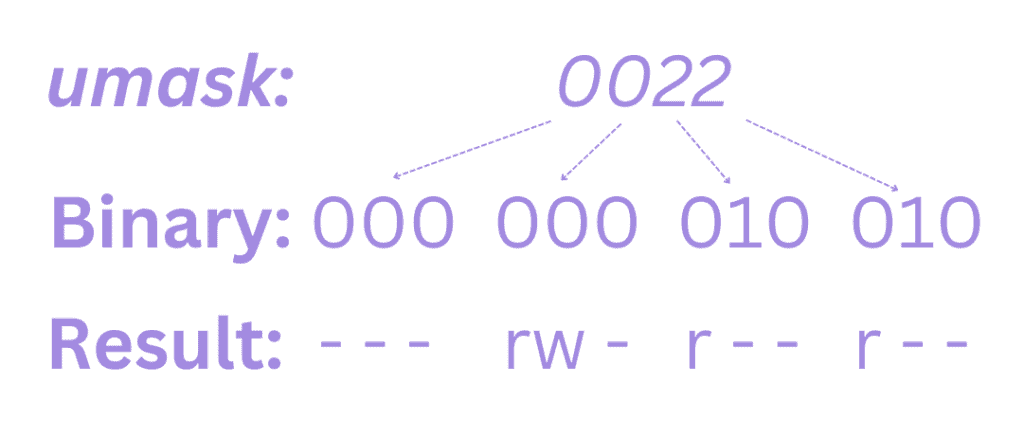
Since 1 unsets an attribute, the umask value indicates which permissions shouldn’t be set and we can see how that’s reflected in this example.
Most times, we won’t need to alter the mask. However, we might want to control it in high-security situations like mounting a device using specific user rights.
4. Using Specific User Rights
In Linux, we can mount a device with specific user rights by using the mount command with the -o option. The -o flag allows us to specify various mount options, including the user and group that should have access to the mounted device.
Notably, we may need superuser privileges to mount a device on the system. Thus, we can use the sudo command to run the mount command as a superuser.
Here’s the syntax for mounting a device with specific user rights:
$ mount -o [options] device_name mount_point
Also, the following example illustrates how we can supply a comma-separated list of options:
$ sudo mount -o uid=user_id,gid=group_id,other_options device mount_point
Here, we can see each option can be supplied along with a value when mounting the device. For example, let’s mount a device as read-only and allow only a user to mount it:
$ sudo mount -o uid=user_id,ro device mount_pointWe can also add or change the mount options in the /etc/fstab file.
4.1. Creating the Mount Point
Notably, the mount point must exist before we can mount the device. We can create it using the mkdir command:
$ sudo mkdir /mnt/sdcFor instance, we can mount a device named /dev/sdc at /mnt/sdc with read-only access for the user with uid=1000:
$ sudo mount -o uid=1000,ro /dev/sdc /mnt/sdc
In this example, ro stands for read-only, and only the user with the uid=1000 can access the file system on the device.
Hence, only that user will be able to read the content of this device:
$ ls -ld /mnt/sdc
drwxr-xr-x  2 user1 user1 4096 feb 15 14:32 /mnt/sdc/
Other users with different uids won’t have access to the files on the device unless they are explicitly granted permission.
Also, we can add other options to the command as needed, such as nosuid to prevent the execution of setuid files, or noexec to prevent the execution of files.
4.2. Adding the umask Option
If we include a specific umask setting when mounting a device, we can exclude certain attributes from the permissions set:
$ sudo mount -o uid=1000,gid=1000,umask=0044 /dev/sdb1 /mnt/dataLet’s break this down:
- uid=1000 specifies the user ID of the user that will have user access to the device
- gid=1000 sets the group ID of the group that will have group access to the device
- umask=0044 shows that, unlike the owning user, owning group members and other users can only write to the device but cannot read its content
Importantly, the file system on a device inherits the permissions of the mount point on which it is mounted. Let’s now check to see the permission on the mounted device:
$ ls -ld /mnt/sdc
drwx-w--w- 2 user1 user1 4096 feb 15 14:32 /mnt/sdc/
Now, we can see that apart from the owner, others can only write to the device.
In general, the umask and mount point directory permissions both affect the permissions of files and directories created on the file system. However, the umask takes precedence over the mount point directory permissions.
5. Conclusion
In this article, we saw how to mount a device on Linux with options. Further, we discussed umask and how it works. Then, we learned how to apply specific user rights when mounting. Finally, we compared umask versus mount point permissions.