

Yes, we're now running our only Summer Sale. All Courses are 30% off until 20th July, 2026:
Learn through the super-clean Baeldung Pro experience:
>> Membership and Baeldung Pro.
No ads, dark-mode and 6 months free of IntelliJ Idea Ultimate to start with.
1. Overview
In this tutorial, we’ll cover how we can do a headless install of Linux. First, we’ll discuss why we might need to use headless Linux. Then, we’ll dive into the installation process. For our example, we’ll use Debian.
Finally, we’ll configure SSH on our newly installed headless Linux.
2. Why Headless Linux?
A headless software runs without a graphical user interface. We can use it through the command line or launch it as a daemon process. Similarly, a headless installation of Linux provides us with the core of the operating system without a graphical environment.
Trivially, we can’t run any graphical software on it because the core GUI libraries are missing. Graphical environments take a relatively large amount of resources. Therefore, it’s more efficient to run a headless Linux server with no support for fancy graphics, input devices, monitors, and so on.
For that reason, it makes sense to use it as a server that serves a specific purpose. For instance, we can use SSH to access a headless server that can help us test code during software development.
3. Installation
There are multiple ways to carry out a headless install of Linux. Typically, the major distributions provide kickstarting scripts to automate the installation. For Fedora and Fedora-based distributions, we can use Kickstart. Similarly, we can use Preseed for Debian-based distributions.
However, we’ll stick with the manual approach. This is a better option for three reasons:
- Instant feedback as we go through the installation
- Easy to diagnose problems
- More control over the installation process
We’ll use the minimal Debian image that is usually less than 300 MB. It contains only the necessary tools to install Debian. The extra tools and utilities will be downloaded from the Debian servers during installation.
Let’s head over to the Debian Download page and download the net installer for our required target architecture. Once we’ve downloaded the ISO image, we can burn it to a live USB stick.
3.1. Burning Image to USB Stick
If we’re using a Virtual Machine, we can safely skip this section.
Most Linux distributions come with dd installed. So, let’s use it to burn our downloaded ISO to a USB stick:
$ dd if=~/Downloads/debian-11.5.0-amd64-netinst.iso of=/dev/sdx bs=4M status=progressThe of option should point to our USB drive. We can check it through fdisk or lsblk.
Once dd has finished, we can use sync to verify that the transfer has been completed:
$ sync3.2. Installing from the USB Stick
This section applies to both installing Debian on bare metal and on a Virtual Machine.
After rebooting/restarting our machine, we can boot from the USB drive. Usually, there is a hotkey for the boot menu that we can press right after starting our system. Moreover, we can also boot from the USB drive through our system’s BIOS setup.
Next, when we boot from the USB drive, we’ll be presented with the installer menu. Here, we’ll select the Graphical Install:
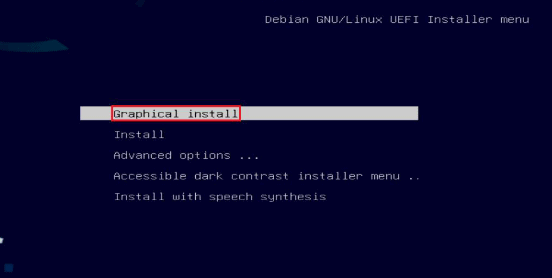
Once the installer loads, we can select our language, region, and keyboard layout. Next, we’ll enter the information required by the Debian installer, such as network selection, hostname, username, passwords, mirrors, and so on.
Before the installation begins, we must make sure that we’re connected to the Internet. Debian will download the necessary components from the web. The installer will install the base system first. Later, it will present us with a software selection list where we can optionally select the graphical environment and utilities that we need:
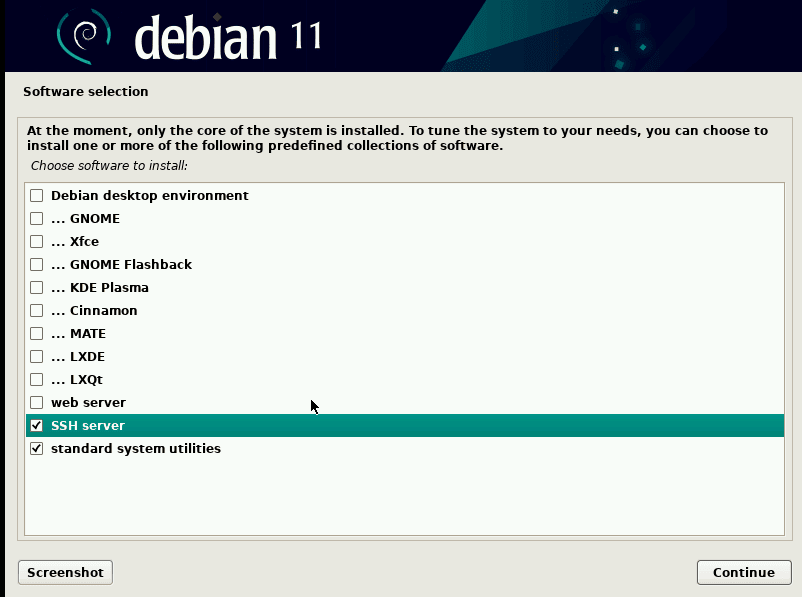
Here, we’ll select only the “SSH server” and “standard system utilities” from the list because that’s all we need. Then, upon pressing “Continue”, the installer will download and install the necessary utilities.
4. Post-Installation
Once the installation is complete, the system will reboot. Upon successful reboot, we’ll be presented with the TTY instance asking for our username and password. We can log in through the username and password we created during the installation process.
Once logged in, we’ll notice that there is no graphical environment installed. What we see is a virtual terminal through which we can configure our server.
4.1. Configuring the SSH Server
First of all, let’s check whether the SSH server is running:
$ systemctl status sshdIf it’s inactive, we can enable the service:
$ systemctl enable sshd --nowThe –now option will start the service right away.
If, for some reason, the SSH server isn’t installed, we can install it using apt:
$ apt update && apt install openssh-server -y4.2. Testing the SSH Server
We’ll first check for our local IP address using ip:
$ ip a
...
3: wlp2s0: <BROADCAST,MULTICAST,UP,LOWER_UP> mtu 1500 qdisc mq state UP group default qlen 1000
    link/ether 60:67:20:85:72:1e brd ff:ff:ff:ff:ff:ff
    inet 192.168.10.12/24 brd 192.168.10.255 scope global dynamic noprefixroute wlp2s0
...
Here, we see that our internal IP address is 192.168.10.12. So, let’s try to connect to this machine using this address:
$ ssh [email protected]Mind that if we’re using a Virtual Machine like VirtualBox, we should enable the network adapter and set it as a “bridged adapter” instead of NAT.
In addition, there’s also a headless mode in several virtual machines. In VirtualBox, right-click on the virtual machine instance and select “Stop Headless”.
5. Conclusion
In this article, we discussed the installation of headless Linux — specifically, Debian. Moreover, we set up and tested a simple SSH server on the headless Linux as well.