

Yes, we're now running our only Summer Sale. All Courses are 30% off until 20th July, 2026:
Adding Other Operating Systems to the GRUB Bootloader
Last updated: July 31, 2024
Learn through the super-clean Baeldung Pro experience:
>> Membership and Baeldung Pro.
No ads, dark-mode and 6 months free of IntelliJ Idea Ultimate to start with.
1. Overview
In this tutorial, we’ll learn how to add different OSes to the boot menu. After dual booting or multi-booting our systems, sometimes the system fails to add the other present OSes to the GRUB menu entry. Let’s see how we can resolve this issue. For simplicity, we’ll refer to GRUB 2 as GRUB.
2. os-prober
The GRUB bootloader is installed by default during Linux installation. During this time, GRUB should discover any other bootable partition within the disk and add the OS within it to the GRUB menu entries. When it fails to do so, we’d need to add it by ourselves.
We use the os-prober command to correct GRUB’s failure to discover the other OSes. os-prober is a command that lists other OSes found in bootable partitions within the disk.
It’s used during installation to create a GRUB boot menu that shows all the discovered OSes. We can also use it to reconfigure the GRUB menu after installation is complete.
os-prober can fail to locate other OSes due to different reasons. For example, Ubuntu 20.04 has os-prober disabled, and it doesn’t discover any other available OS during installation.
Let’s run os-prober:
$ sudo os-prober
/dev/sda1:Windows 10:Windows:chain
If our system is dual-booted, we’ll get a similar output with the name of the second OS. Otherwise, it gives us an empty output followed by a new line meaning only one OS exists on our disk.
If we get the following result, we need to install os-prober since it’s missing:
$ sudo os-prober
Command 'os-prober' not found, but can be installed with:
sudo apt install os-prober
Do you want to install it? (N/y)
Now that we’ve looked at os-prober let’s see how we can use it to discover other OSes. First, let’s check if os-prober is disabled:
$ sudo cat /etc/default/grub | grep 'GRUB_DISABLE_OS_PROBER'
GRUB_DISABLE_OS_PROBER=true
If we get false, then it shows os-prober is active. Otherwise, if it’s true, it’s not active. Let’s enable it by changing true to false.
Apart from this, if we get no output, this setting is missing, and we need to add it. If it’s missing, let’s append this line to /etc/default/grub:
$ sudo vi /etc/default/grub
GRUB_DISABLE_OS_PROBER=false
Afterward, we save the file. Now, let’s update the GRUB menu configuration and reboot for the changes to take effect:
$ sudo update-grub
$ sudo reboot -f
After we’ve rebooted, the discovered OS/OSes should be on the GRUB menu.
We must note that os-prober is insecure. This is because it mounts all partitions on our disk as root using the grub-mount command to check if they contain other OSes. As a result, this can be exploited and used to gain root privileges. For this reason, os-prober is disabled in some distros.
3. Reinstalling GRUB
In some instances, after an update, Windows may write on the MBR of our disk. This may change the bootloader, and the BIOS will go straight into the Windows bootloader at boot time. Other times, this might happen after installing Windows as our second OS.
For both cases, we’ll need to reinstall GRUB. If we can’t access our installed Linux, we have to use a live CD/USB to access the Linux terminal.
Let’s list the drive, see which partitions are bootable, and find the drive letters:
$ sudo fdisk -l
Disk /dev/sda: 465.76 GiB, 500107862016 bytes, 976773168 sectors
Disklabel type: dos
Device     Boot     Start       End   Sectors   Size Id Type
/dev/sda1  *         2048    104447    102400    50M  7 HPFS/NTFS/exFAT
/dev/sda2          104448 484152681 484048234 230.8G  7 HPFS/NTFS/exFAT
/dev/sda3       484155392 485249023   1093632   534M 27 Hidden NTFS WinRE
/dev/sda4       485251070 976771071 491520002 234.4G  5 Extended
/dev/sda5       485251072 974772223 489521152 233.4G 83 Linux
/dev/sda6       974774272 976771071   1996800   975M 82 Linux swap / Solaris
Given that our system only has a single drive, it’s listed as sda. The partitions within our disk have a number appended to sda. From this output, we notice that we’ve got OSes installed in sda4, sda5 while sda1 is the boot partition. To reinstall GRUB, let’s run these commands:
$ sudo mount /dev/sda1 /mnt
$ sudo grub-install --boot-directory=/mnt/boot /dev/sda
$ sudo update-grub
$ sudo reboot -f
If we plan to dual-boot/multi-boot our system with Windows, we need to install Windows first, followed by any other Linux distro.
4. Using Boot-Repair
Boot-Repair is a tool to repair the boot issues we usually experience. We use Boot-Repair to create boot-info, configure GRUB, purge GRUB, specify the disk to install GRUB, and add kernel options.
Let’s use apt to install the boot-repair tool:
$ sudo add-apt-repository ppa:yannubuntu/boot-repair && sudo apt update
$ sudo apt install -y boot-repair && boot-repair
After installation, we can launch it from System Settings, where we’ll find it under Administration. After it loads, we select the Recommended repair option and follow the prompts:
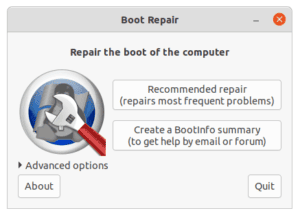
After going through the wizard, we should be able to boot without issues.
5. Conclusion
In this article, we looked at adding other OSes to our GRUB menu entry. We saw how to use os-prober to discover other OSes on our disk.
We also learned how to manually add these OSes by reinstalling GRUB.
It’s important to be aware of the bootable partitions when adding additional OSes to the GRUB menu. Lastly, a live CD/USB can help if we lose access to our Linux system.