

Learn through the super-clean Baeldung Pro experience:
>> Membership and Baeldung Pro.
No ads, dark-mode and 6 months free of IntelliJ Idea Ultimate to start with.
Last updated: March 31, 2025
Learn through the super-clean Baeldung Pro experience:
>> Membership and Baeldung Pro.
No ads, dark-mode and 6 months free of IntelliJ Idea Ultimate to start with.
Google Photos offers fairly comprehensive photo storage and sharing services. However, at first, uploading many images to Google Photos may seem challenging. Still, we can automate and simplify the process in Linux with the right tools and techniques.
In this tutorial, we’ll see how to upload a large number of photos to Google Photos at the same time on Ubuntu 24.04. First, we explore the gphotos-uploader-cli tool. After that, we go over rclone. Further, we look at using cron jobs to automate the task.
gphotos-uploader-cli is an open-source command-line tool. Specifically, it’s designed to upload photos to Google Photos.
We can install gphotos-uploader-cli using the official pre-compiled binaries. The process for doing so can even be automated with fairly standard Linux tools:
$ LOCATION=$(curl -s https://api.github.com/repos/gphotosuploader/gphotos-uploader-cli/releases/latest \
| grep browser_download_url \
| awk '{ print $2 }' \
| tr -d \" \
| grep linux); wget --quiet -O - $LOCATION | tar -zxf -
Alternatively, we can compile the tool from its source code. First, we acquire the source code:
$ git clone https://github.com/gphotosuploader/gphotos-uploader-cli \Then, we move to the downloaded directory and compile via make:
$ cd gphotos-uploader-cli && make buildThese steps ensure that the tool is installed and ready for configuration in the next steps.
After installation, we configure the gphotos-uploader-cli tool by linking it with a Google account.
The next step is to get a configuration file. This file contains details about the upload parameters and API credentials. To generate a configuration file, we initialize gphotos-uploader-cli using the init sub-command:
$ gphotos-uploader-cli init
[info] Using application data at '/home/vagrant/.gphotos-uploader-cli'.
[done] √ Application data ....
Please edit:
- `/home/vagrant/.gphotos-uploader-cli/config.hjson` to add ...
As a result, we get the config.hjson file. This file lives inside the /home/vagrant/.gphotos-uploader-cli directory.
Before we continue further, we need API credentials for the Google Photos service.
Let’s go to the Google Developers Console to generate credentials for use with gphotos-uploader-cli.
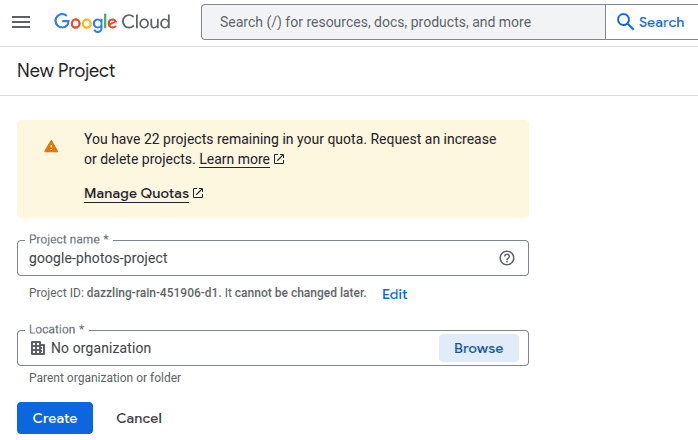
Here, we create a new project, say google-photos-project:
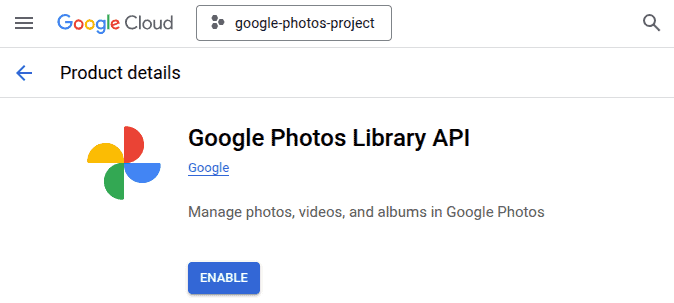
Next, we go to the Google Photos Library API page. Here, we enable the Google Photos Library API:
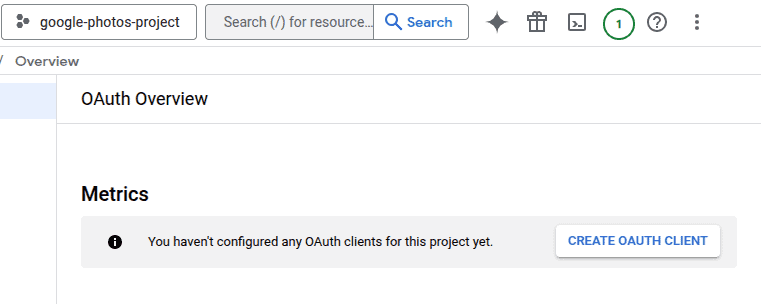
Further, we create OAuth credentials to use the API. For this, we go to the OAuth consent screen and click the Get Started button. This starts a project configuration wizard.
Now, we input different details:
Finally, we finish the configuration. Once the page reloads, we click on the CREATE OAUTH CLIENT button:
Alternatively, we can go to the credentials page. Then, we click the CREATE CREDENTIALS button and select the OAuth client ID option. In both cases, we land on the same page:
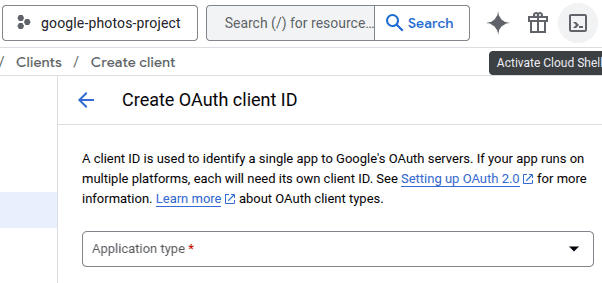
On the above page, we select the Application type as Desktop app.
Let’s put the name of the client as Desktop client 1. After creating the client, we download and preserve the client ID and its secret:
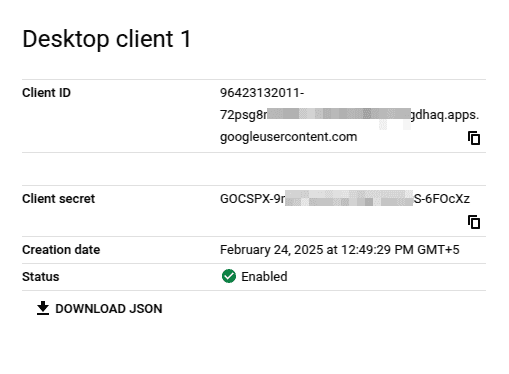
The above credentials are used in the next steps.
Now, we return to the command line and check the config.hjson file inside the .gphotos-uploader-cli directory:
$ cat .gphotos-uploader-cli/config.hjson
{
  APIAppCredentials: {
    ClientID: OUR_APP_CLIENT_ID
    ClientSecret: OUR_APP_CLIENT_SECRET
  }
  Account: OUR_GOOGLE_PHOTOS_ACCOUNT
  SecretsBackendType: file
  Jobs: [
    {
      SourceFolder: OUR_FOLDER_PATH
      DeleteAfterUpload: false
      IncludePatterns: []
      ExcludePatterns: []
    }
  ]
}
In the config.hjson file, we replace the ClientID and ClientSecret from the credentials file we downloaded in the earlier step. Also, for the Account parameter, we put in the email ID of the account where the uploaded photos should go.
For SecretsBackendType, we use auto to select the backend automatically. Finally, the source directory path is set against SourceFolder.
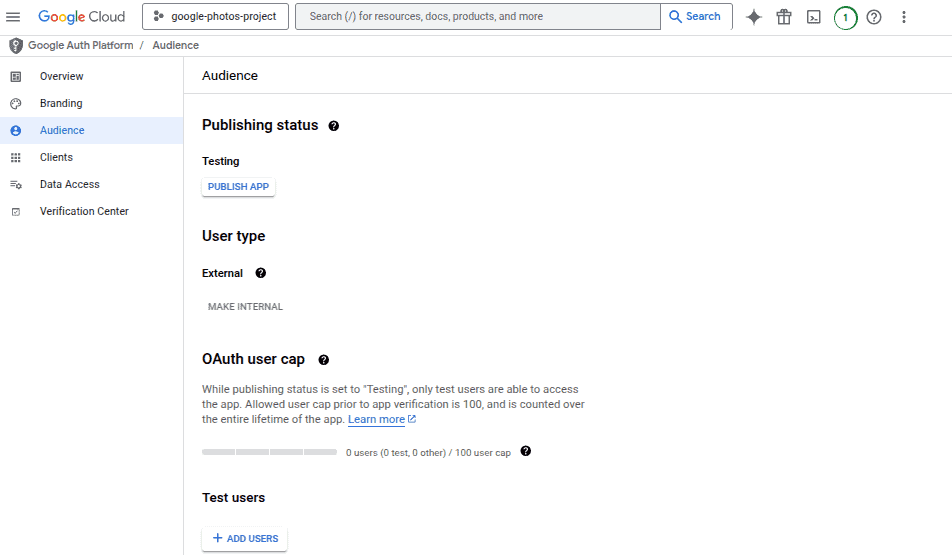
To test whether the setup works, we need a test user. To create it, we go to the Audience section of the console page.
Under the Test users, we add a new user via an email identifier:
Finally, we can move to the authentication process.
To authenticate the gphotos-uploader-cli app, we use the auth sub-command:
$ gphotos-uploader-cli auth
The above command gives a localhost-based URL.
Let’s open the URL in a browser:
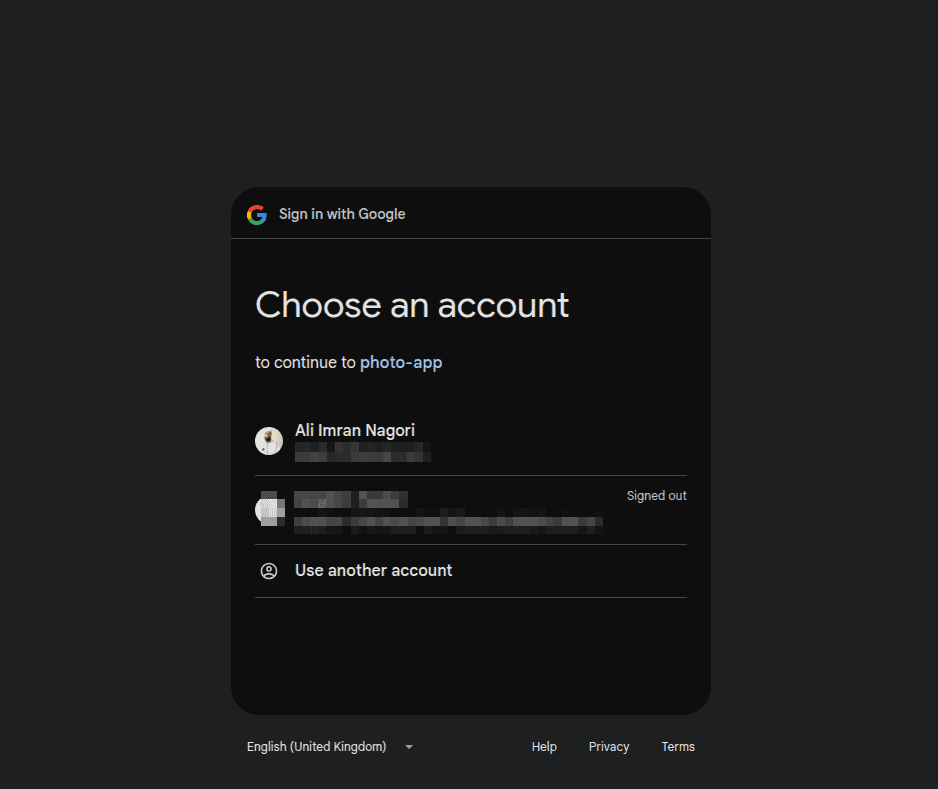
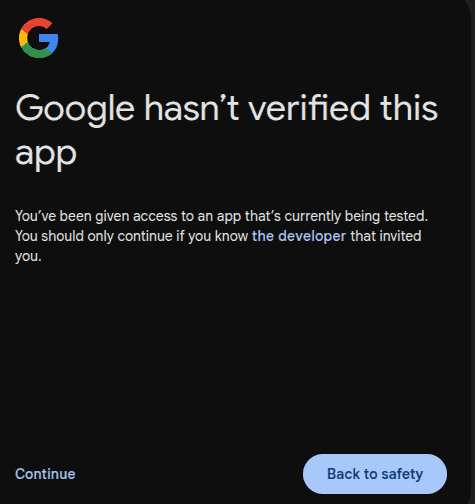
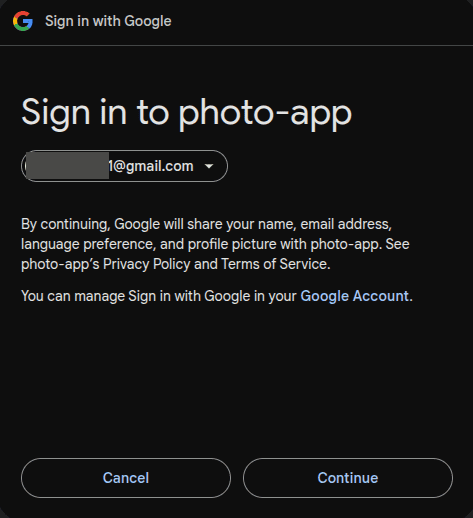
Moving on, we see another verification step from Google. Here, we click continue:
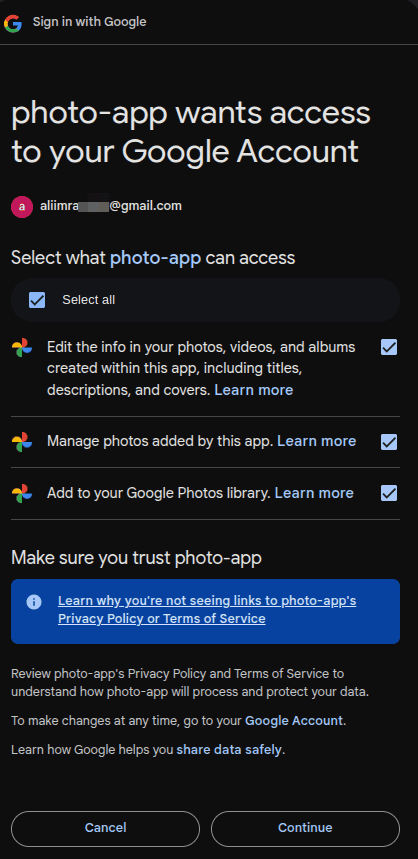
Furthermore, we provide permissions for photo-app to access the Google account:
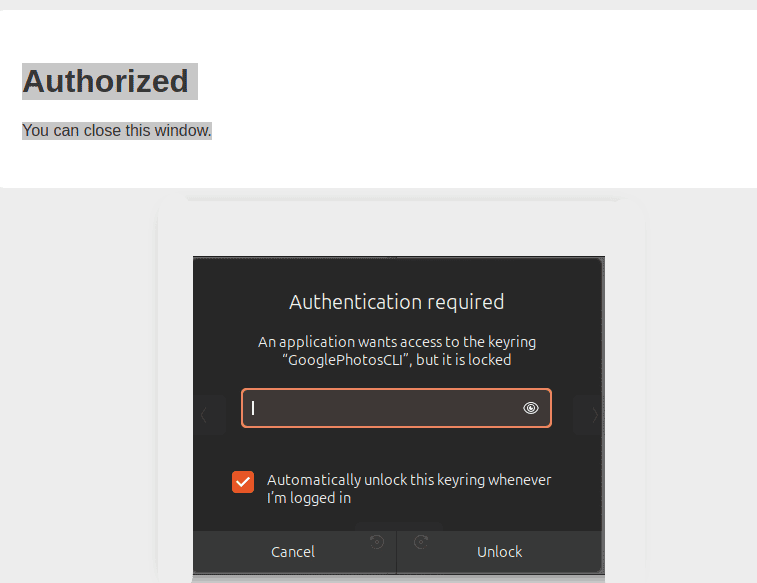
As a result, we see Authorized output on the browser.
Moreover, we might need to enter the system keyring to continue:
Eventually, we see a message of completion on the terminal window:
[done] √ Token obtained, expires at 2025-02-24 16:48:37.193100233 +0530 IST m=+...
[done] √ Successful authentication for account '*****@gmail.com'
This completes the authentication steps.
Let’s now upload some photos from the directory we set in the config.hjson file:
$ gphotos-uploader-cli push
[info]   Reading configuration from '/.../.gphotos-uploader-cli...
[info]   Authenticating using token for '*****@...
[done] √ Token is valid, expires at 2025-02-24 ...
[info]   Found 1 items to be uploaded ...
[done] √ 1 processed files: 1 successfully, 0 with errors
As a result, the push sub-command uploads all the files to the Google Photos account:
Also, we can add more photos to the directory at any time. In that case, only the new changes are pushed to the account.
Let’s try to automate the upload job. In this case, we first set up all configurations and authentication steps as before.
Then, we can put an entry in the crontab:
$ crontab -e
...
* * * * * gphotos-uploader-cli push
The above script runs continuously. As a result, the push command automatically places all the new files on Google Photos.
However, if we delete some photos from the Google account, still only new photos are synced.
Rclone is also a CLI-based tool for file management on the cloud. It synchronizes files and directories to many cloud storage providers. Notably, rclone supports Google Photos and enables automated batch uploads.
We can install rclone using an install script. This script can be run on Linux, macOS, and BSD systems.
Let’s download and run the script:
$ sudo -v ; curl https://rclone.org/install.sh | sudo bashAlternatively, rclone also provides a precompiled binary for installation.
Let’s go to Google Cloud Console to get API credentials. Here, we can create a new project or use an existing one. Again, the Google Photos Library API should be enabled here.
Further, we create OAuth Client Credentials on the OAuth consent screen:
Alternatively, we can use an existing client, e.g., from the previous section.
Let’s now configure rclone to work with Google Photos API. For this, we run the configuration wizard:
$ rclone config
No remotes found, make a new one?
n) New remote
s) Set configuration password
q) Quit config
n/s/q>
The above command starts a series of prompts to add a new remote.
First, we enter n for a new remote storage. Then, it asks for a name for the new remote with a name> prompt:
Enter name for new remote.
name>
Let’s name the remote gphotos. Following this, a list of remote storage options is shown. We choose the storage type by entering the number that corresponds to Google Photos:
Option Storage.
Type of storage to configure.
Choose a number from below, or type in your own value.
 1 / 1Fichier
   \ (fichier)
 2 / Akamai NetStorage
...
Storage> 21
Thereafter, we input the client ID we created above:
Option client_id.
OAuth Client Id.
Leave blank normally.
Enter a value. Press Enter to leave empty.
client_id>
Further, we input the client’s secret:
Option client_secret.
...
Leave blank normally.
Enter a value. Press Enter to leave empty.
client_secret>
Next, we select the access type for rclone. Here, we enter the default option – False:
Enter a boolean value (true or false). Press Enter for the default (false).
read_only>
Further, we escape the advanced config editing.
In the next step, we choose to open a web browser. This automatically authenticates rclone with the remote storage:
Use web browser to automatically authenticate rclone with remote?
 * Say Y if the machine running rclone has a web browser you can use
 * Say N if running rclone on a (remote) machine without web browser access
If not sure try Y. If Y failed, try N.
y) Yes (default)
n) No
y/n>
As a result, a sign-in tab should open in the web browser. We sign in with the respective account and click continue at the verification step:
Again, we allow access to the photo-app. As a result, we see a message indicating success in the browser: All done. Please go back to rclone.
Now, back to the terminal, rclone asks to confirm uploading images in original resolution. So, we accept the default answer.
Further, we need to confirm that we want to keep the remote gphotos:
Configuration complete.
Options:
- type: google photos
- client_id: ...
...
Keep this "gphotos" remote?
y) Yes this is OK (default)
e) Edit this remote
d) Delete this remote
y/e/d>
As the last step of configuration, we exit the configuration wizard by entering q.
Now, we should be able to use rclone to sync images to Google Photos. However, rclone can only upload to the albums it created.
Let’s first create a new album in the Google Photos account using mkdir:
$ rclone mkdir "gphotos:album/RemoteAlbum"
2025/02/26 15:36:43 NOTICE: Google Photos path ...
Warning: running mkdir on a remote which can't have ...
does nothing
Once rclone creates the album directory, we can upload images. For example, to sync a local directory with Google Photos, we use the copy sub-command:
$ rclone copy /path/to/images/ gphotos:album/RemoteAlbumIn the above command, /path/to/images is the directory that contains photos we want to be uploaded.
As a result, rclone copies all the photos to the remote location. We can list albums using the lsd subcommand:
$ rclone lsd gphotos:album
-1 2025-02-26 15:54:02 10 RemoteAlbum
Thus, we can see that RemoteAlbum contains 10 files. As a result, we ensure the file upload is successful.
Let’s create a crontab entry to automate the upload job.
This job checks for new images in the local directory. Then, it uploads them using rclone:
$ crontab -e
...
* * * * * rclone copy /path/to/pictures/* gphotos:album/RemoteAlbum
Unlike gphotos-uploader-cli, rclone syncs old images from local storage even if we delete them from the Google Account.
Of course, we can always use the Google Photos web interface from a Linux deployment with a graphical desktop environment. Let’s see the process of uploading multiple photos using that method in detail.
First, we open Google Photos in a browser. Here, we can create a new album or use the default location. Then, on the local machine, we go to the local directory containing photos we want to upload.
Finally, we drag and drop the source directory or files to the destination on Google Photos. As a result, the files start uploading to the destination album.
Also, we can track the upload status in the small progress pop-up. The status bar appears at the bottom-left area of Google Photos.
In this article, we saw how to upload a large number of photos to Google Photos.
First, we went through two command line ways:
The first option usually needs a bit more configuration as compared to the second. However, gphotos-uploader-cli doesn’t need to create a separate album for upload. Also, in both options, it’s important to be careful while configuring API credentials.
Finally, we also used the Google Photos web interface, which is simply a drag-and-drop process.