Learn through the super-clean Baeldung Pro experience:
>> Membership and Baeldung Pro.
No ads, dark-mode and 6 months free of IntelliJ Idea Ultimate to start with.
Last updated: December 3, 2024
In this tutorial, we’ll learn how to transfer a Linux distribution installed in and booted from a USB drive to the RAM of our system. By default, we cannot remove the USB if we’re running Linux from a live USB. Otherwise, the system will freeze and may corrupt, reporting a lot of input/output errors. However, there are scenarios where we need to remove the USB disk.
For example, imagine a system with two USB ports where we connect the mouse and the keyboard, apart from the Live USB. Another problem may be performance: some USB ports have a low transfer rate, which makes running applications and read operations slow. But by transferring the content of the USB drive to the RAM (which is a faster device), we’ll be able to improve performance.
In any case, the RAM resources available in our system must be larger than those required by the live USB.
The first approach to booting a live USB into the RAM and enabling the removal of the USB drive is to choose a suitable Linux distribution. We can find Linux distributions that already have the functionality to transfer the content to RAM and remove the disk. There are plenty of these distributions, and we’ll cover three of them in this section.
PuppyLinux is a set of lightweight distributions aimed at less powerful systems since they’ve reduced the memory footprint as much as possible. There are different flavors of PuppyLinux, but they mostly have a lot of options during the booting process to transfer the Operating System partly or completely to the RAM.
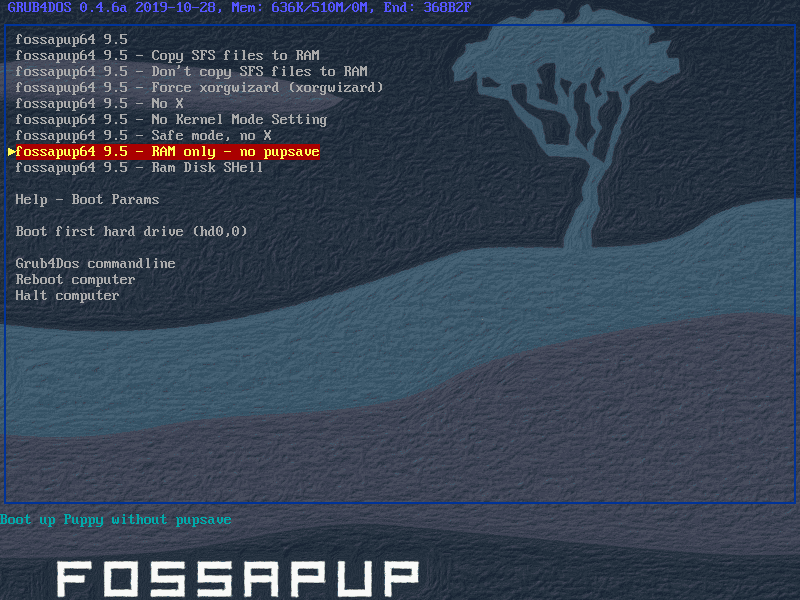
For example, let’s take Fossapup as the PuppyLinux flavor in the 64-bit version. When we boot, we’ll get a screen like:

We can see a lot of options to launch Linux with different settings affecting the user view interface, drivers, and (concerning this discussion) RAM copying settings.
Let’s review the options related to RAM storage:
With all these options, we can tweak the behavior of PuppyLinux and what we want to store in the RAM based on our needs. Any of these options should let us remove the USB drive used to boot and free the port or the disc bay.
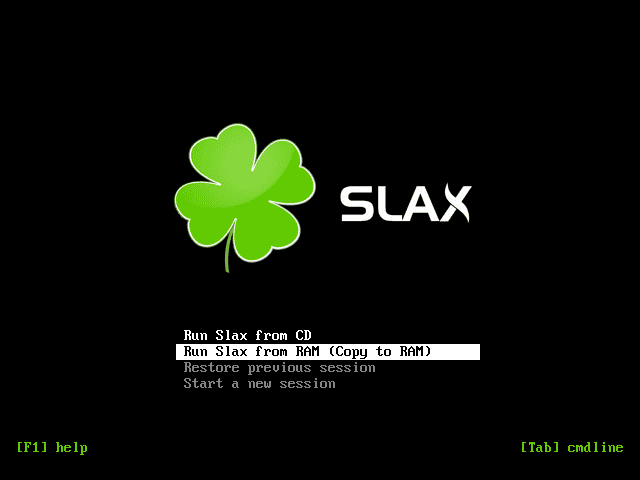
Another well-known distribution is Slax. Slax is a modular Linux distribution that puts an emphasis on speed, including the copy2ram feature. In the boot menu of Slax, we’ve got the “Run Slax from RAM (Copy to RAM)” option:

If we check this option, we’ll need to wait a little bit longer during the booting operation, since Slax will copy everything that it needs from the USB drive (or CD) to the computer RAM.
Then, Slax starts from the RAM instead of the external device from where we booted. After this, we can unplug the USB drive or eject the CD while still using the system, without freezing the machine.
The last Linux distribution we’ll discuss here is Tails (“The Amnesic Incognito Live System”) — a Linux distribution focused on privacy, anonymity, and security. By design, Tails is “amnesic”: Tails is directly run on the RAM and doesn’t write into any other storage drive.
For this distribution, we don’t even need to choose how to run it (as with the two previous distributions) since it will always run on the RAM. The objective of this is to avoid leaving traces in the systems where we run Tails. To avoid cold boot attacks, Tails also overwrites most of the RAM when shutting down the system.
One nice feature of Tails is that it allows for persistent storage. We can choose to use Tails with “Persistent Storage” and keep the applications, settings, or personal files that we create when using the system in the USB drive where Tails is installed. Even if this storage is encrypted, it isn’t completely hidden, but we can still make use of it to expand the capabilities of such Linux distribution.
Let’s imagine we want a Linux distribution without an explicit boot option to copy the operating system into RAM. In the GRUB menu, we can still modify the boot parameters to request that the system loads, during booting, the distribution into the RAM. We can do this temporarily for a single boot, but we can also make it persistent. We’ll use Ubuntu, but this applies to most Linux distributions.
The boot parameter that instructs the distribution to go to the RAM is toram. For Ubuntu, this has been around since Ubuntu 10.04.
How can we pass this boot parameter to the GRUB? When we boot from a USB containing Ubuntu, we’ll see something like:

This screen will be different, depending on whether we’ve used the UEFI or legacy boot method. Anyway, we won’t see any option like “Copy to RAM” as we did for the previous distributions. We need to edit the commands before booting. In this case, we can do that by pressing e (on the legacy boot, we press F6):

These are the settings provided by Ubuntu as default for booting. For example, the splash parameter in the Linux line shows a splash screen. Meanwhile, the quiet parameter in the same line controls the boot output messages.
We want to silence those messages that would otherwise mess up the splash screen. To do so, we simply need to append the word toram after the quiet and splash parameters:

To boot with these parameters, we then need to press F10 (or Enter in legacy BIOS).
Booting with the toram parameter will take longer than without it since, when in use, the system copies everything to the RAM from the USB. We need to check that the RAM specifications of our system match the minimum resource requirements of the Linux distribution. Afterward, we can remove the USB stick (or CD) while using Ubuntu and its programs normally.
Finally, some Linux distributions may not recognize the toram parameter. For example, in Arch Linux, the kernel boot parameter to trigger the copy to RAM is copytoram. However, the behavior is different from that in Ubuntu. In Arch Linux, the squash image is copied but contents are only uncompressed when used, so it’s slower than from the USB.
Let’s say we’re happy with how the toram parameter is working. However, it’s annoying to set it up every time we want to boot the system from the USB drive. Let’s see how we can permanently add the toram parameter to the GRUB boot parameters.
The first step is to locate and mount the /boot directory of the USB drive. This can be either a standalone partition (usually taking little disk space) or a folder within the root partition.
We then need to edit the file /boot/grub/grub.cfg in our favorite text editor. The objective is to add the toram parameter in another new menu entry. The original file will look something like:
$ cat /boot/grub/grub.cfg
set timeout=30
loadfont unicode
set menu_color_normal=white/black
set menu_color_highlight=black/light-gray
menuentry "Try or Install Ubuntu" {
	set gfxpayload=keep
	linux	/casper/vmlinuz  --- quiet splash
	initrd	/casper/initrd
}
menuentry "Ubuntu (safe graphics)" {
	set gfxpayload=keep
	linux	/casper/vmlinuz nomodeset  --- quiet splash
	initrd	/casper/initrd
}
grub_platform
if [ "$grub_platform" = "efi" ]; then
menuentry 'Boot from next volume' {
	exit 1
}
menuentry 'UEFI Firmware Settings' {
	fwsetup
}
else
menuentry 'Test memory' {
	linux16 /boot/memtest86+x64.bin
}
fi
Let’s duplicate the first menu entry and customize it. We need to append the toram option there as we did in the GRUB menu:
$ cat /boot/grub/grub.cfg
set timeout=30
loadfont unicode
set menu_color_normal=white/black
set menu_color_highlight=black/light-gray
menuentry "Try or Install Ubuntu" {
	set gfxpayload=keep
	linux	/casper/vmlinuz  --- quiet splash
	initrd	/casper/initrd
}
menuentry "Try or Install Ubuntu (toram parameter)" {
	set gfxpayload=keep
	linux	/casper/vmlinuz  --- quiet splash toram
	initrd	/casper/initrd
}
menuentry "Ubuntu (safe graphics)" {
	set gfxpayload=keep
	linux	/casper/vmlinuz nomodeset  --- quiet splash
	initrd	/casper/initrd
}
...
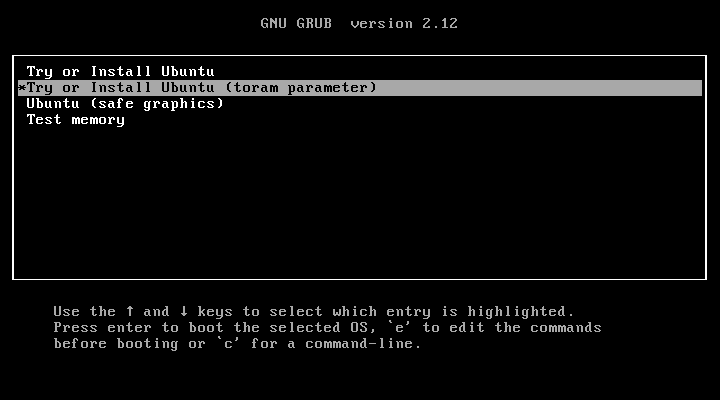
The rest of the file can remain the same. Finally, when we reboot our system, we’ll see the new entry:

This solution is truly convenient to automate the RAM transfer of any specific Linux distribution, even without the option available out of the box.
In this article, we’ve talked about different ways to boot a Linux distribution from a live USB into the system RAM to enable USB disk removal.
There are Linux distributions that ease this, such as PuppyLinux, Slax, or Tails. Some distributions are tweaked to load the live USB from the RAM directly from the boot screen without further modification.
However, we may want a specific distribution, such as Ubuntu. Most Linux distributions will have a boot kernel parameter to request that the live USB content be copied to the RAM.
The booting process will be slower, but in counterpart, we’ll be able to remove the USB disk. We must also be sure that we’ve got enough RAM resources available in our system to host the live USB.