Learn through the super-clean Baeldung Pro experience:
>> Membership and Baeldung Pro.
No ads, dark-mode and 6 months free of IntelliJ Idea Ultimate to start with.
Last updated: March 18, 2024

Learn through the super-clean Baeldung Pro experience:
>> Membership and Baeldung Pro.
No ads, dark-mode and 6 months free of IntelliJ Idea Ultimate to start with.
Linux provides us with some command-line tools to display files side by side. In this tutorial, we’ll take a look at some of these commands.
For the purpose of our examples, let’s assume that we have two files. The first file, inventory-1.txt, contains the following:
$ cat inventory-1.txt
Optical Mouse 10
Ethernet Cables 33

Total Memory In All The Laptops In Bytes 68,719,441,551
23' Monitors 45
Graphic Cards 61
The content of the second file, inventory-2.txt, is:
$ cat inventory-2.txt
Ethernet Cables 33
23' Monitors 45
Graphic Cards 61
Wifi Dongles 23
Headphones 5
Let’s see how we can open them side by side in Linux.
The pr command is primarily used for paginating text files. Additionally, it can also merge several files, optionally displaying them alongside each other. Let’s take a look at some examples.
The pr command has the following syntax:
pr [OPTION]... [FILE]...The first argument, OPTION, is a list of flags that we can pass to modify the behavior of the pr command.
The FILE argument is a list of files that will be preprocessed by the pr command. If the FILE argument is absent, or the value is ‘-‘, the command will read from the standard input instead.
To display inventory-1.txt and inventory-2.txt side by side, we can run the following command:
$ pr -m -t inventory-1.txt inventory-2.txt
Optical Mouse 10		    Ethernet Cables 33
Ethernet Cables 33		    23' Monitors 45
				    Graphic Cards 61
Total Memory In All The Laptops In  Wifi Dongles 23
23' Monitors 45			    Headphones 5
Graphic Cards 61
The -m flag causes the pr command to merge the two files into two columns on a single page. Without the flag, pr will concatenate both files into two pages of output instead of displaying them in columns.
Additionally, the flag -t removes the default header and newlines in the output.
By default, pr will only print 72 characters per row, truncating the rest. Therefore, the fourth row of inventory-1.txt has been truncated in the previous example.
To increase the page width, we’ll use the flag -w:
$ pr -m -t -w 120 inventory-1.txt inventory-2.txt
Optical Mouse 10					    Ethernet Cables 33
Ethernet Cables 33					    23' Monitors 45
							    Graphic Cards 61
Total Memory In All The Laptops In Bytes 68,719,441,551	    Wifi Dongles 23
23' Monitors 45						    Headphones 5
Graphic Cards 61In the previous section, we saw how we could use the -w flag to increase the page width. However, if the files have lines that are longer than the screen width, it is futile to increase the page width alone.
Fortunately, we can use the fold command to first wrap our text files to predetermined page width, and then combine them with pr:
$ pr -m -t -w 80 <(fold -w 40 inventory-1.txt) <(fold -w 40 inventory-2.txt)
Optical Mouse 10			Ethernet Cables 33
Ethernet Cables 33			23' Monitors 45
					Graphic Cards 61
Total Memory In All The Laptops In Byte Wifi Dongles 23
 68,719,441,551				Headphones 5
23' Monitors 45
Graphic Cards 61
First, we wrap the lines of inventory-1.txt and inventory-2.txt to 40 characters width each with the fold -w 40 command. Then, we pipe the wrapped output to the pr command.
As a result, we can see that the entire page has 80 characters width with each column taking up 40 characters width. Additionally, the fourth row of inventory-1.txt is now wrapped instead of truncated.
sdiff is a command that compares two files and displays the differences between them. This tool is useful if the purpose of opening two files beside each other is to compare them.
One thing to take note of with the sdiff command is that it only accepts two files for comparison purposes. Therefore this command is not suitable if we have more than two files to open beside each other.
The sdiff command has the following format:
sdiff [OPTION]... FILE1 FILE2The OPTION is a list of flags that can be applied to configure the command. Next, the name of the files to be compared are passed as the argument FILE1 and FILE2.
To show the difference between the two files side by side, we can run the sdiff command:
$ sdiff inventory-1.txt inventory-2.txt
Optical Mouse 10					      <
Ethernet Cables 33						Ethernet Cables 33
							      <
Total Memory In All The Laptops In Bytes 68,719,441,551	      <
23' Monitors 45							23' Monitors 45
Graphic Cards 61						Graphic Cards 61
							      |	Wifi Dongles 23
							      >	Headphones 5
From the output, we can see the content of both files is arranged side by side. Additionally, we can observe that there are some annotations markers on the output, such as ‘<‘, ‘|’, and ‘>’.
Each marker is used to show the differences between the two files:
The paste command is another handy command that merges files line by line, thereby creating a combination of multiple files in parallel. To learn more about the paste command, feel free to check out the paste article.
The paste command has the following general syntax:
paste [OPTION]... [FILE]...The command allows flags to be passed in through the OPTION argument. Additionally, the name of the files to be merged are passed with the argument FILE.
To combine the two files side by side with paste, we can run the following command:
$ paste inventory-1.txt inventory-2.txt
Optical Mouse 10	Ethernet Cables 33
Ethernet Cables 33	23' Monitors 45
	Graphic Cards 61
Total Memory In All The Laptops In Bytes 68,719,441,551	Wifi Dongles 23
23' Monitors 45	Headphones 5
Graphic Cards 61
From the output, we can observe that the content of inventory-1.txt and inventory-2.txt have been merged line by line by paste.
Although the paste command displays the two files side by side, the output is not formatted. To make it more readable, we can tabulate it with the column command.
For Debian based Linux (such as Debian and Ubuntu), we’ll need to first install the command using apt-get:
$ apt-get update
$ apt-get install -y bsdmainutils
On the other hand, RedHat based Linux (such as Fedora and CentOS) can skip the installation as it comes bundled with the OS by default. We won’t be covering the apt-get tool in this article as there’s another separate article on this site that covers the tool in detail.
To tabulate the output of paste, we can first merge the files line by line with paste, and then pipe the output to column command for formatting purpose. Concretely, in Debian based Linux:
paste inventory-1.txt inventory-2.txt | column -t -s $'\t' -nOn the other hand, RedHat based Linux can run the command without the -n flag:
paste inventory-1.txt inventory-2.txt | column -t -s $'\t'The -t flag instructs the column command to tabulate the input by creating columns, using delimiter as a guide. Then, we specify the delimiter tab character using the -s flag. In essence, whenever column command sees a tab character in the input, it will treat the sequence that comes after it as a new column.
Finally, the -n flag is required on the Debian based Linux so that empty cells are interpreted as a valid cell. Without the flag, the output will look like the following:
$ paste inventory-1.txt inventory-2.txt | column -t -s $'\t'
Optical Mouse 10                                         Ethernet Cables 33
Ethernet Cables 33                                       23' Monitors 45
Graphic Cards 61
Total Memory In All The Laptops In Bytes 68,719,441,551  Wifi Dongles 23
23' Monitors 45                                          Headphones 5
Graphic Cards 61
From the output, we can see that the column command is not interpreting the empty line in inventory-1.txt. As a result, it shifts the corresponding line in inventory-2.txt to the left instead.
tmux is a powerful tool that allows us to create and use multiple terminals concurrently. In addition to displaying the files alongside each other, we can also edit them using any text editor available in the system.
First, we need to install tmux by running the following command:
$ apt-get update
$ apt-get install -y tmux
Then, we can verify the installation by getting the tmux’s version:
$ tmux -V
tmux 3.0a
If it returns the version, the installation is successful.
To display inventory-1.txt and inventory-2.txt alongside each other, we can run the following command:
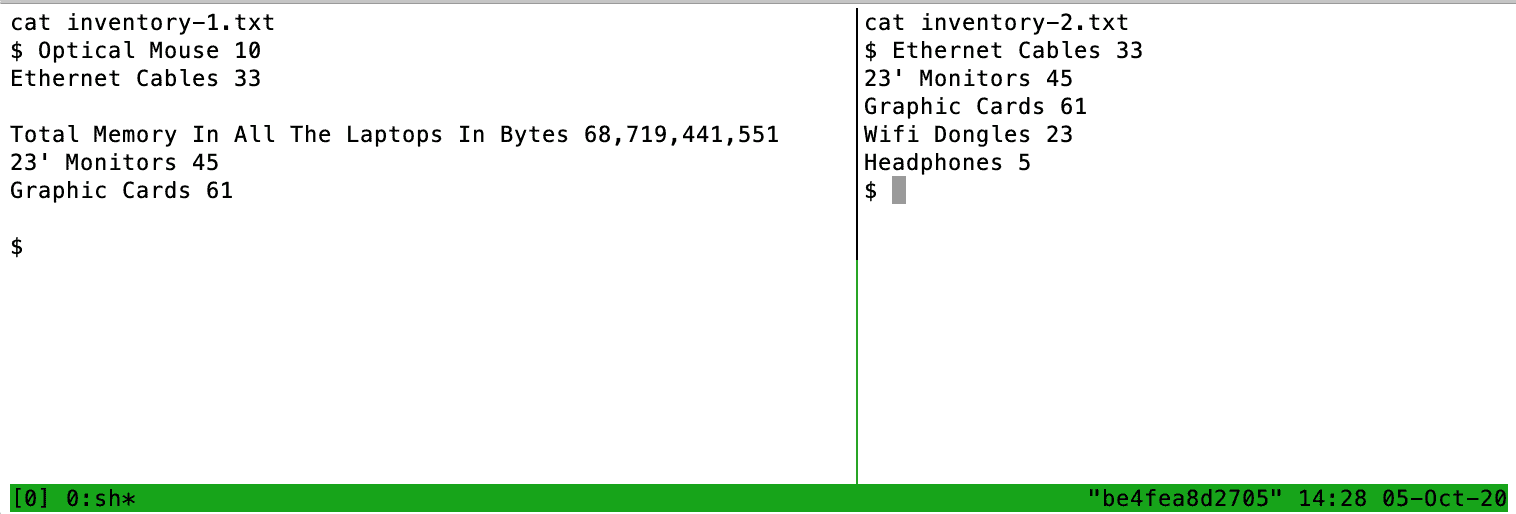
$ tmux new-session \; send-keys 'cat inventory-1.txt' C-m \; split-window -h \; send-keys 'cat inventory-2.txt' C-m \;The command above first creates a new session on tmux with the new-session argument. Then, it sends the cat inventory-1.txt command to the created terminal. The characters C-m executes the sent command on the terminal.
Next, we issue a split-window -h command, which splits the current window horizontally by creating a new terminal beside the first one. Finally, we issue the second cat inventory-2.txt command on the new terminal.
After the command is executed, we’ll have a tmux session with two windows in parallel as illustrated in the diagram below:
If we wanted to edit the files, we could replace the cat command with text editor commands like vi, vim, nano, and etc.
Finally, to quit the tmux session simply hit the key CTRL + b and x. Then, input y when prompted to kill the session.
In this article, we’ve seen many different ways to display multiple files side by side on Linux.
We’ve started off combining the files with the pr command. Then, we’ve used sdiff to compare the files side by side.
Next, we’ve looked at the paste command to merge files line by line. We’ve also taken a step further to format the output with the column command.
Finally, we’ve introduced tmux that not only displays files alongside each other but also provides the ability to interact with them with our text editors.