

Learn through the super-clean Baeldung Pro experience:
>> Membership and Baeldung Pro.
No ads, dark-mode and 6 months free of IntelliJ Idea Ultimate to start with.
Last updated: March 18, 2024
Learn through the super-clean Baeldung Pro experience:
>> Membership and Baeldung Pro.
No ads, dark-mode and 6 months free of IntelliJ Idea Ultimate to start with.
“Container” is a buzzword in the industry and is frequently cited in lists of hot new topics. Essentially, it’s easier and faster for the organization to build and deploy the application anywhere. Images are the backbone of the containers, so in this article, let’s look under the hood at how they are stored inside the host machine.
Without any further ado, let’s get into the nitty-gritty of it.
A Docker image is a cut-down version of the operating system files and dependencies required to run an application or service.
From a system administrator’s point of view, we can think of the images as VM templates, much like a halted VM. Similarly, a Docker image is analogous to a stopped container; thus, images are referred to as build-time constructs.
Typically, the containers are lightweight and make it fast to deploy the application or service anywhere. Hence, the images are generally very small by stripping away all non-essential parts. For instance, Docker images don’t have their own kernel. Instead, they share the kernel with the host machine. Images are not shipped with four or five shells; instead, they come with a single or no shell. Consequently, we sometimes refer to the image as a sufficient operating system.
The official Ubuntu OS Image 22.04 LTS has a file size of 3.6GB, but the containerized version of the same image, which eliminates all extraneous components, is only 77.8 MB. It’s almost a 98% reduction in size and subsequent savings in hardware resource utilization:
$ docker images
REPOSITORY   TAG       IMAGE ID       CREATED       SIZE
ubuntu 22.04 216c552ea5ba 10 days ago 77.8MBGenerally, we can pull the images from the DockerHub registry, but others do exist. We use the docker pull command to get the images from the DockerHub:
$ docker pull node:latest
latest: Pulling from library/node
f606d8928ed3: Pull complete
47db815c6a45: Pull complete
bf4849400000: Pull complete
a572f7a256d3: Pull complete
8f7d05258955: Pull complete
3a459f9ab1c6: Pull complete
c37bcb1df089: Pull complete
bf0ef0f2bfc7: Pull complete
9c17ea02add5: Pull complete
Digest: sha256:9d8a6466c6385e05f62f8ccf173e80209efb0ff4438f321f09ddf552b05af3ba
Status: Downloaded newer image for node:latest
docker.io/library/node:latest
As we see, the image is downloaded as multiple layers from the DockerHub blob store. The lines marked “pull complete” denote the layers. Here, our image has nine read-only layers stacked on top of each other to form a single, cohesive image object. Again, we use the docker images command to get the list of images available in our local repository:
$ docker images
REPOSITORY   TAG       IMAGE ID       CREATED       SIZE
node         latest    35ff1df466e8   9 days ago    991MB
ubuntu       22.04     216c552ea5ba   10 days ago   77.8MB
Yet another way to see the layers of an image is by using the docker inspect command. Now let’s inspect the node:latest image and get the SHA256 hashes of all layers:
$ docker inspect 35ff1df466e8
[
    {
        "Id": "sha256:35ff1df466e834b2408d56faca095d16dc4002cbd3e4c46c15c72e2aaf18afaf",
        "RepoTags": [
            "node:latest"
        ],
...
        "RootFS": {
            "Type": "layers",
            "Layers": [
                "sha256:8e079fee21864e07daa88efcf74f23ad5ade697c06417d0c04a45dfe580ab7f3",
                "sha256:955c9335e041ebf1840e5d9779a217a5957561086148c7da89bdd4000acd62c4",
                "sha256:186da837555d4da0f772d025f29940370be7a464c2b92871a166941cde9fca3d",
                "sha256:288cf3a46e320aa79274f52d3ce609be1a9f67bab6d34305231ddc7f40c6a261",
                "sha256:75ba0293749684938f4de0f9c9c9deb7d200399c1fb129f3d0147e5772effa67",
                "sha256:ff5b3ba76c67f918a022a8be0dc412978d03a7e876ca094291ddb6bda9ba8e16",
                "sha256:7b882706e16e206df8c8d9fb69869b2b83912a37b78c8cd463608a693df37c36",
                "sha256:40eaad54c8b1838dcd3ae5e10fd7bc700e2176cad488328a47316d0d25167b6e",
                "sha256:73ebbf1d19781242c9e3d9106ff8bbd7899bc06efab691e622ab2e8a4466d5d7"
            ]
        },
...
]
Here, the first line under the layer section shows the base layer; as we add content with the build commit, the new layers are formed on top of it. The base layer for the node:latest image is 8e079fee21. In the following section, let’s examine the specifics of Docker image storage in more detail.
Generally, Docker uses storage drivers to store the image layers efficiently. It manages the storage and administration of images and containers on our Docker host. Further, storage drivers also know the specifics of how these layers communicate with one another.
Now let’s see where and what is stored in these image layers.
Let’s first get the storage driver information from the host machine using the docker info command. Furthermore, Docker engine additionally supports a variety of storage drivers, including overlay2, fuse-overlay2, btrfs, zfs, aufs, overlay, devicemapper, and vfs:
$ docker info | grep -i "Storage Driver"
 Storage Driver: overlay2
Next, let’s obtain information on the Docker root directory, which houses the majority of Docker’s data:
$ docker info | grep "Root Dir"
Docker Root Dir: /var/lib/dockerIdentifying the Docker files and their content in the root folder is not straightforward. But let’s try to decipher it easily with the below six simple steps:
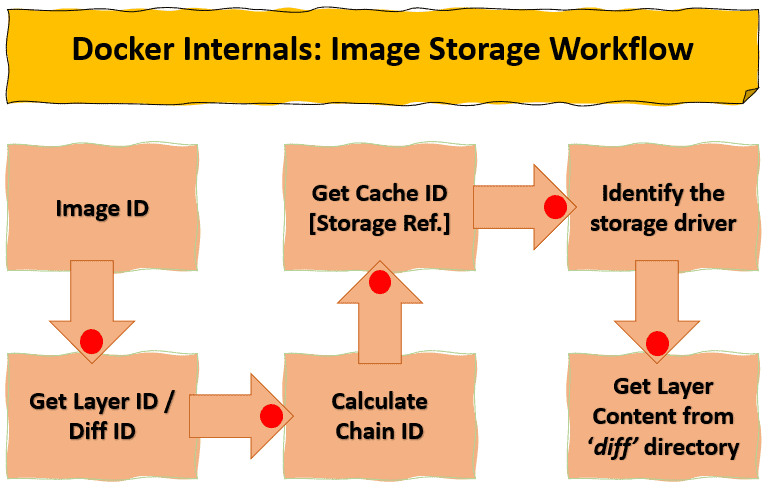
Here, let’s get the image layers using the docker inspect command for node:latest image id. Usually, the first line represents the base layer of the image. The other lines depict the subsequent image layers in an ordered way:
$ docker inspect 35ff1df466e8
[
...
        "RootFS": {
            "Type": "layers",
            "Layers": [
                "sha256:8e079fee21864e07daa88efcf74f23ad5ade697c06417d0c04a45dfe580ab7f3",
                "sha256:955c9335e041ebf1840e5d9779a217a5957561086148c7da89bdd4000acd62c4",
                "sha256:186da837555d4da0f772d025f29940370be7a464c2b92871a166941cde9fca3d",
                "sha256:288cf3a46e320aa79274f52d3ce609be1a9f67bab6d34305231ddc7f40c6a261",
                "sha256:75ba0293749684938f4de0f9c9c9deb7d200399c1fb129f3d0147e5772effa67",
                "sha256:ff5b3ba76c67f918a022a8be0dc412978d03a7e876ca094291ddb6bda9ba8e16",
                "sha256:7b882706e16e206df8c8d9fb69869b2b83912a37b78c8cd463608a693df37c36",
                "sha256:40eaad54c8b1838dcd3ae5e10fd7bc700e2176cad488328a47316d0d25167b6e",
                "sha256:73ebbf1d19781242c9e3d9106ff8bbd7899bc06efab691e622ab2e8a4466d5d7"
            ]
        },
...
]
Using the chainID formula, let’s calculate the chainID for layer 2, layer 3, and so on, whilst the chainID for layer 1 is the same as the diffID or layerID:
### Layer-2: chainID Calculation
$ echo -n "sha256:8e079fee21864e07daa88efcf74f23ad5ade697c06417d0c04a45dfe580ab7f3 sha256:955c9335e041ebf1840e5d9779a217a5957561086148c7da89bdd4000acd62c4" | sha256sum

b00657a91aea31613d9a8764759a8784f35a4c7ab55299bc4a9fa88d989d5c15

### Layer-3: chainID Calculation
$ echo -n "sha256:955c9335e041ebf1840e5d9779a217a5957561086148c7da89bdd4000acd62c4 sha256:186da837555d4da0f772d025f29940370be7a464c2b92871a166941cde9fca3d" | sha256sum

fa38591e75d0b112fdfa4d09798c3489e2acc4ffdb67da620cf548a69e4be2a3

...
Likewise, with the help of chainID, browse through the /var/lib/docker/image/overlay2/layerdb/shs256 directory to get the actual content index known as cacheID. Furthermore, the directory also has the parent information of the layer and its size:
$ pwd
/var/lib/docker/image/overlay2/layerdb/sha256

$ tree b00657a91aea31613d9a8764759a8784f35a4c7ab55299bc4a9fa88d989d5c15
b00657a91aea31613d9a8764759a8784f35a4c7ab55299bc4a9fa88d989d5c15
├── cache-id
├── diff
├── parent
├── size
└── tar-split.json.gz

0 directories, 5 files
$ cd /var/lib/docker/image/overlay2/layerdb/sha256/b00657a91aea31613d9a8764759a8784f35a4c7ab55299bc4a9fa88d989d5c15
$ cat cache-id
6112cbe71a05105ba0907929415b48c5b07ade33b15d0b57abb83596dcaaaac0

$ cat parent
sha256:8e079fee21864e07daa88efcf74f23ad5ade697c06417d0c04a45dfe580ab7f3

$ cat size
10696859
Lastly, locate the directory containing the retrieved cacheID by browsing the /var/lib/docker/overlay2 path. Simply navigate to the diff directory in that path to access the layer’s actual contents:
$ pwd
/var/lib/docker/overlay2

$ ls -l /var/lib/docker/overlay2/6112cbe71a05105ba0907929415b48c5b07ade33b15d0b57abb83596dcaaaac0
total 16
-rw------- 1 root root    0 Oct 14 09:07 committed
drwxr-xr-x 6 root root 4096 Oct 14 09:07 diff
-rw-r--r-- 1 root root   26 Oct 14 09:07 link
-rw-r--r-- 1 root root   28 Oct 14 09:07 lower
drwx------ 2 root root 4096 Oct 14 09:07 work
server# cd 6112cbe71a05105ba0907929415b48c5b07ade33b15d0b57abb83596dcaaaac0

$ ls
committed  diff  link  lower  work

$ tree
.
├── committed
├── diff
│   ├── etc
│   │   ├── ca-certificates.conf
│   │   ├── ethertypes
...
... output truncated ...
...

160 directories, 802 filesIn summary, we examined the fundamentals of Docker images and their layers. Further, we also learned about a few key concepts, such as diffID, chainID, and cacheID, to identify the layer files and their real contents.