

Learn through the super-clean Baeldung Pro experience:
>> Membership and Baeldung Pro.
No ads, dark-mode and 6 months free of IntelliJ Idea Ultimate to start with.
Learn through the super-clean Baeldung Pro experience:
>> Membership and Baeldung Pro.
No ads, dark-mode and 6 months free of IntelliJ Idea Ultimate to start with.
Amazon S3 is an immensely popular cloud object storage service offered by Amazon Web Services. Over the years, the service has grown so popular that S3 has become a common API definition for connecting with object storage services. Even providers other than AWS, such as Cloudflare R2, DigitalOcean Spaces, and the open-source MinIO, are compatible with the S3 API. As Linux users, we can leverage S3 both for software development and personal use, such as storing photos and videos.
In this tutorial, we’ll be looking at various tools that can act as S3 clients to allow us to manage the objects stored in S3-compatible object storage services. With each tool, we’ll look at how to list, view, create, and delete objects from the bucket.
s3cmd is a command-line tool written in Python that can be used to work with S3 buckets. It works with Amazon S3 and other services that are compatible with S3. Let’s look at how we can set this up and do some basic tasks with it.
As s3cmd is a Python-based tool, it can be installed using pip on any OS that has Python and pip installed:
$ pip install s3cmdAfter running the above command, we should have s3cmd installed and available on the command line.
The next step after installation is configuration. Here, we need to provide s3cmd our S3 access key, and secret key, and define other parameters, such as endpoint. The endpoint parameter allows us to connect to S3-compatible services, other than that of AWS, by specifying the appropriate endpoint of that service. Let’s interactively configure s3cmd:
$ s3cmd --configure

Enter new values or accept defaults in brackets with Enter.
Refer to user manual for detailed description of all options.

Access key and Secret key are your identifiers for Amazon S3. Leave them empty for using the env variables.
Access Key []: <PASTE_AWS_ACCESS_KEY>
Secret Key []: <PASTE_AWS_SECRET_KEY>
Default Region []: auto

Use "s3.amazonaws.com" for S3 Endpoint and not modify it to the target Amazon S3.
S3 Endpoint []: https://67693b021983678625c08af3ee3cd837.r2.cloudflarestorage.com

... more configuration ...
In the above interactive configuration, we supplied the access and secret key. Further, we set the region to auto and set up a connection to Cloudflare R2 service instead of the default AWS S3 service, using the appropriate endpoint. The configuration is stored in a plain text file at ~/.s3cfg.
To create a bucket, we can use the s3cmd mb command:
$ s3cmd mb s3://example-bucket
Bucket 's3://example-bucket/' created
To double-check if this worked, we can use the list buckets command:
$ s3cmd ls
2025-03-19 05:51  s3://example-bucket
2025-03-03 01:34  s3://pagelax
In the list above, we can see our newly created bucket, along with some pre-existing buckets.
To start with, we’ll copy an object from our local system to the bucket we created:
$ s3cmd put shopping-list.md s3://example-bucket/list.md
upload: 'shopping-list.md' -> 's3://example-bucket/list.md'  [1 of 1]
 69 of 69   100% in    0s    72.15 B/s  done
Next, we’ll list the objects in the bucket to see that the file has been stored there:
$ s3cmd ls s3://example-bucket
2025-03-19 06:14           69  s3://example-bucket/list.md
We see that our file is stored in the bucket. Also, it’s the only file there because we freshly created the bucket and added only this file. Next, let’s copy the file back to our system:
$ s3cmd get s3://example-bucket/list.md list2.md
download: 's3://example-bucket/list.md' -> 'list2.md'  [1 of 1]
 69 of 69   100% in    0s   226.02 B/s  done
Now that we’ve copied the file back to our system, let’s delete it on the bucket:
$ s3cmd del s3://example-bucket/list.md
delete: 's3://example-bucket/list.md'
The above command deletes the file that we initially copied.
We can remove the bucket using the s3cmd rb command:
$ s3cmd rb s3://example-bucket
Bucket 's3://example-bucket/' removed

$ s3cmd ls
2025-03-03 01:34  s3://pagelax
In the above snippet, we removed the bucket and relisted them to confirm it’s gone. The remove command worked straightaway because the bucket was empty. To remove a bucket that contains some objects, we need to use the –force flag:
$ s3cmd rb --force s3://example-bucketThe –force flag automatically fetches a list of all the objects in the bucket, deletes them one by one, and finally removes the bucket once it’s empty.
The MinIO Client (mc) is a program that allows us to access local filesystems and S3-compatible object storage services using a unified command-line interface. While s3cmd allows us to work with a single service only, we can use mc with multiple services using its alias feature. We can create multiple aliases with different sets of access keys, secret keys, and endpoints, and use all of them simultaneously. Now, let’s look at how to use mc.
MinIO Client is a Go program, which is compiled into binaries for different platforms. Assuming we’re running a x86_64 Linux machine, we can just download the corresponding compiled binary and start using it right away:
$ wget https://dl.min.io/client/mc/release/linux-amd64/mc
$ chmod +x mc
$ ./mc --help
In the above command, we downloaded the mc binary, added the executable flag to it, and then checked if it works by running its –help command. Once this step is complete, let’s look at how to use it.
We can set up aliases to connect to different S3-compatible services, each with different configurations. Let’s see how to do this for the R2 service we used in the earlier example:
$ ./mc alias set r2 <ENDPOINT> <ACCESS_KEY> <SECRET_KEY>The above command creates an alias named r2 using the endpoint, access key, and secret key we specified. This relieves us from specifying these details for every request we make to the storage service.
Like we did in the previous example, let’s create a new bucket and then list the available buckets:
$ ./mc mb r2/example-bucket
Bucket created successfully `r2/example-bucket`.

$ ./mc ls r2
[2025-03-19 12:26:29 IST]     0B example-bucket/
[2025-03-03 07:04:54 IST]     0B pagelax/
In the above snippet, we first created a bucket called example-bucket and then listed the buckets to see that it’s present. These commands are similar to s3cmd. The only difference is that we mention the alias name r2 in our commands.
Let’s copy an object hello.txt on the local machine to our newly created bucket:
$ ./mc cp hello.txt r2/example-bucket/hello.txt
/home/kd/hello.txt:     29 B / 29 B ┃▓▓▓▓▓▓▓▓▓▓▓▓▓▓▓▓▓▓▓▓▓▓▓▓▓▓▓┃ 17 B/s 1s
This command is very similar to the native Linux cp command. We specify the source file and the destination, and the command just copies the file! It also shows a progress bar, which is very useful if we’re copying large files.
Next, let’s list the objects in the bucket using ls:
$ ./mc ls r2/example-bucket
[2025-03-19 12:34:04 IST]    29B STANDARD hello.txt
We can see that our hello.txt file is on the bucket. Now, let’s copy it back to the local machine:
$ ./mc cp r2/example-bucket/hello.txt hello2.txt
...ample-bucket/hello.txt: 29 B / 29 B ┃▓▓▓▓▓▓▓▓▓▓▓▓▓▓▓▓▓▓▓▓▓┃ 34 B/s 0s

$ ls -l *.txt
-rw-r--r-- 1 kd users 29 Mar 19 12:39 hello2.txt
-rw-r--r-- 1 kd users 29 Mar 19 12:32 hello.txt
Finally, let’s delete the file from the bucket:
$ ./mc rm r2/example-bucket/hello.txt
Removed `r2/example-bucket/hello.txt`.
Similar to the native command, rm removes the specified file.
Just like s3cmd, we can use rb to remove a bucket:
$ ./mc rb r2/example-bucket
Removed `r2/example-bucket` successfully.
The above command will work for empty buckets. To remove non-empty buckets, we need to add the –force flag, which iteratively deletes the objects from the bucket and then removes it.
s3fs-fuse is a tool that enables an S3-compatible file storage service to be mounted as a file system on our local machine using FUSE (Filesystem in Userspace). Once this is done, all files and directories on the bucket can be accessed as though they were local files. Let’s see how to set this up.
s3fs-fuse packages are available for the most popular Linux distributions. On Ubuntu, it can be installed with the package manager:
$ sudo apt install s3fsOnce we have it installed, we can set it up by adding our keys.
First, let’s add the access key and secret key to our storage service. To do this, we can create a file ~/.passwd-s3fs, containing the credentials in the format <ACCESS_KEY>:<SECRET_KEY>:
$ echo '<ACCESS_KEY>:<SECRET_KEY>' > ~/.passwd-s3fs
$ chmod 600 ~/.passwd-s3fs
We also used the chmod command to secure the file. Alternatively, we can use an AWS credentials file (~/.aws/credentials), or specify the access key and secret key using the environment variables AWS_ACCESS_KEY_ID and AWS_SECRET_ACCESS_KEY, respectively. Next, we can mount our bucket:
$ s3fs <bucket_name> ~/s3-bucket -o passwd_file=/home/kd/.passwd-s3fs -o url=https://67693b021983678625c08af3ee3cd837.r2.cloudflarestorage.comIn the above command, we mounted the S3 bucket by specifying the bucket name, mount point, and the password file we created earlier. We also specified the endpoint for Cloudflare R2. We can skip this if we are using the default AWS S3 service.
After successfully mounting, we can access the bucket using file-handling commands or graphical tools. Firstly, let’s try ls:
$ ls -l ~/s3-bucket
total 8
drwxr-x--- 1 kd users 4096 Jan  1  1970 dev
drwxr-x--- 1 kd users 4096 Jan  1  1970 prod
We can see that there are two directories in the bucket, dev and prod. Commands such as cp, mv, and rm will work on the bucket like they do on regular files. Finally, the bucket can also be accessed from a graphical file explorer:
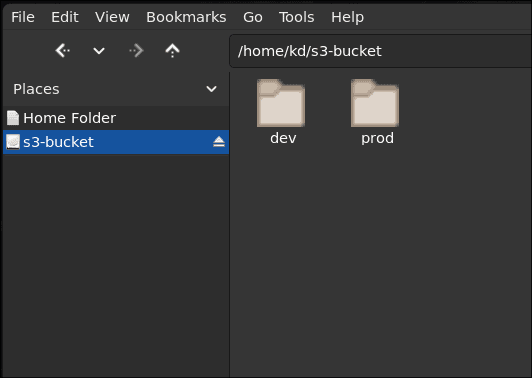
The above image shows the directories inside the bucket visible in the file browser, at the path that we mounted the bucket on.
In this article, we looked at different methods to work with S3-compatible object storage services on Linux. To begin with, we looked at two command-line interfaces to the S3 API, s3cmd and mc. These are very similar to each other, but mc is more versatile in terms of being able to simultaneously connect to different services using aliases. It also handles the local filesystem, intending to be a replacement or enhancement of the popular file-handling commands, such as ls, cp, mv, rm, etc.
Finally, we looked at s3fs-fuse, which essentially mounts the S3 bucket as a directory on the filesystem, after which we can work with the bucket using any command-line or GUI file processing tools available.