

Yes, we're now running our only Summer Sale. All Courses are 30% off until 20th July, 2026:
Learn through the super-clean Baeldung Pro experience:
>> Membership and Baeldung Pro.
No ads, dark-mode and 6 months free of IntelliJ Idea Ultimate to start with.
1. Overview
Alpine Linux is a lightweight distribution popular in containerized environments due to its small size and simplicity. In this tutorial, we’ll walk through the process of installing the OpenJDK package on Alpine Linux.
2. Checking Package Availability
Before we proceed to the installation, it’s a good idea to check if the package is available on the Alpine Linux repositories. We can check the package availability through the pkgs.alpinelinux.org website.
The pkgs.alpinelinux.org is a website that indexes all the packages in the main and community repositories. It offers a simple interface for searching packages. Specifically, we can search packages by name using the website. Additionally, the name field supports wildcard matches using the asterisk character for zero or more matches, and a question mark for zero or one match. This makes it convenient for fuzzy matching the package name when we’re unsure about the exact name of a package.
For example, we can search for the package we want to install by its name, openjdk8:
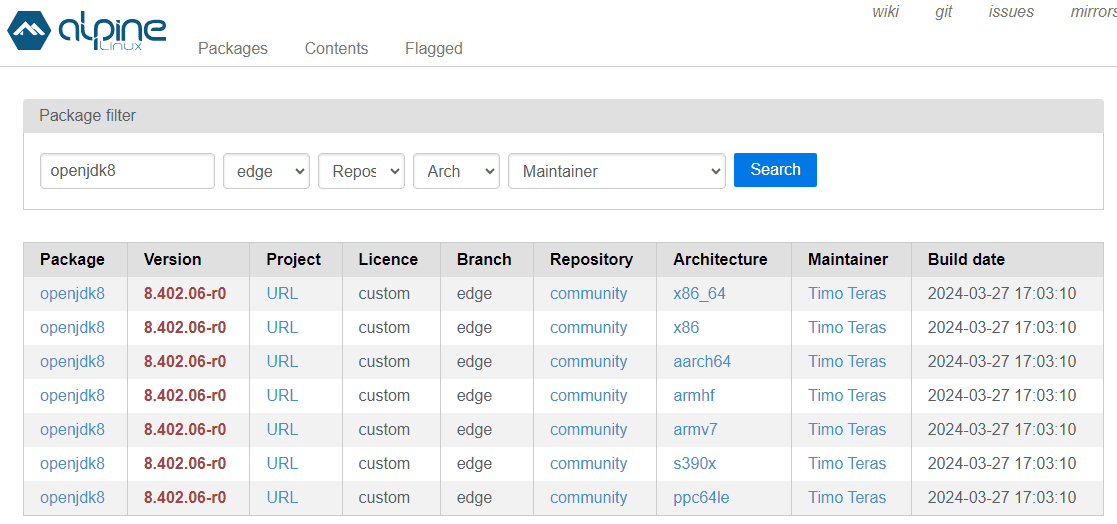
The result list shows us that there are several package names openjdk8. Specifically, there’s one openjdk8 for all system architectures, like x86_64 and aarch64. When we install the package using the apk add command in Alpine Linux, it’ll resolve the current system architecture and obtain the package built for the same architecture.
After we’ve confirmed that the package is available, we can proceed with installing it on our Alpine Linux.
3. Unable to Select Package Error
One common problem we can face when installing a package in Alpine Linux is the error with a message that complains “unable to select packages”. This happens when the apk command cannot find the package by the given name from all the configured repositories.
Let’s install the openjdk8 package using the apk add command on our Alpine Linux instance:
$ apk add openjdk8
fetch https://dl-cdn.alpinelinux.org/alpine/v3.20/main/x86_64/APKINDEX.tar.gz
ERROR: unable to select packages:
  openjdk8 (no such package):
    required by: world[openjdk8]
This error can be puzzling because we’re sure the package openjdk8 is verified through the pkgs.alpinelinux.org website. So why can’t the package manager get the package?
It turns out, that the community repository in many Alpine Linux is disabled by default. As the openjdk8 package resides in the community repository, the installation will fail without enabling access to the community repository.
4. Enabling Community Repository in Alpine Linux
Alpine Linux organizes its packages into different repositories, namely the main and community repositories. The main repository contains the core packages supported by the Alpine official maintainers. On the other hand, packages that are contributed by the community live in the community package.
In Alpine Linux, the /etc/apk/repositories file controls the location from which we’ll fetch the package’s information. We can use the cat command to inspect the content:
$ cat /etc/apk/repositories
https://dl-cdn.alpinelinux.org/alpine/v3.20/main
# https://dl-cdn.alpinelinux.org/alpine/v3.20/community
The first line of the file is the URL to the main repository of the Alpine Linux package. Then, the second line points to the community repository. However, the second line is disabled because it’s commented out using the hash character.
To enable the repository, we can uncomment the community repository URL using the sed command:
$ sed -i '2s/^# *//' /etc/apk/repositoriesThe command above uses the -i option to edit the file in place. Then, the ‘2s/^# *//’ is the sed expression that performs the substitution on the second line of the file. Specifically, the substitution is done by matching the ^# * pattern and replacing it with an empty string.
After we’ve enabled the community repository, we can run the apk update to refresh the package index:
$ apk update
fetch https://dl-cdn.alpinelinux.org/alpine/v3.20/main/x86_64/APKINDEX.tar.gz
fetch https://dl-cdn.alpinelinux.org/alpine/v3.20/community/x86_64/APKINDEX.tar.gz
v3.20.2-141-g245cbcf0f71 [https://dl-cdn.alpinelinux.org/alpine/v3.20/main]
v3.20.2-144-g7b99aa88a04 [https://dl-cdn.alpinelinux.org/alpine/v3.20/community]
OK: 24165 distinct packages available
Notably, the apk update is now fetching the community package indexes as indicated by the second output line.
5. Installting OpenJDK 8 Using apk add
After we’ve enabled the community repository in our Alpine Linux, we can proceed to install the openjdk8. To do that, we can run the apk add command:
$ apk add openjdk8
(1/49) Installing libexpat (2.6.2-r0)
(2/49) Installing brotli-libs (1.1.0-r2)
(3/49) Installing libbz2 (1.0.8-r6)
...
Executing busybox-1.36.1-r29.trigger
Executing ca-certificates-20240705-r0.trigger
OK: 123 MiB in 63 packages
Once the installation completes, we can verify the installation using the command java -version:
$ java -version
openjdk version "1.8.0_402"
OpenJDK Runtime Environment (IcedTea 3.30.0) (Alpine 8.402.06-r0)
OpenJDK 64-Bit Server VM (build 25.402-b06, mixed mode)
When the command executes without any error, our installation is completed successfully.
6. Conclusion
In this tutorial, we learned that Alpine Linux group packages into two repositories: main and community. Then, we’ve seen how some Alpine Linux installations disable the community repository by default.
Subsequently, we’ve demonstrated how to enable the community package by uncommenting the line in the /etc/apk/repositories file. Finally, we installed the openjdk8 package to set up the Java environment in our Alpine Linux.