

Learn through the super-clean Baeldung Pro experience:
>> Membership and Baeldung Pro.
No ads, dark-mode and 6 months free of IntelliJ Idea Ultimate to start with.
Learn through the super-clean Baeldung Pro experience:
>> Membership and Baeldung Pro.
No ads, dark-mode and 6 months free of IntelliJ Idea Ultimate to start with.
In this quick tutorial, we’ll look at how to handle multidimensional arrays with the Kotlin language. We’ll start with a short introduction to the Array Kotlin data type, then we’ll talk about multidimensional Arrays, how to create them and how to access their values.
Arrays in Kotlin are part of the basic type handled by built-in classes representing a collection of similar items. In this tutorial, we’ll use the generic Array<T> Kotlin class because it’s the class we need to create arrays with more than one dimension.
It is possible to allocate a unidimensional array using the constructor provided by the Array Generic Class, which “creates a new array with the specified [size], where each element is calculated by calling the specified [init] function”:
public class Array<T> {
   //...
   public inline constructor(size: Int, init: (Int) -> T)
}
The T in angular brackets is called a “type parameter” and makes this class generic. This allows us to use the Array with any class we like. As an example, let’s create an Array with ten elements of a just-defined Pixel data class:
data class Pixel(val red: Int, val green: Int, val blue: Int)

val pixelArray: Array<Pixel> = Array(10) { Pixel(
   (0..255).random(),
   (0..255).random(),
   (0..255).random())
}
To access the value of the PixelArray at a specific location, we can either use the getter and setter functions or the C-like square bracket overloaded function. Let’s loop through the array and print the value of his objects:
for(i in 0..9){
    print(pixelArray[i]) // this will print "Pixel(red=..., green=..., blue=...)"
    Assertions.assertThat((pixelArray[i].red in 0..255))
    Assertions.assertThat((pixelArray[i].blue in 0..255))
    Assertions.assertThat((pixelArray[i].green in 0..255))
}
The combination of red, green, and blue, from 0 to 255, gives the origin to 16 million colors. To better understand Multidimensional Arrays, Let’s imagine the just created array like a random colored row:
To create an Array with more than one dimension, we have to take advantage of the generic type parameter using another Array.
As an example, let’s now create a Matrix (two-dimensional array) of Pixels:
val matrix: Array<Array<Pixel>> = Array(10) {
Array(10) {
Pixel(
(0..255).random(),
(0..255).random(),
(0..255).random()
)
}
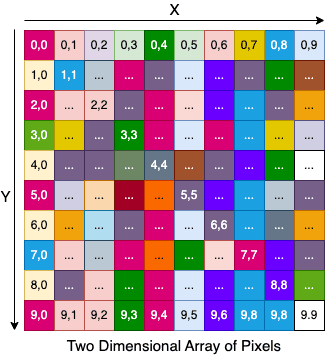
}This matrix will be composed of 10 x 10 Pixels of different colors. We could also call this peculiar structure an “Image”. Let’s now print the value of the single pixels:
for (i in 0..9) {
    for (j in 0..9) {
        print(matrix[i][j]) // this will print "Pixel(red=..., green=..., blue=...)"
        Assertions.assertThat((matrix[i][j].red in 0..255))
        Assertions.assertThat((matrix[i][j].blue in 0..255))
        Assertions.assertThat((matrix[i][j].green in 0..255))
    }
    println()
}
It’s possible to access the single element of the matrix by specifying both the coordinates of the two dimensions X and Y. Let’s now see a visual representation of the just created data structure:
Adding another dimension to an Array is as easy as replacing the inner parametrizable class of the Array again with another Array. To access a specific value, we should now give three specific coordinates for X (i), Y (j), and Z(k):
val video: Array<Array<Array<Pixel>>> = Array(10) {
    Array(10) {
        Array(10) {
            Pixel(
                (0..255).random(),
                (0..255).random(),
                (0..255).random()
            )
        }
    }
}
for (i in 0..9) {
    for (j in 0..9) {
        for(k in 0..9) {
            print(video[i][j][k]) // this will print "Pixel(red=..., green=..., blue=...)"
            Assertions.assertThat((video[i][j][k].red in 0..255))
            Assertions.assertThat((video[i][j][k].blue in 0..255))
            Assertions.assertThat((video[i][j][k].green in 0..255))
        }
        println()
    }
    println("---")
}
We can imagine this data structure as a 10(X) * 10(Y) image that evolves over time (Z).
In case we have to handle a multidimensional array of Kotlin basic types, we can rely on various primitive library functions and additional Classes. In fact, Kotlin defines additional classes as IntArray, BooleanArray, LongArray, etc., together with library functions to instantiate those types.
As an example, let’s see how it’s possible to define a simple two-dimensional array of integers using the “arrayOf” and the “intArrayOf” method:
val first: Array<IntArray> = arrayOf(
    intArrayOf(2, 4, 6), // we can also use shortArrayOf or doubleArrayOf...
    intArrayOf(1, 3, 5)
)
Finally, using arrayOfNulls is possible to initialize an array with null values. With this method is thus possible to initialize each row with a different array size:
val arrayNulls = arrayOfNulls<Array<Int>>(2)
arrayNulls[0] = Array(3) { 0 }
arrayNulls[1] = Array(2) { 1 }
This snippet will produce a bi-dimensional array with two rows: the first row containing three elements with a value of 0 and the second containing two elements with a value of 1.
Multik is the official Kotlin library with several features to work with Multidimensional arrays in a extremely convenient way. In order to use it and start experimenting, we need to include the library in our dependencies. With Gradle it’s enough to import the following libraries:
implementation "org.jetbrains.kotlinx:multik-core:0.2.2"
implementation "org.jetbrains.kotlinx:multik-default:0.2.2"
With Maven instead we also need to import additional libraries that are not automatically included as transitive dependencies:
<dependency>
   <artifactId>multik-core</artifactId>
   <groupId>org.jetbrains.kotlinx</groupId>
   <version>0.2.2</version>
</dependency>
<dependency>
   <artifactId>multik-core-jvm</artifactId>
   <groupId>org.jetbrains.kotlinx</groupId>
   <version>0.2.2</version>
</dependency>
<dependency>
   <artifactId>multik-default</artifactId>
   <groupId>org.jetbrains.kotlinx</groupId>
   <version>0.2.2</version>
</dependency>
   <dependency>
   <artifactId>multik-default-jvm</artifactId>
   <groupId>org.jetbrains.kotlinx</groupId>
   <version>0.2.2</version>
</dependency>val matrix = mk.ndarray(mk[mk[1.0,2.0], mk[3.0,4.0]])val identity = mk.identity<Double>(2)
val sum = matrix + identity
Assertions.assertThat(sum[0, 0] == 2.0)
Assertions.assertThat(sum[0, 1] == 2.0)
Assertions.assertThat(sum[1, 0] == 3.0)
Assertions.assertThat(sum[1, 1] == 5.0)val times = matrix * identity
Assertions.assertThat(matrix == times)In this tutorial, we have seen the difference between a single-dimension array and a multiple-dimension array with the Kotlin programming language. In the last part of the article, we have also seen how we can rely on the library function to instantiate a multidimensional array with a few lines of code.