Learn through the super-clean Baeldung Pro experience:
>> Membership and Baeldung Pro.
No ads, dark-mode and 6 months free of IntelliJ Idea Ultimate to start with.
Learn through the super-clean Baeldung Pro experience:
>> Membership and Baeldung Pro.
No ads, dark-mode and 6 months free of IntelliJ Idea Ultimate to start with.
When using Docker extensively, the management of several different containers quickly becomes cumbersome.
Docker Compose is a tool that helps us overcome this problem and easily handle multiple containers at once.
In this tutorial, we’ll examine its main features and powerful mechanisms.
In short, Docker Compose works by applying many rules declared within a single docker-compose.yml configuration file.
These YAML rules, both human-readable and machine-optimized, provide an effective way to snapshot the whole project from ten-thousand feet in a few lines.
Almost every rule replaces a specific Docker command, so that in the end, we just need to run:
docker-compose upWe can get dozens of configurations applied by Compose under the hood. This will save us the hassle of scripting them with Bash or something else.
In this file, we need to specify the version of the Compose file format, at least one service, and optionally volumes and networks:
version: "3.7"
services:
  ...
volumes:
  ...
networks:
  ...
Let’s see what these elements actually are.
First of all, services refer to the containers’ configuration.
For example, let’s take a dockerized web application consisting of a front end, a back end, and a database. We’d likely split these components into three images, and define them as three different services in the configuration:
services:
  frontend:
    image: my-vue-app
    ...
  backend:
    image: my-springboot-app
    ...
  db:
    image: postgres
    ...
There are multiple settings that we can apply to services, and we’ll explore them in more detail later on.
Volumes, on the other hand, are physical areas of disk space shared between the host and a container, or even between containers. In other words, a volume is a shared directory in the host, visible from some or all containers.
Similarly, networks define the communication rules between containers, and between a container and the host. Common network zones will make the containers’ services discoverable by each other, while private zones will segregate them in virtual sandboxes.
Again, we’ll learn more about them in the next section.
Now let’s begin to inspect the main settings of a service.
Sometimes, the image we need for our service has already been published (by us or by others) in Docker Hub, or another Docker Registry.
If that’s the case, then we refer to it with the image attribute by specifying the image name and tag:
services:
  my-service:
    image: ubuntu:latest
    ...
Alternatively, we might need to build an image from the source code by reading its Dockerfile.
This time, we’ll use the build keyword, passing the path to the Dockerfile as the value:
services:
  my-custom-app:
    build: /path/to/dockerfile/
    ...
We can also use a URL instead of a path:
services:
  my-custom-app:
    build: https://github.com/my-company/my-project.git
    ...
Additionally, we can specify an image name in conjunction with the build attribute, which will name the image once created, making it available for use by other services:
services:
  my-custom-app:
    build: https://github.com/my-company/my-project.git
    image: my-project-image
    ...
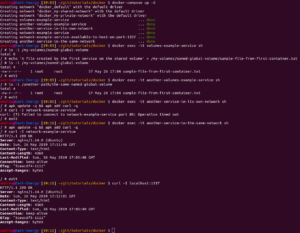
Docker containers communicate between themselves in networks created, implicitly or through configuration, by Docker Compose. A service can communicate with another service on the same network by simply referencing it by the container name and port (for example network-example-service:80), provided that we’ve made the port accessible through the expose keyword:
services:
  network-example-service:
    image: karthequian/helloworld:latest
    expose:
      - "80"
In this case, it would also work without exposing it because the expose directive is already in the image Dockerfile.
To reach a container from the host, the ports must be exposed declaratively through the ports keyword, which also allows us to choose if we’re exposing the port differently in the host:
services:
  network-example-service:
    image: karthequian/helloworld:latest
    ports:
      - "80:80"
    ...
  my-custom-app:
    image: myapp:latest
    ports:
      - "8080:3000"
    ...
  my-custom-app-replica:
    image: myapp:latest
    ports:
      - "8081:3000"
    ...
Port 80 will now be visible from the host, while port 3000 of the other two containers will be available on ports 8080 and 8081 in the host. This powerful mechanism allows us to run different containers exposing the same ports without collisions.
Finally, we can define additional virtual networks to segregate our containers:
services:
  network-example-service:
    image: karthequian/helloworld:latest
    networks:
      - my-shared-network
    ...
  another-service-in-the-same-network:
    image: alpine:latest
    networks:
      - my-shared-network
    ...
  another-service-in-its-own-network:
    image: alpine:latest
    networks:
      - my-private-network
    ...
networks:
  my-shared-network: {}
  my-private-network: {}
In this last example, we can see that another-service-in-the-same-network will be able to ping and reach port 80 of network-example-service, while another-service-in-its-own-network won’t.
There are three types of volumes: anonymous, named, and host.
Docker manages both anonymous and named volumes, automatically mounting them in self-generated directories in the host. While anonymous volumes were useful with older versions of Docker (pre 1.9), named ones are now the suggested way to go. Host volumes also allow us to specify an existing folder in the host.
We can configure host volumes at the service level, and named volumes in the outer level of the configuration, in order to make the latter visible to other containers, rather than only to the one they belong:
services:
  volumes-example-service:
    image: alpine:latest
    volumes:
      - my-named-global-volume:/my-volumes/named-global-volume
      - /tmp:/my-volumes/host-volume
      - /home:/my-volumes/readonly-host-volume:ro
    ...
  another-volumes-example-service:
    image: alpine:latest
    volumes:
      - my-named-global-volume:/another-path/the-same-named-global-volume
    ...
volumes:
  my-named-global-volume:
Here, both containers will have read/write access to the my-named-global-volume shared folder, regardless of which path they’ve mapped it to. Instead, the two host volumes will be available only to volumes-example-service.
The /tmp folder of the host’s file system is mapped to the /my-volumes/host-volume folder of the container. This portion of the file system is writeable, which means that the container can read and also write (and delete) files in the host machine.
We can mount a volume in read-only mode by appending :ro to the rule, like for the /home folder (we don’t want a Docker container erasing our users by mistake).
Often, we need to create a dependency chain between our services so that some services get loaded before (and unloaded after) other ones. We can achieve this result through the depends_on keyword:
services:
  kafka:
    image: wurstmeister/kafka:2.11-0.11.0.3
    depends_on:
      - zookeeper
    ...
  zookeeper:
    image: wurstmeister/zookeeper
    ...
We should be aware, however, that Compose won’t wait for the zookeeper service to finish loading before starting the kafka service; it’ll simply wait for it to start. If we need a service to be fully loaded before starting another service, we need to get deeper control of the startup and shutdown order in Compose.
Working with environment variables is easy in Compose. We can define static environment variables, as well as dynamic variables, with the ${} notation:
services:
  database:
    image: "postgres:${POSTGRES_VERSION}"
    environment:
      DB: mydb
      USER: "${USER}"
There are different methods to provide these values to Compose.
One method is setting them in a .env file in the same directory, structured like a .properties file, key=value:
POSTGRES_VERSION=alpine
USER=foo
We can also set them in the OS before calling the command:
export POSTGRES_VERSION=alpine
export USER=foo
docker-compose up
Finally, we might find it easy to use a simple one-liner in the shell:
POSTGRES_VERSION=alpine USER=foo docker-compose up
Furthermore, we can also set default values for the environment variables. We can use the :- syntax in the docker-compose file to set a default value for the environment variable:
environment:
  DB: mydb
  USER: "${USER:-admin}"
In this example, the USER environment variable will default to admin if the USER is either unset or empty. However, if we want to allow an empty value to be passed if the environment variable is set but empty, we can use the following syntax:
environment:
  DB: mydb
  USER: "${USER-admin}"
Notice that in this case, there is no : symbol. As a result, if the USER variable is set but is empty, Docker Compose will use the empty value rather than the default.
The rules for determining which value is used when the settings are specified in sources are beyond the scope of this article. They can be found on the Docker website.
In older Compose versions, we were allowed to scale the instances of a container through the docker-compose scale command. Newer versions deprecated it, and replaced it with the ––scale option.
We can exploit Docker Swarm, a cluster of Docker Engines, and autoscale our containers declaratively through the replicas attribute of the deploy section:
services:
  worker:
    image: dockersamples/examplevotingapp_worker
    networks:
      - frontend
      - backend
    deploy:
      mode: replicated
      replicas: 6
      resources:
        limits:
          cpus: '0.50'
          memory: 50M
        reservations:
          cpus: '0.25'
          memory: 20M
      ...
Under deploy, we can also specify many other options, like the resources thresholds. Compose, however, considers the whole deploy section only when deploying to Swarm, and ignores it otherwise.
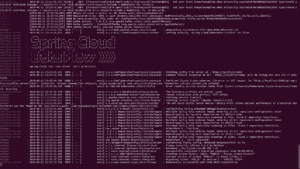
While small experiments help us understand the single gears, seeing the real-world code in action will definitely unveil the big picture.
Spring Cloud Data Flow is a complex project, but simple enough to be understandable. Let’s download its YAML file and run:
DATAFLOW_VERSION=2.1.0.RELEASE SKIPPER_VERSION=2.0.2.RELEASE docker-compose up
Compose will download, configure, and start every component, and then intersect the container’s logs into a single flow in the current terminal.
It’ll also apply unique colors to each one of them for a great user experience:
We might get the following error running a brand new Docker Compose installation:
lookup registry-1.docker.io: no such hostWhile there are different solutions to this common pitfall, using 8.8.8.8 as DNS is probably the simplest.
Now let’s take a closer look at the syntax of Docker Compose:
docker-compose [-f <arg>...] [options] [COMMAND] [ARGS...]
While there are many options and commands available, we need to at least know the ones to activate and deactivate the whole system correctly.
We’ve seen that we can create and start the containers, the networks, and the volumes defined in the configuration with up:
docker-compose upAfter the first time, however, we can simply use start to start the services:
docker-compose startIf our file has a different name than the default one (docker-compose.yml), we can exploit the -f and ––file flags to specify an alternate file name:
docker-compose -f custom-compose-file.yml startCompose can also run in the background as a daemon when launched with the -d option:
docker-compose up -dTo safely stop the active services, we can use stop, which will preserve containers, volumes, and networks, along with every modification made to them:
docker-compose stopTo reset the status of our project, we can simply run down, which will destroy everything with the exception of external volumes:
docker-compose downIn this article, we learned about Docker Compose and how it works.
As usual, we can find the source docker-compose.yml file on GitHub, along with a helpful battery of tests immediately available in the following image: