Yes, we're now running our only Summer Sale. All Courses are 30% off until 20th July, 2026:
Verification of SSL Certificates
Last updated: June 17, 2023

Learn through the super-clean Baeldung Pro experience:
>> Membership and Baeldung Pro.
No ads, dark-mode and 6 months free of IntelliJ Idea Ultimate to start with.
1. Overview
In this tutorial, we’ll study SSL certificate verification. In brief, we verify a public key certificate by checking its authenticity. Authenticity here means that all pieces of information included in the certificate are valid.
We’ll first explain the use of asymmetric cryptography for encryption and signatures. Then, we’ll justify the need for public key certificates. This will finally lead us to the role of SSL certificates and the process of verifying them.
2. Asymmetric Cryptography
In asymmetric cryptography, a network user has two keys: a private key and a public one. So, user  has a public key
  , which is known to all other users. Also, has a private key
  which is known only to . One of the possible uses of such a setup is encryption and decryption.
2.1. Asymmetric Encryption and Decryption
Let’s assume that our friend Alice (also known as ) would like to send a secret message  to her friend Bob (
 ). If she sends the message over a communication channel, an intruder (
 ) listening to the channel would thus be able to read it. Alice, therefore, encrypts using ‘s public key to obtain a cipher text
  . Now, intruder cannot read , even if he intercepted
  . Thus, to decrypt and reveal , Bob has to use his private key.
In such a way, asymmetric cryptography enables anyone to send encrypted messages to Bob since  is publicly known. However, only Bob can decrypt the message sent since he’s the only one who knows
  . Moreover, we can use public/private key pairs for digital signatures.
2.2. Signatures and Verification
In the current scenario, our friend Alice would like to buy a car. She goes to Bob, who is a car dealer. Alice chooses a car, thus writing and signing a check to pay Bob. Bob will therefore present the check to the bank to cash it. Of course, the bank will need to analyze whether the check is authentic. To do so, employees at the bank will thus perform two verification steps:
- They need to make sure that it was actually Alice who signed the check
- They need to verify that the check was not modified in any way after Alice signed it
In other words, they need to evaluate the origin and integrity of the check.
We’re now talking in terms of paper checks. But what if we wanted to digitalize this process? Let’s talk about digital signatures!
2.3. Digital Signatures
Similar in purpose to handwritten signatures, digital signatures are meant to prove the origin and integrity of digital documents. A digital signature scheme considers two different algorithms: a signing algorithm and a signature verification algorithm. In this case, Alice uses the signing algorithm to sign a message . She then sends to the bank with instructions to transfer a certain amount to the car dealer’s account.
In addition to , the signing algorithm needs Alice’s private key as input. With these inputs, the algorithm produces Alice’s signature over :  . Thus, due to the use of a private key, we are confident that no one else can produce the same signature over .
Alice then sends the message and to the bank. Of course, the bank needs to inspect if the message is authentic. In other words, it needs to confirm that Alice really produced the signature and that no one modified . This process is the role of the signature verification algorithm.
2.4. Verification of Digital Signatures
The verification algorithm at the bank receives Alice’s public key , a message  , and a signature
  over message . It then gives a yes or no answer:
![\[ \text{verify}(K_A, m^\prime, \text{sgn}_X(m)) = \left\{ \begin{array}{ll} \text{Yes} & \text{if}~ X = A ~\text{and}~ m = m^\prime\\ \text{No} & \text{otherwise} \end{array} \right. \]](/wp-content/ql-cache/quicklatex.com-3bed355663a850a69d3e7a6f7fb958e2_l3.svg "Rendered by QuickLaTeX.com")
Let’s clarify some points here. First, when the bank receives a message, it assumes an intruder may have modified the message during transmission. This scenario justifies why we write the message as instead of . Second, the bank makes no assumptions about who produced the signature. This is why we write  for the signer.
So, the bank needs to obtain Alice’s public key in order to be able to run the verification algorithm. But how does the bank finds this key? Let’s see in the following section.
3. Public Key Certificates
In asymmetric cryptography, we need to publish public keys. We also need to know the owner of each public key. A certificate ties the value of a public key to the identity of its owner. In such a way, we can use this key to encrypt messages sent to the key’s owner. We can also use the key to verify its owner’s signatures.
3.1. Generating Keys
Users generate public/private key pairs using an algorithm, for instance, the RSA algorithm.
A user keeps his private key secret and never shares it with anyone. On the other hand, the user needs to share his public key along with their identity.
For example, Alice needs to publish the information  in some directory server, such as a server using the Lightweight Directory Access Protocol (LDAP).
Then, when other users would like to find the value of Alice’s key, they can search this directory using Alice’s identity . So, the directory service returns the data structure .
There is some inherent risk in this system, though: what if some intruder could attack the directory and replace Alice’s key with his own ( )? If so, this directory will contain
  .
.
Now users will send messages to Alice encrypted by , and will be able to decrypt them. Moreover, can now sign documents using  while pretending to be Alice.
In this way, any user receiving these signatures will verify them (successfully) using , and therefore will be able to fool other users.
It’s in this scenario that public key certificates come into play!
3.2. Issuing Public Key Certificates
A Certification Authority ( ) issues public key certificates to prevent the attack described in the last subsection.
User ‘s certificate contains the information:  . In this case, a user searching for ‘s public key and receiving the certificate can verify it:
![\[ \text{verify}(K_{\text{CA}}, (A, K_A), \text{sgn}_{\text{CA}}(A, K_A)) \]](/wp-content/ql-cache/quicklatex.com-b5ba30bffc7e10f934967e4e66faded6_l3.svg "Rendered by QuickLaTeX.com")
The verification will be successful only if no one modified the certificate information. To understand this, consider the previous attack. The intruder that tries to impersonate may be able to change the certificate information to be  .
.
We note that the intruder cannot generate ‘s signature over the forged information. This is because doesn’t know ‘s private key. Consequently, the verification will fail, and any user receiving the certificate will reject it.
Let’s dig a little deeper into the certificate verification process now.
3.3. Verifying Public Key Certificates
Users verify a public key certificate by verifying the ‘s signature included in the certificate. However, in order to do that, users need ‘s public key. This key is included in a certificate that has the following content:
![\[ \langle \text{CA}, K_{\text{CA}}, \text{sgn}_{\text{CA}}(\text{CA}, K_{\text{CA}})\rangle \]](/wp-content/ql-cache/quicklatex.com-17c0365f18daff4c1bb00f81248d5fd3_l3.svg "Rendered by QuickLaTeX.com")
In other words, this is a certificate that the issues for itself and signs its contents. It is thus called a self-signed or root certificate.
Self-signed certificates can be easily forged. It occurs because the key needed to verify the certificate is included in the certificate itself. So, let’s imagine that a user sent a root certificate over a public channel. An intruder can replace it with:
![\[ \langle \text{CA}, K_{I}, \text{sgn}_{I}(\text{CA}, K_{I})\rangle \]](/wp-content/ql-cache/quicklatex.com-84f1fdf96931bd7527cb452962796cab_l3.svg "Rendered by QuickLaTeX.com")
In this case, replaces the ‘s signature. The verification will be successful since also replaces the ‘s public key with its own key . This is why we never send root certificates over public channels. Instead, they’re pre-installed in software such as operating systems and web browsers.
3.4. Practical Considerations
There are some practical considerations when we’re developing a system for public key certificates:
- What information to include about the certificate’s owner (also called the subject, e.g., name, email, domain name, etc.?
- Which entity should perform the role of a certification authority?
- What are the exact steps of issuing certificates to users, including ensuring the information they provide is correct?
- What is the exact format of a certificate?
We must tackle these issues when we build a system for certificates (also called a Public Key Infrastructure – PKI).
4. SSL Certificates
The Secure Sockets Layer (SSL) protocol uses certificates to create a secure link between a client and a server. For instance, a web server may use SSL to set up keys for encrypting traffic between itself and clients.
4.1. SSL Protocol
The SSL protocol starts with a handshake in which the client and server establish an encryption key. This key is used by a symmetric encryption algorithm to encrypt future traffic. During the handshake, the server sends its public key certificate to the client.
The server’s certificate, in turn, contains information such as the domain name and the server’s public key, and it’s signed by a . The public key is used to authenticate the server to the client and to establish a symmetric encryption key.
4.2. Verifying SSL Certificates
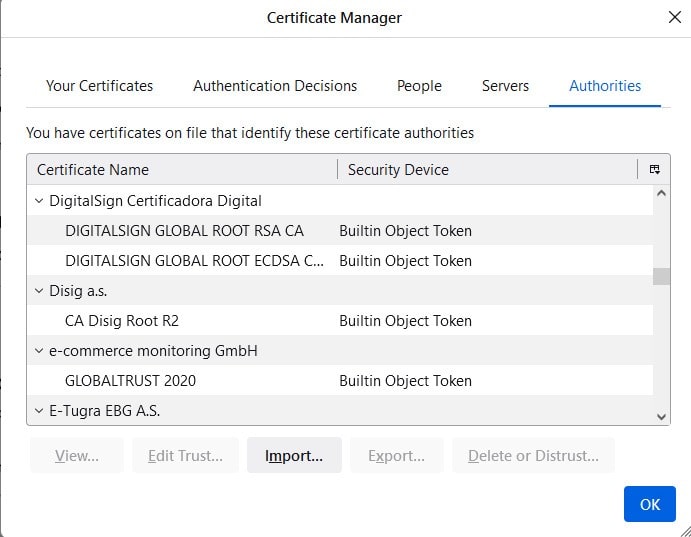
When a client receives the server’s certificate, it reads the name of the CA that issued this certificate. Then, the client searches for this CA’s public key certificate in its stored root certificates. Finally, the client uses this public key to verify the server’s certificate.
The following image shows some root certificates (CA’s certificates) stored in the Firefox browser:

5. Conclusion
In this article, we explained the role of SSL certificates and how they are issued and verified. In fact, they’re extensively used by Internet protocols to secure connections to servers. SSL certificates enable us to use services that exchange sensitive data, such as in contexts of Internet banking or e-commerce. Of course, these applications wouldn’t be possible without proper verification of certificates.