

Learn through the super-clean Baeldung Pro experience:
>> Membership and Baeldung Pro.
No ads, dark-mode and 6 months free of IntelliJ Idea Ultimate to start with.
Learn through the super-clean Baeldung Pro experience:
>> Membership and Baeldung Pro.
No ads, dark-mode and 6 months free of IntelliJ Idea Ultimate to start with.
Scala Macros are an experimental feature introduced in Scala 2.10.0. They enable us to utilize the compiler’s Abstract Syntax Tree API to implement compile-time reflection. This, in its turn, allows our programs to modify themselves or generate new code during compilation time. Many Scala libraries, such as Play and Slick use Scala Macros. In this tutorial, we’ll see in-depth what they do and how to implement them.
The compilation process has 25 phases that our code goes through. The first one is the parser phase in which the compiler generates an Abstract Syntax Tree.
The Abstract Syntax Tree is a data structure that represents our source code in a tree structure. As its name implies, the syntax is abstract, meaning that not all the details of the code syntax are present, but the structure is detailed: 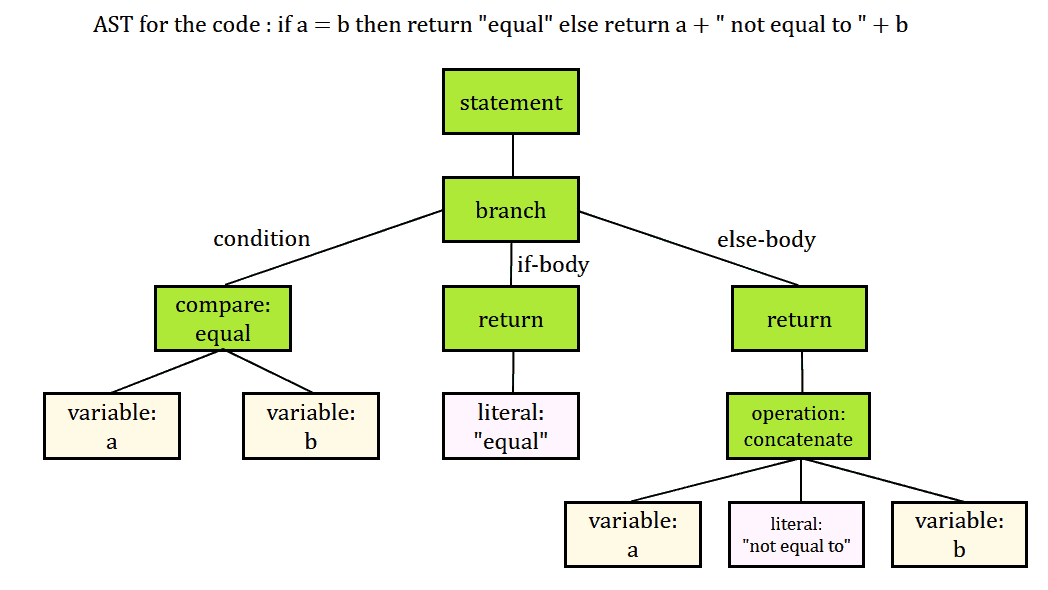 In the example above, we can see how to represent a simple if-else statement as an Abstract Syntax Tree. Each statement is a different node in the tree. For example, the if statement condition is a different branch that also branches out to the comparison operator which, in turn, branches out to the variables to compare.
Similarly, the if block itself is a different branch that contains a node for the return statement and the actual literal to return.
Finally, the else statement is yet another branch that has a node for the return statement and the operator, which again branches out to three nodes for the variables and the literal string to concatenate.
Defining macros is pretty straightforward. However, there are many ways to do it and the implementation itself may become way complex, depending on our needs. The only thing we need to do in order to start defining macros is to add the following import statements in our file:
import scala.language.experimental.macros
import scala.reflect.macros.blackbox
The first import allows us to define macros within the file, while the second imports a macro context.
A macro context is a wrapper of a compiler universe. As stated in the documentation, “a universe provides a complete set of reflection operations which make it possible for one to reflectively inspect Scala type relations, such as membership or subtyping”.
There are two types of contexts in Scala, blackbox and whitebox. We use whitebox context to refine the return type of a macro to something more specific, sacrificing readability. We use the blackbox context for more simple macros that actually handle a macro definition as a black box where only input and output are known.
In this article, we’ll only use the blackbox context, as our macros are pretty simple.
Def Macros is the simplest way to define a macro. We’ll start by defining a macro that accepts a number and returns a String informing us if the number is odd or even:
def defOddEvenMacro(number: Int): String = macro defMacroImplRefThe macro keyword lets the compiler know that this is a Scala macro. The compiler then knows to expand the definition to the corresponding implementation with the AST of the arguments.
So now we have to actually implement our macro:
def defMacroImplRef(
  c: blackbox.Context
)(number: c.Expr[Int]): c.Expr[String] = {
  import c.universe._

  val Literal(Constant(s_number: Int)) = number.tree

  val result = s_number % 2 match {
    case 0 => Literal(Constant("even"))
    case _ => Literal(Constant("odd"))
  }

  c.Expr[String](result)

}
We are currently dealing with ASTs, so the syntax isn’t the one we are used to in simple programming. Let’s understand the above implementation.
The macro implementation needs a universe context, which we already have in scope, by importing blackbox. This is always the first argument. The second argument(s) is the one defined in the macro definition. The definition expects an argument of type Int, while the implementation expects type c.Expr[Int]. Expr is actually a wrapper class defined within the context that wraps an AST.
In our example, our AST is of type Int and the return type is of type String. It’s worth noting that the name and the types have to match up in order to compile our macro.
In the above implementation, we first import everything from c.universe. We do this to have all the functions and types of the compiler’s API exposed by the universe in scope.
After that, we want to get the actual value of our Int argument, which is in AST form. The Expr type contains the tree variable, which is the actual AST of the argument. The AST contains a Literal, which means that the compiler computes the value within, and within the Literal there is a Constant, holding the actual value passed.
Using pattern matching, we expose the value to the s_number variable. Then, we evaluate if the number is odd or even, using simple Scala syntax. We wrap our result in a Constant and a Literal, and then return it within an Expr wrapper.
reify is a function of the universe that helps us create ASTs in an easier and more readable way. Let’s create a macro for an odd/even check using reify:
def defOddEvenMacroReify(number: Int): String = macro defMacroImplReifyRef

def defMacroImplReifyRef(
  c: blackbox.Context
)(number: c.Expr[Int]): c.Expr[String] = {
  import c.universe._

  reify {
    number.splice % 2 match {
      case 0 => "even"
      case _ => "odd"
    }
  }

}
reify takes an expression of type T and wraps it within an Expr. This way, we only have to worry about the code and not the AST specifics. We didn’t have to use pattern matching on this type to extract the value of the actual argument. We simply used the slice function of the Expr class.
Slice is a function that can be only used within a reify block and returns the actual value of the argument.
Scala macros are actually nothing more than function definitions expanded at compile-time. This limitation makes the modularization of complex macros difficult and doesn’t allow us to easily pass parameters through different macros, since they are path-dependent on the context.
Macro bundles allow us to declare macros within classes and overcome those limitations.
Macro bundles accept an argument of type Context, blackbox or whitebox in their constructor, thus making it unnecessary in the actual macro implementation.
For example, here’s a simple bundle definition:
class Bundle(val c: blackbox.Context) {
  import c.universe._
}Quasinotes are another way to manipulate ASTs within macro implementations, using string interpolation. We can wrap a string within the q interpolator and it’ll be translated into a Tree expression.
Let’s see this by defining our macro again. For this example, we’ll use the previously defined bundle:
class Bundle(val c: blackbox.Context) {
  import c.universe._

  def macroBundleImpRef(number: c.Expr[Int]): Tree =
    q"""
         $number % 2 match {
           case 0 => "even"
           case _ => "odd"
         }"""
}
We can pass parameters within the quasinote exactly the same way we do it in string interpolation, by using the $ symbol. The compiler then translates this whole string to a Tree type.
We should remember that the Expr class type that we used in all other examples is a wrapper for the same type.
Like with normal functions, macros can also be generic. We’ll see this by defining a generic macro that accepts an argument and returns its type as String:
def getType[T](obj: T): String = macro getTypeImplRef[T]

def getTypeImplRef[T: c.WeakTypeTag](
  c: blackbox.Context
)(obj: c.Expr[T]): c.universe.Tree = {
  import c.universe._

  val x = c.weakTypeTag[T].tpe.toString

  q"$x"
}
In the macro definition, the generic type T comes with WeakTypeTag context bounds that carry all the necessary information regarding the class from compile time to run time. We use WeakTypeTag and not TypeTag to allow references to parameters or abstract classes.
After that, the rest of the implementation is quite simple. The tpe variable contains the type of type T, which we then cast to String and return it using a quasinote. We completely ignore the actual argument value because it’s irrelevant to this example.
Since macros are expanded within the compiler, in order to debug them, we need to run the compiler under a debugger. Although this sounds difficult, it’s actually pretty simple.
First, we need to add all the libraries from the lib directory in our Scala home directory to the classpath of our debug configuration.
Then, we’ll set the scala.tools.nsc.Main as our main class. This is actually the compiler’s main class.
To be able to find this class, we also need to add the following dependency to our build.sbt:
libraryDependencies += "org.scala-lang" % "scala-compiler" % scalaVersion.value % "test"
We add it only as a test dependency, as this is the only way we are going to use it. Moving on, we’ll also add the -Dscala.usejavacp=true to the JVM options.
Next, we’ll pass the command line argument -cp <package and class name of our test class> <absolute path to the test class file>.scala.
After that, we can add a breakpoint inside our macro. If we use IntelliJ for debugging, the process is a little simpler, as we don’t need to add the lib libraries in our classpath. We need to select the Use classpath of module option, in Modify options.
Let’s look at a sample debug configuration: 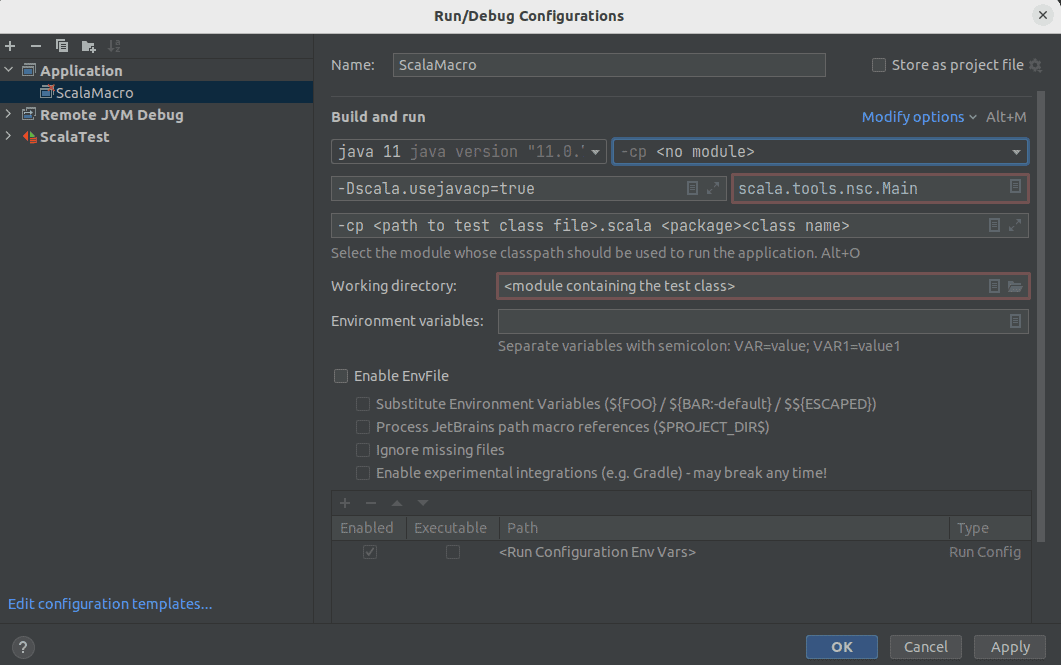
Below we modify options and set ‘Use classpath of module‘:

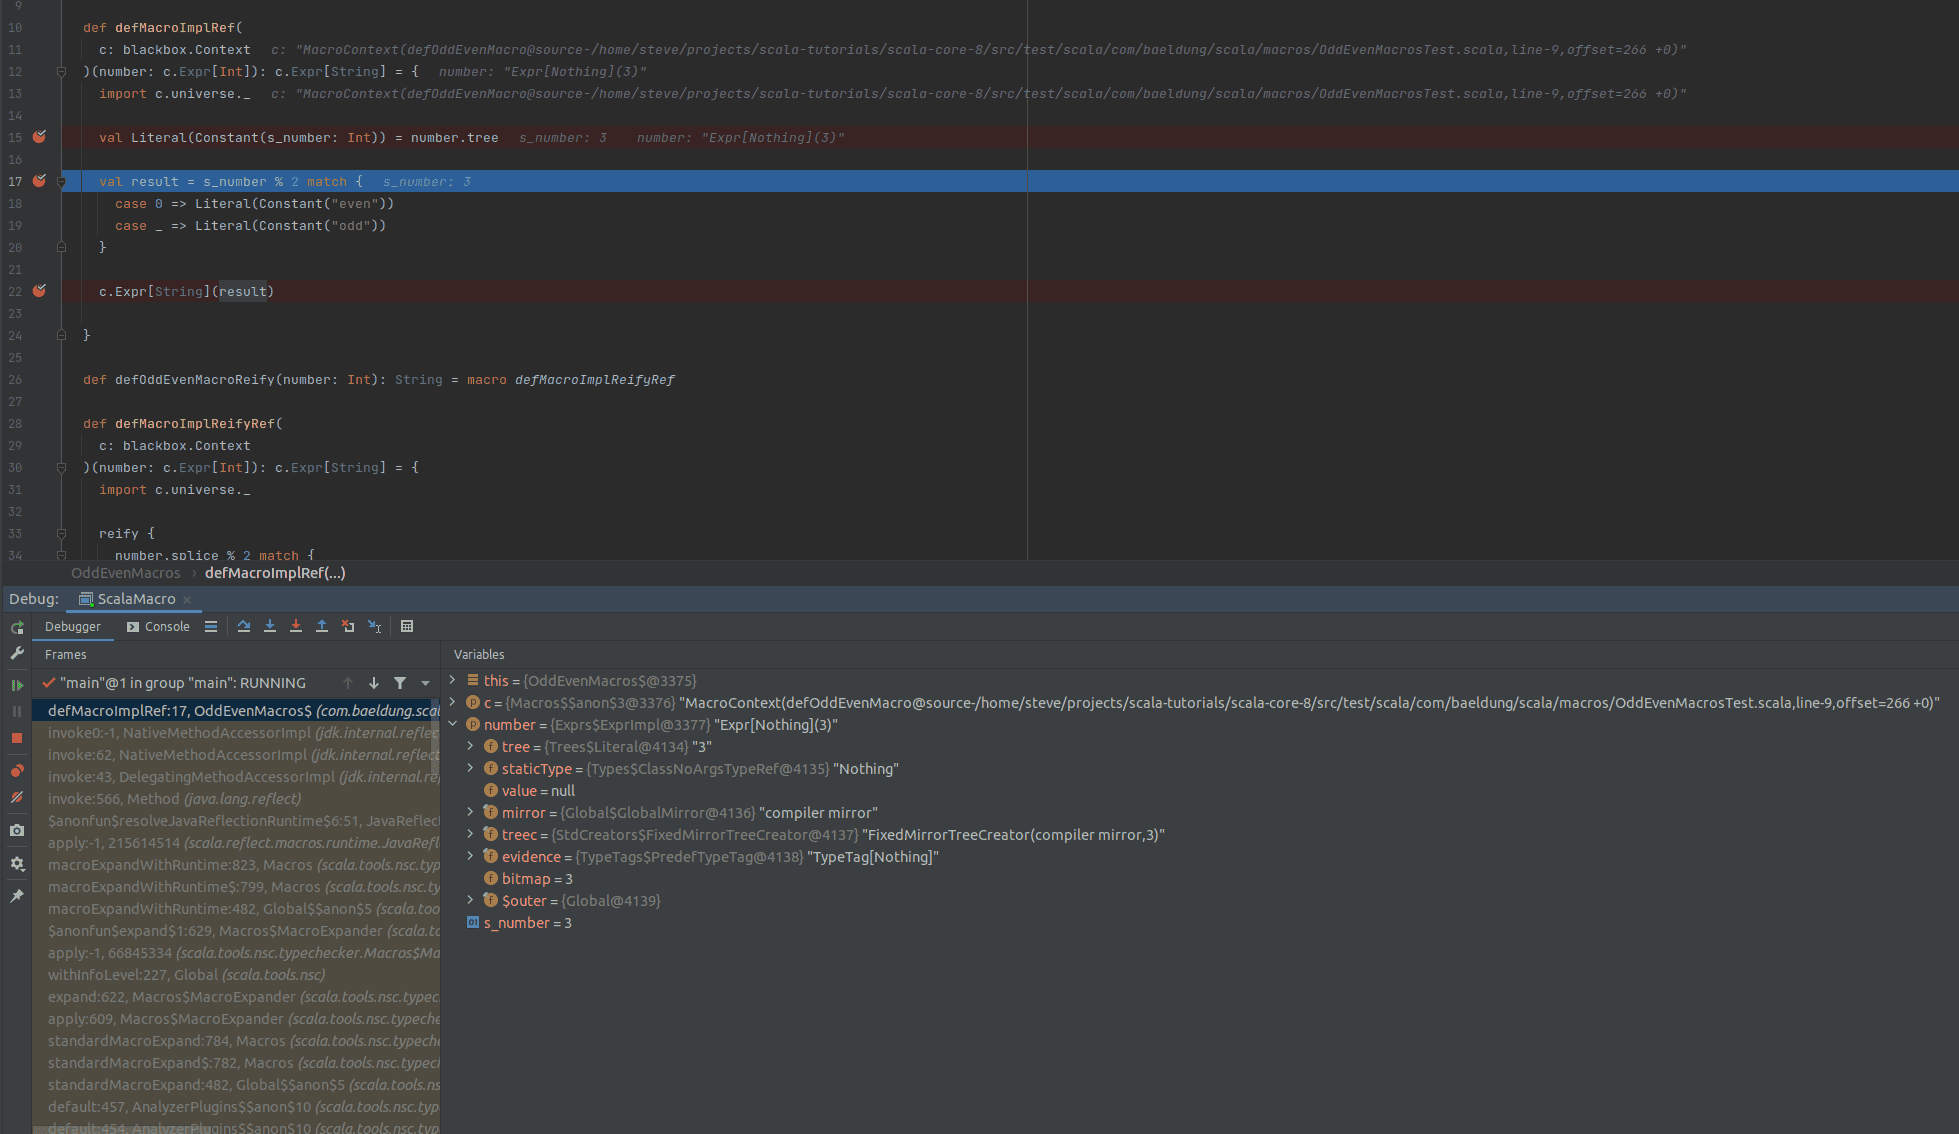
Next, we see that the debugger stops at a breakpoint within our macro:
It’s worth noticing that we can inspect the macro expansion by printing the AST in the compiler’s console during compilation. To do this, we need to add the following code line in our build.sbt:
scalacOptions += "-Ymacro-debug-lite"This prints all the macro expansions in our application.
In this article, we learned what an Abstract Syntax Tree is and how Scala macros use it. In particular, we looked at how to implement simple macros and generic ones using different approaches. Finally, we saw how to debug macros in an IDE.