

Learn through the super-clean Baeldung Pro experience:
>> Membership and Baeldung Pro.
No ads, dark-mode and 6 months free of IntelliJ Idea Ultimate to start with.
Learn through the super-clean Baeldung Pro experience:
>> Membership and Baeldung Pro.
No ads, dark-mode and 6 months free of IntelliJ Idea Ultimate to start with.
Scala is a very powerful and versatile language. It supports both object-oriented and functional programming concepts. However, one of the criticisms of Scala is that it’s not easy for newcomers owing to the complexities of the build tools. Without build tools such as SBT and Mill, writing a non-trivial beginner-friendly application is difficult.
As a result, the Scala team has introduced a new tool called Scala-CLI that makes it easy for beginners to get started and write non-trivial Scala applications. Moreover, it helps to easily manage complex issues like Scala version selection, JVM selection, packaging an application, etc.
In this tutorial, we’ll look into Scala-CLI and learn how it makes learning Scala very easy.
First, let’s install the Scala-CLI application based on the operating system. Then, let’s verify the installation:
scala-cli --versionIf the installation is correct, this should show the version of the Scala-CLI along with the default Scala version installed. We can also open a Scala REPL:
scala-cliIt’s worth noting that, unlike standard Scala installation, we don’t need to install any other tools such as JDK, SBT, and Scala Compiler to use Scala-CLI. The Scala-CLI automatically installs the required Scala versions and JDK versions to execute Scala code. It uses Coursier under the hood to manage all these required applications. As a result, the developers don’t need to worry about installing any other tools for executing a Scala program.
It’s worth noting that the applications installed by Scala-CLI don’t modify any PATH variables and aren’t directly accessible on the system.
Consequently, we can also use Coursier to manage the local environment.
Now that we have installed Scala-CLI, let’s write a simple Scala program using any text editor and save it as ScalaCliApp.scala:
object ScalaCliApp {
  @main
  def main() =
    println("Hello from Scala-CLI app!")
}
This is a very trivial Scala program using Scala 3 that prints a text to the console when executed.
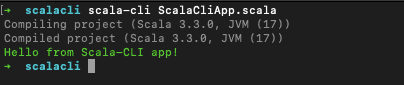
We can run this program using the command:
scala-cli ScalaCliApp.scalaOn the first execution, Scala-CLI downloads the Scala Compiler, JDK, and any other required libraries for compiling and executing this file. By default, Scala-CLI uses the latest Scala 3 version for the compilation.
We can also compile the program without executing it:
scala-cli compile ScalaCliApp.scalaSometimes, we might get some errors related to the environment and compiled metadata. In such cases, we can clean the generated metadata and class files:
scala-cli clean .This deletes the content of the hidden directory .scala-build that the Scala-CLI generates.
So far, we created the sample Scala code in a simple text editor. However, this isn’t very user-friendly since it can’t provide features such as auto-completion, suggestions, and so on, which are generally available with an IDE like IntelliJ IDEA or VS Code Metals. We can generate the necessary configuration files for using an IDE by running a command where the Scala file exists:
scala-cli ide-setup .This generates the BSP config files. Now, we can open the directory in an IDE and get all the benefits of it.
Directives are a special syntax that Scala-CLI uses to define the configuration settings. We can use directives for settings such as providing the Scala version, configuring the JDK version, managing dependencies, etc.
The directives use a special syntax that begins with //> using. The directives should be at the beginning of the file, even before the package and import statements. In this section, we’ll look into some of the popular directives.
We can fix a Scala version for a file using directives. The Scala-CLI uses the specified version of the Scala compiler to compile and run the file. Let’s look at it in action:
//> using scala "3.3.0"
object Test {
  @main
  def main() =
    println("Hello from Scala-CLI app!")
}
In the above code, we specified the exact Scala version that should be used to execute this code. We can give the value as 3. In such a case, Scala-CLI uses the latest available version of the Scala 3 compiler.
Similar to setting the Scala version, we can also use the directives to specify the JVM version to be used to run the program. For example, let’s use the Java 21:
//> using jvm 21Scala-CLI downloads the JVM 21 if it’s not already available in the environment and uses it to execute the program. By default, Scala-CLI uses the Adoptium Open JDK version of Java. We can also specify an exact JVM by providing it and the version available from the Coursier list.
For instance, we can use Zulu JVM 21:
//> using jvm zulu:21.0.1This uses version 21.0.1 of Zulu JVM for the program execution. If we use only zulu:21 instead, it uses the latest available minor version of Zulu 21 JVM.
We can use third-party libraries easily by providing the Maven coordinates using the dep directives. Let’s see how we can use the fansi library in the Scala-CLI program:
//> using dep com.lihaoyi::fansi:0.4.0
object Test {
  @main
  def main() =
    println(fansi.Color.Green("Hello from Scala-CLI app!"))
}
When we execute this, we can see that the message is printed in green color:
Now that we know the basics of Scala-CLI, let’s look at some of its advanced features.
We can create an executable package of the above program very easily using Scala-CLI. We don’t need additional plugins for creating the executable, unlike in Maven or SBT.
Let’s create an executable package for our simple program:
scala-cli --power package ScalaCliApp.scala -o appWe use the package command to create an executable. However, since this is an advanced feature, we must enable it using the flag –power. We can specify the executable app name using the -o parameter. The above command creates an executable program with the name app. When we execute it, it prints the same result as before:

However, this packages only the application code. The dependencies are downloaded when executed for the first time. We can create an app with all of its dependencies packaged together by passing the flag –assembly along with the package command:
scala-cli --power package ScalaCliApp.scala -o app --assemblyThis packages all the dependencies, making the app size a bit bigger. However, this doesn’t need to download anything when executed in a different environment.
In the previous section, we used directives to provide the Scala and JVM versions. We can override the Scala and JVM versions during the execution using the command line arguments.
To override the JVM version, we can use the flag –jvm while executing:
scala-cli --jvm 18 ScalaCliApp.scalaThis overrides the JVM version to 18 and ignores the JVM version specified using the directives. Similarly, we can override the Scala version:
scala-cli --scala 3.3.1 ScalaCliApp.scalaThis uses Scala 3.3.1 instead of the Scala version defined using the directive.
In this article, we looked into Scala-CLI and some of its powerful features. We discussed how to quickly and easily set up the environment to write Scala programs. Moreover, we also learned some advanced features of Scala CLI that make it helpful in writing even non-trivial Scala applications.