Yes, we're now running our only Summer Sale. All Courses are 30% off until 20th July, 2026:
Introduction to Alpakka
Last updated: May 23, 2025

Learn through the super-clean Baeldung Pro experience:
>> Membership and Baeldung Pro.
No ads, dark-mode and 6 months free of IntelliJ Idea Ultimate to start with.
1. Introduction
In any enterprise system, the ability to integrate with multiple systems is a crucial requirement. A large organization typically has specialized systems that need to communicate with each other, and in a microservices architecture, integration becomes even more critical.
In this tutorial, we’ll discuss Alpakka, a popular integration framework for Java and Scala.
2. About Alpakka
Alpakka is a relatively new Enterprise Integration Framework. It is implemented following the principles of Reactive Streams and built on top of Akka and Akka-Streams. Unlike most other integration frameworks, Alpakka is designed natively to support streaming and reactive programming. Since its inception, Alpakka has been able to positively impact the way integration systems are built.
3. Comparison with Camel
Apache Camel is considered the de facto framework for any integration pipelines. Camel already has support for more than 300 different systems, and many large enterprise applications are using it.
Alpakka provides an alternative for Apache Camel. Even though it’s relatively young, Alpakka has been receiving a lot of positive attention.
A few of the advantages of Alpakka over Camel are:
- Better type-safety
- Native support for streaming and back-pressure
- Better DSL for asynchronous programming
4. Example Scenario
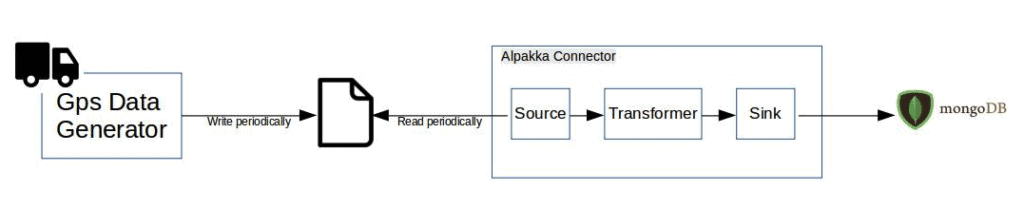
In this tutorial, we’re going to build a simple integration pipeline for processing data generated by IoT devices from vehicles.
For the sake of simplicity, let’s assume that the data generated from different IoT devices are continuously written to a flat file. But it may as well be an IoT device using the MQTT protocol or a complex Kafka system as the source.
We’ll write an Alpakka connector to read the data from the file and push it to the MongoDB database.
The diagram below shows an overview of the integration connector:
5. Building the Alpakka Connector
Now, let’s start building the Alpakka MongoDB connector.
5.1. Dependencies
To start, we’ll add the required dependencies to build.sbt:
libraryDependencies ++= Seq(
  "com.lightbend.akka" %% "akka-stream-alpakka-mongodb" % "8.0.0",
  "com.typesafe.akka" %% "akka-stream" % "2.9.3",
  "org.mongodb.scala" %% "mongo-scala-driver" % "5.2.0",
  "com.lightbend.akka" %% "akka-stream-alpakka-file" % "8.0.0"
)
5.2. Writing the Connector
Now, let’s write the connector logic. First, we need to create a database connection for MongoDB:
final val client = MongoClients.create("mongodb://localhost:27019")
final val db = client.getDatabase("vehicle-tracker")
Next, we’ll create relevant case classes and a codec registry. The MongoDB driver uses this to convert the case class to a BSON Object and vice-versa:
final case class GPSLocation(lat: Double, lng: Double)
final case class VehicleData(vehicleId: Long, location: GPSLocation)

val vehicleCodec = fromRegistries(fromProviders(classOf[VehicleData], classOf[GPSLocation]), DEFAULT_CODEC_REGISTRY)
Now, let’s create an instance of MongoCollection using the db instance:
val vehicleDataCollection: MongoCollection[VehicleData] =
  db.getCollection(classOf[VehicleData].getSimpleName, classOf[VehicleData])
    .withCodecRegistry(CodecRegistry.vehicleCodec)
We’re using a flat file as the source of data (Alpakka Source) and MongoDB as the Alpakka Sink. FileTailSource is a the Alpakka connector for reading from a file continuously.
Now, we can read the vehicle data from the flat file and push it to the MongoDB database:
val fs = FileSystems.getDefault
def init() = {
  FileTailSource.lines(
    path = fs.getPath(filePath),
    maxLineSize = 8192,
    pollingInterval = 100.millis
  ).map(s => {
    val v = s.split(",")
    VehicleData(v(0).toLong, GPSLocation(v(1).toDouble, v(2).toDouble))
  }).runWith{
    MongoSink.insertOne(vehicleCollection)
  }
}
In the above code, the FileTailSource will continuously read the data from the flat-file. The Alpakka connector will look for new changes to the file at regular time intervals that we’ve specified as pollingInterval.
maxLineSize is the maximum allowed size of the line as a ByteString. The stream will fail if the size of the line exceeds maxLineSize.
Akka Streams flow will convert this flat file data into instances of the VehicleData case class. Then, the MongoSink will take this VehicleData and insert it into MongoDB.
With only ten lines of code, we’re able to build a stream-based integration pipeline using Alpakka.
6. Other Alpakka Sources and Sinks
In the previous example, we’ve used a FileTailSource. Additionally, we can use any other sources to read data without making any changes to the Flow and the Sink.
Let’s say we want to create a simple Akka stream Source from a List:
val simpleSource = Source(List(
  "1, 70.23857, 16.239987",
  "1, 70.876, 16.188",
  "2, 17.87, 77.71443",
  "3, 55.7712, 16.9088"
))
Now, we’ll replace the FileTailSource with the above simpleSource, keeping all other code the same:
simpleSource.map(s => {...}).runWith{...}Similarly, we can use any other sources or sinks, depending on our requirements.
7. Streaming and Back-Pressure
As mentioned in the previous sections, Alpakka is designed to support streaming operations. Since Alpakka is built on top of Akka Streams, all the concepts of Akka Streams are supported. One of the most important features is back-pressure.
In our previous example, the MongoSink will send a demand request to the upstream Flow that it can accept new messages. The flow will then send the demand to its upstream, FileTailSource. This FileTailSource will then read the content from the file and push to the flow and then to the MongoSink.
If the MongoDB operation is taking more time, then the sink won’t send the demand back, which in turn reduces the speed at which the rows are read from the file. This way, large files can be processed without causing much overhead.
8. Conclusion
In this article, we looked at Alpakka and saw how we can use it to build robust integration pipelines.
The code backing this article is available on GitHub. Once you're logged in as a Baeldung Pro Member, start learning and coding on the project.