

Learn through the super-clean Baeldung Pro experience:
>> Membership and Baeldung Pro.
No ads, dark-mode and 6 months free of IntelliJ Idea Ultimate to start with.
Last updated: September 30, 2024
Learn through the super-clean Baeldung Pro experience:
>> Membership and Baeldung Pro.
No ads, dark-mode and 6 months free of IntelliJ Idea Ultimate to start with.
Podman is an open-source container management tool with a Docker-compatible command line interface for managing containers and container images. It uses Open Container Initiative (OCI) standards to ensure compatibility with other container technologies.
Most Docker commands work with Podman, making it easier for Docker users to transition. Since Podman is OCI compliant, it can work with container images stored in the Docker registry, as they both use the OCI image format. Podman can push and pull images from the Docker registry without any special configuration.
In this tutorial, we’ll learn how to push images to the Docker registry using Podman.
All commands in this tutorial have been tested on Ubuntu 22.04.
Before pushing a container image to a Docker registry, we should have Podman on the machine.
To verify the installation, we run the podman –version command in the terminal:
$ podman --version
podman version 3.4.4
If not installed, the package is available on Ubuntu (after 20.10) and Debian official repositories:
$ sudo apt-get update
$ sudo apt-get -y install podman
On the other hand, a Podman installer is recommended for Mac and Windows machines.
Additionally, possessing a Docker registry account (e.g., Docker Hub, Quay.io) is mandatory for pushing images. We use Docker Hub for this tutorial.
First, we install NodeJS on the machine. We can install it directly from the official apt repositories:
$ sudo apt install nodejsNow, we can create the application.
Initially, we create a directory named podman-node-server and navigate into it:
$ mkdir -p ~/podman-node-server
$ cd ~/podman-node-server
Next, let’s initialize npm and install the express package:
$ npm init -y
$ npm install express
Then, we create a server.js file that builds a Web server that runs on port 3000:
$ cat ~/podman-node-server/server.js
const express = require('express');
const app = express();
const port = 3000;

app.get('/', (req, res) => {
  res.send('Hello, Podman! This is Baeldung');
});

app.listen(port, () => {
  console.log(`Server running at http://localhost:${port}`);
});
Furthermore, let’s update the package.json file created by default on initialization to include a start script in the scripts section:
$ cat ~/podman-node-server/package.json
{
  "name": "podman-node-server",
  "version": "1.0.0",
  "main": "server.js",
  "scripts": {
    "test": "echo \"Error: no test specified\" && exit 1",
    "start": "node server.js"
  },
  "keywords": [],
  "author": "",
  ...
  }
}
To confirm whether the NodeJS application is functional, we can run the server locally using the npm start command:
$ npm start

> [email protected] start
> node server.js

Server running at http://localhost:3000
Using a browser, we access the server through localhost on port 3000:

Alternatively, we can use the curl command:
$ curl localhost:3000
Hello, Podman! This is Baeldung
Hence, we’ve successfully created the NodeJS application and verified its function.
Podman offers excellent compatibility with the Dockerfile mechanism, making it easier for users familiar with Docker to transition to Podman.
Podman can build images directly from a Dockerfile without any modifications. The syntax and instructions used for Dockerfiles are fully supported.
In fact, Podman uses a similar build command to Docker:
podman build -t <imagename:tag> .This command works the same way as the docker build command.
Furthermore, Podman supports a lot of Docker features:
Let’s create a Dockerfile in the project directory (~/podman-node-server) to containerize the NodeJS application:
$ cat Dockerfile
FROM node:14

WORKDIR /usr/src/app

COPY package*.json ./

RUN npm install

COPY . .

EXPOSE 3000

CMD [ "node", "server.js" ]
This Dockerfile specifies node:14 as the base image for the new Docker container. This provides us with a pre-configured environment with NodeJS installed.
It then sets the working directory inside the container to /usr/src/app and copies the package.json and package-lock.json files from the local directory to the container’s working directory. This is executed before running the npm install command to take advantage of Podman’s caching mechanism for faster builds.
Lastly, the instructions copy all the files and directories from the local project directory to the container’s working directory and then exposes port 3000 at runtime. The CMD arguments specify the command to run when the container starts. In this case, it runs node server.js to start the NodeJS server.
Let’s build the container image:
$ podman build -t podman-node-server:latest .Once the build is complete, we verify the image creation using the podman images command
$ podman images
REPOSITORY                    TAG         IMAGE ID      CREATED        SIZE
localhost/podman-node-server  latest      6bc75f05e543  2 days ago     946 MB
docker.io/library/node        14          1d12470fa662  17 months ago  937 MB
As seen in the output above, the podman-node-server image has been created.
Before we push the image to Docker Hub, we can run the image locally to be sure the build is correct. Let’s create a container from the image using the podman run command:
$ podman run -d -p 3000:3000 podman-node-server
1a95f9d4571a2631e175794b63bb40f5933cd079f08a51fd948a0c3d464ee846
Podman creates and starts a container based on the postman-node-server image in detached mode. It then maps port 3000 from inside the container to port 3000 on the host machine. The NodeJS server inside the container starts running. We can confirm this using the curl command or Web browser.
Also, we can verify the container status using the podman ps command:
$ podman ps
CONTAINER ID  IMAGE                                COMMAND         CREATED         STATUS             PORTS                   NAMES
1a95f9d4571a  localhost/podman-node-server:latest  node server.js  10 seconds ago  Up 11 seconds ago  0.0.0.0:3000->3000/tcp  adoring_banzai
Hence, the image build is correct and functions appropriately. We can now push the image to Docker Hub.
To begin, let’s log in with the proper credentials using the podman login command:
$ podman login docker.io
Username: ****
Password:
As seen above, the command prompts us to enter the correct username and password for Docker Hub.
Once the login is successful, we can push the image to Docker Hub using the podman push command. It has a fairly simple usage syntax:
podman push <IMAGE_ID> docker://docker.io/<username>/<imagename>So, let’s push the podman-node-server image:
$ podman push 6bc75f05e543 docker://docker.io/afkzoro/podman-node-serverAfter the push is complete, we can verify the image’s publication on the Docker Hub website:
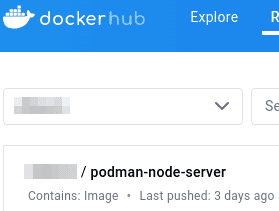
Alternatively, using the CLI, we can list the images in the registry via the podman search command:
$ podman search docker.io/<username>
INDEX       NAME                                  DESCRIPTION  STARS       OFFICIAL    AUTOMATED
docker.io   docker.io/<username>/python-hello-world               0
docker.io   docker.io/<username>/podman-node-server               0
Hence, we’ve successfully pushed an image to Docker Hub using Podman.
In this article, we’ve covered the essential aspects of working with Podman to build, push, and run containerized applications, particularly focusing on a NodeJS server. Additionally, we published the image to a Docker registry.
In conclusion, Podman provides a daemonless container engine compatible with Docker which can be used in much the same way but with added features.