Learn through the super-clean Baeldung Pro experience:
>> Membership and Baeldung Pro.
No ads, dark-mode and 6 months free of IntelliJ Idea Ultimate to start with.
Last updated: March 26, 2025

Learn through the super-clean Baeldung Pro experience:
>> Membership and Baeldung Pro.
No ads, dark-mode and 6 months free of IntelliJ Idea Ultimate to start with.
In this tutorial, we’ll go through the basics of service mesh architecture and understand how it complements a distributed system architecture.
We’ll primarily focus on Istio, which is an implementation of service mesh. In the process, we’ll cover the core architecture of Istio and understand how to benefit from it on Kubernetes.
Over the past couple of decades, we’ve seen how monolithic applications have started to decompose into smaller applications. It has found unprecedented popularity with cloud-native computing and microservices architecture. Further, containerization technology like Docker and orchestration system like Kubernetes have only helped in this regard.
While there are a number of advantages for adopting microservices architecture on a distributed system like Kubernetes, it has its fair share of complexities. Since distributed services have to communicate with each other, we have to think about discovery, routing, retries, and fail-over.
There are several other concerns like security and observability that we also have to take care of:
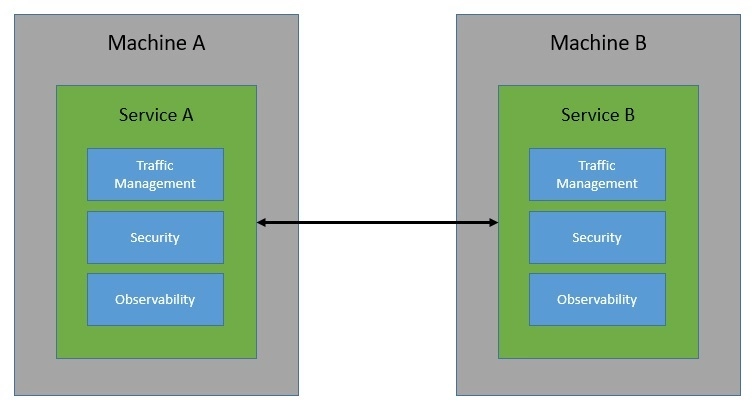
Now, building these communication capabilities within each service can be quite tedious — even more so when the service landscape grows and communication becomes complex. This is precisely where a service mesh can help us. Basically, a service mesh takes away the responsibility of managing all service-to-service communication within a distributed software system.
The way service mesh is able to do that is through an array of network proxies. Essentially, requests between services are routed through proxies that run alongside the services but sit outside in the infrastructure layer:
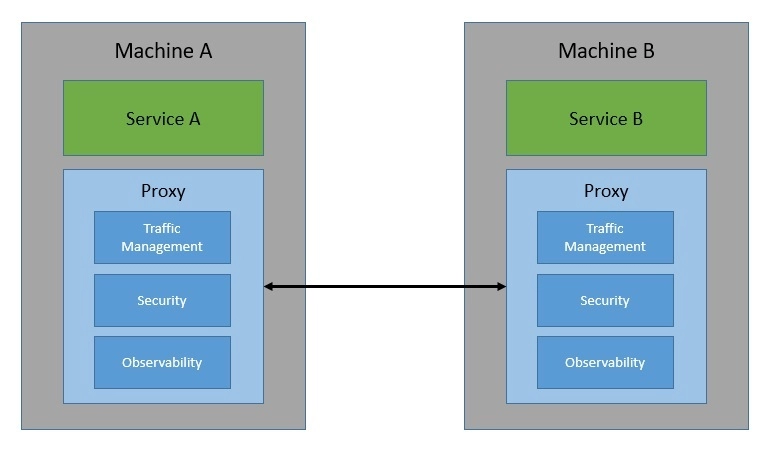
These proxies basically create a mesh network for the services — hence the name, service mesh! Through these proxies, a service mesh is able to control every aspect of service-to-service communication. As such, we can use it to address the eight fallacies of distributed computing, a set of assertions that describe false assumptions we often make about a distributed application.
Let’s now understand some of the features that a service mesh can provide us. Please note that the list of actual features depends upon the implementation of service mesh. But, in general, we should expect most of these features in all implementations.
We can broadly divide these features into three categories: traffic management, security, and observability.
One of the fundamental features of a service mesh is traffic management. This includes dynamic service discovery and routing. It also enables some interesting use-cases like traffic shadowing and traffic splitting. These are very useful for performing canary releases and A/B testing.
As all service-to-service communication is handled by the service mesh, it also enables some reliability features. For instance, a service mesh can provide retries, timeouts, rate-limiting, and circuit breakers. These out-of-the-box failure recovery features make the communication more reliable.
A service mesh typically also handles the security aspects of the service-to-service communication. This includes enforcing traffic encryption through mutual TLS (MTLS), providing authentication through certificate validation, and ensuring authorization through access policies.
There can also be some interesting use cases of security in a service mesh. For instance, we can achieve network segmentation allowing some services to communicate while prohibiting others. Moreover, a service mesh can provide precise historical information for auditing requirements.
Robust observability is the underpinning requirement for handling the complexity of a distributed system. Because a service mesh handles all communication, it’s rightly placed to provide observability features. For instance, it can provide information about distributed tracing.
A service mesh can generate a lot of metrics like latency, traffic, errors, and saturation. Moreover, a service mesh can also generate access logs, providing a full record for each request. These are quite useful in understanding the behavior of individual services as well as the whole system.
Istio is an open-source implementation of the service mesh originally developed by IBM, Google, and Lyft. It can layer transparently onto a distributed application and provide all the benefits of a service mesh like traffic management, security, and observability.
It’s designed to work with a variety of deployments, like on-premise, cloud-hosted, in Kubernetes containers, and in servicers running on virtual machines. Although Istio is platform-neutral, it’s quite often used together with microservices deployed on the Kubernetes platform.
Fundamentally, Istio works by deploying an extended version of Envoy as proxies to every microservice as a sidecar:
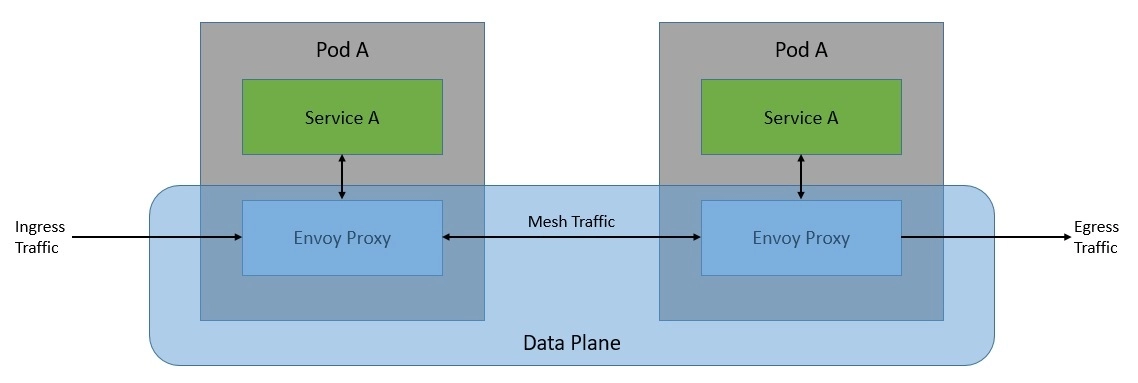
This network of proxies constitutes the data plane of the Istio architecture. The configuration and management of these proxies are done from the control plane:
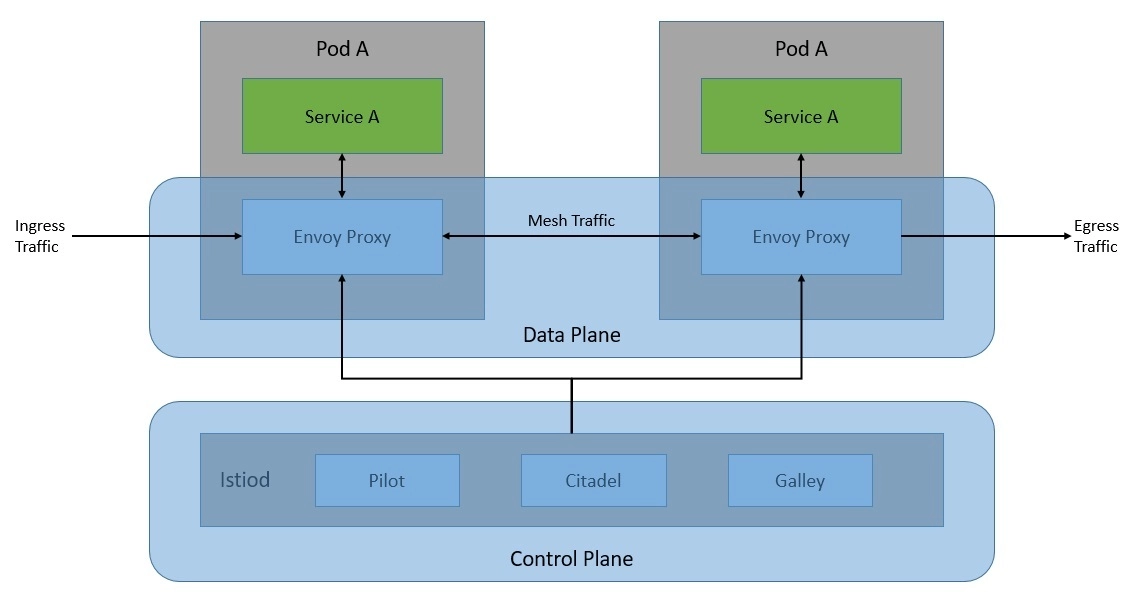
The control plane is basically the brain of the service mesh. It provides discovery, configuration, and certificate management to Envoy proxies in the data plane at runtime.
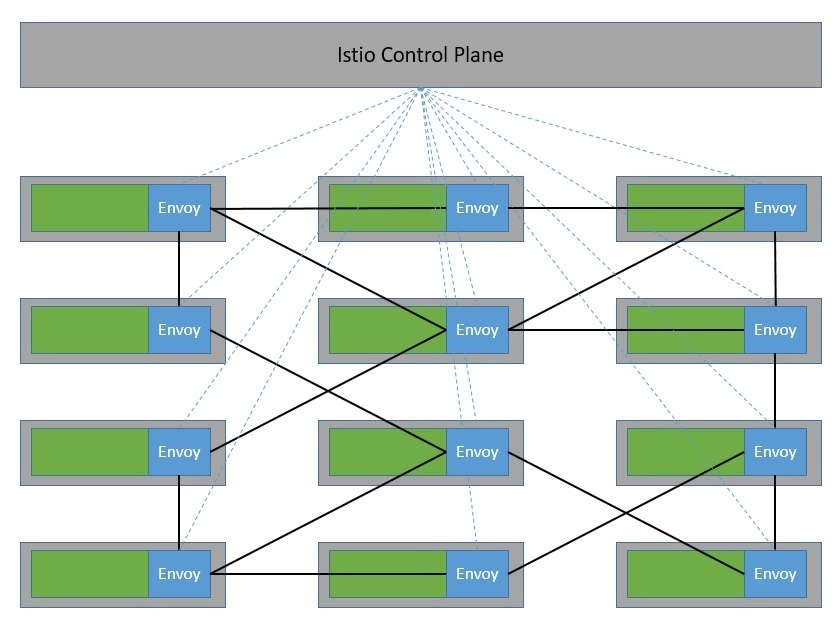
Of course, we can only realize the benefit of Istio when we have a large number of microservices that communicate with each other. Here, the sidecar proxies form a complex service mesh in a dedicated infrastructure layer:
Istio is quite flexible in terms of integrating with external libraries and platforms. For instance, we can integrate Istio with an external logging platform, telemetry, or policy system.
We have seen that the Istio architecture consists of the data plane and the control plane. Further, there are several core components that enable Istio to function.
In this section, we’ll go through the details of these core components.
The data plane of Istio primarily comprises an extended version of the Envoy proxy. Envoy is an open-source edge and service proxy that helps decouple network concerns from underlying applications. Applications simply send and receive messages to and from localhost, without any knowledge of the network topology.
At the core, Envoy is a network proxy operating at the L3 and L4 layers of the OSI model. It works by using a chain of pluggable network filters to perform connection handling. Additionally, Envoy supports an additional L7 layer filter for HTTP-based traffic. Moreover, Envoy has first-class support for HTTP/2 and gRPC transports.
Many of the features that Istio provides as a service mesh are actually enabled by the underlying built-in features of the Envoy proxies:
One of the other reasons Envoy works so well with Istio is its extensibility. Envoy provides a pluggable extension model based on WebAssembly. This is quite useful in custom policy enforcement and telemetry generation. Further, we can also extend the Envoy proxy in Istio using the Istio extensions based on the Proxy-Wasm sandbox API.
As we’ve seen earlier, the control plane is responsible for managing and configuring the Envoy proxies in the data plane. The component that is responsible for this in the control plane is istiod. Here, istiod is responsible for converting high-level routing rules and traffic control behavior into Envoy-specific configurations and propagating them to sidecars at runtime.
If we recall the architecture of the Istio control plane from some time back, we’ll notice that it used to be a set of independent components working together. It comprised components like Pilot for service discovery, Galley for configuration, Citadel for certificate generation, and Mixer for extensibility. Due to complexity, these individual components were merged into a single component called istiod.
At the core, istiod still uses the same code and APIs as the individual components earlier. For instance, Pilot is responsible for abstracting platform-specific service discovery mechanisms and synthesizing them into a standard format that sidecars can consume. Hence, Istio can support discovery for multiple environments like Kubernetes or Virtual Machines.
In addition, istiod also provides security, enabling strong service-to-service and end-user authentication with built-in identity and credential management. Moreover, with istiod, we can enforce security policies based on service identity. The process istiod also acts as a Certificate Authority (CA) and generates certificates to facilitate mutual TLS (MTLS) communication in the data plane.
We’ve learned what the typical features of a service mesh are. Further, we’ve gone through the basics of Istio architecture and its core components. Now, it’s time to understand how Istio provides these features through the core components in its architecture.
We’ll focus on the same categories of features that we went through earlier.
We can exercise granular control over the traffic in the service mesh by using Istio traffic management API. We can use these APIs to add our own traffic configurations to Istio. Further, we can define the API resources using Kubernetes custom resource definitions (CRDs). The key API resources that help us control the traffic routing are virtual services and destination rules:

Basically, a virtual service lets us configure how requests are routed to a service within the Istio service mesh. Hence, a virtual service consists of one or more routing rules that are evaluated in order. After the routing rules of a virtual service are evaluated, the destination rules are applied. The destination rules help us to control the traffic to a destination — for instance, grouping service instances by version.
Security in Istio begins with the provisioning of strong identities to every service. The Istio agents running alongside every Envoy proxy work with istiod to automate key and certificate rotation:
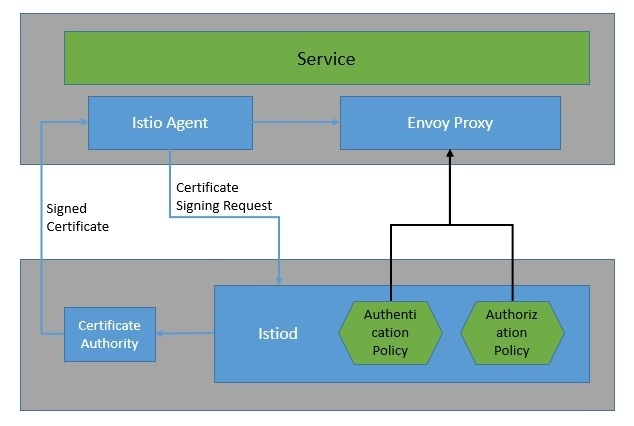
Istio provides two types of authentication — peer authentication and request authentication. Peer authentication is used for service-to-service authentication where Istio offers mutual TLS as a full-stack solution. Request authentication is used for end-user authentication where Istio offers JSON Web Token (JWT) validation using a custom authentication provider or an OpenID Connect (OIDC) provider.
Istio also allows us to enforce access control to services by simply applying an authorization policy to the services. The authorization policy enforces access control to the inbound traffic in the Envoy proxy. With this, we can apply access control at various levels: mesh, namespace, and service-wide.
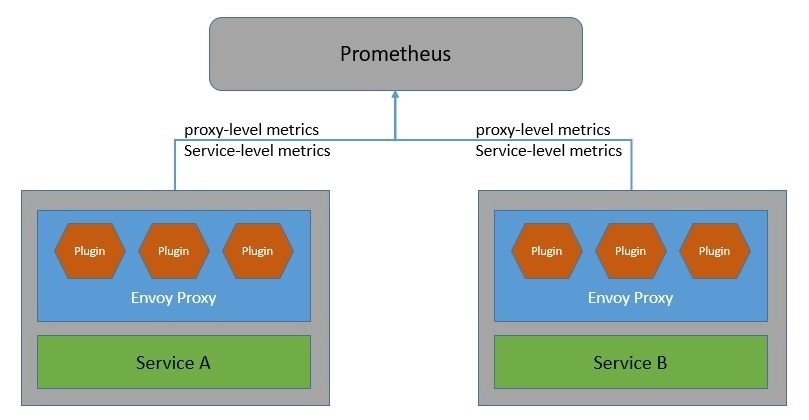
Istio generates detailed telemetry like metrics, distributed traces, and access logs for all service communication within the mesh. Istio generates a rich set of proxy-level metrics, service-oriented metrics, and control plane metrics.
Earlier, the Istio telemetry architecture included Mixer as a central component. But starting with Telemetry v2, features provided by Mixer were replaced with the Envoy proxy plugins:
Moreover, Istio generates distributed traces through the Envoy proxies. Istio supports a number of tracing backends like Zipkin, Jaeger, Lightstep, and Datadog. We can also control the sampling rate for trace generation. Further, Istio also generates access logs for service traffic in a configurable set of formats.
Now that we’ve gone through enough background, we’re ready to see Istio in action. To begin with, we’ll install Istio within a Kubernetes cluster. Further, we’ll use a simple microservices-based application to demonstrate the capabilities of Istio on Kubernetes.
There are several ways to install Istio, but the simplest of them is to download and extract the latest release for a specific OS like Windows. The extracted package contains the istioctl client binary in the bin directory. We can use istioctl to install Istio on the target Kubernetes cluster:
istioctl install --set profile=demo -yThis installs Istio components on the default Kubernetes cluster with the demo profile. We can also use any other vendor-specific profile instead of the demo.
Finally, we need to instruct Istio to automatically inject Envoy sidecar proxies when we deploy any application on this Kubernetes cluster:
kubectl label namespace default istio-injection=enabledWe’re using kubectl here with an assumption that a Kubernetes cluster like Minikube and the Kubernetes CLI kubectl are already available on our machine.
For the purpose of demonstration, we’ll imagine a very simple application for placing online orders. This application comprises three microservices that interact with each other to fulfill an end user’s request for order:
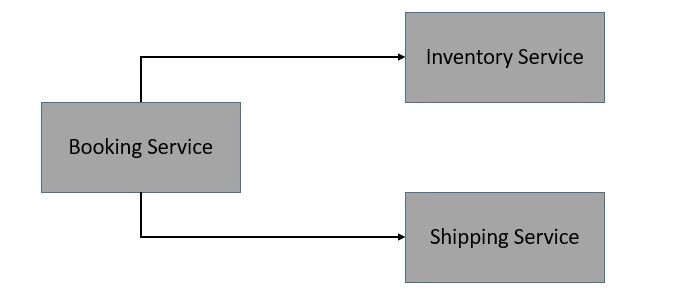
We’re not going into the details of these microservices, but they can be fairly simple to create using Spring Boot and REST APIs. Most importantly, we create a Docker image for these microservices so that we can deploy them on Kubernetes.
Deploying a containerized workload on the Kubernetes cluster like Minikube is fairly straightforward. We’ll be using the Deployment and Service resource types to declare and access the workload. Typically, we define them in a YAML file:
apiVersion: apps/v1beta1
kind: Deployment
metadata:
  name: order-service
  namespace: default
spec:
  replicas: 1
  template:
    metadata:
      labels:
        app: order-service
        version: v1
    spec:
      containers:
      - name: order-service
        image: kchandrakant/order-service:v1
        resources:
          requests:
            cpu: 0.1
            memory: 200
---
apiVersion: v1
kind: Service
metadata:
  name: order-service
spec:
  ports:
  - port: 80
    targetPort: 80
    protocol: TCP
    name: http
  selector:
    app: order-service
This is a very simple definition for the Deployment and Service for the order-service. Similarly, we can define the YAML file for the inventory-service and the shipping-service.
Deploying these resources using kubectl is fairly straightforward as well:
kubectl apply -f booking-service.yaml -f inventory-service.yaml -f shipping-service.yamlSince we’ve enabled auto-injection of Envoy sidecar proxies for the default namespace, everything will be taken care of for us. Alternatively, we can use the kube-inject command of istioctl to manually inject the Envoy sidecar proxies.
Now, Istio is primarily responsible for handling all the mesh traffic. Hence, any traffic to or from outside of the mesh is not permitted by default. Istio uses gateways to manage inbound and outbound traffic from the mesh. This way, we can precisely control the traffic that enters or leaves the mesh. Istio provides some preconfigured gateway proxy deployments: istio-ingressgateway and istio-egressgateway.
We’ll create a Gateway and a Virtual Service for our application to make this happen:
apiVersion: networking.istio.io/v1alpha3
kind: Gateway
metadata:
  name: booking-gateway
spec:
  selector:
    istio: ingressgateway
  servers:
  - port:
      number: 80
      name: http
      protocol: HTTP
    hosts:
    - "*"
---
apiVersion: networking.istio.io/v1alpha3
kind: VirtualService
metadata:
  name: booking
spec:
  hosts:
  - "*"
  gateways:
  - booking-gateway
  http:
  - match:
    - uri:
        prefix: /api/v1/booking
    route:
    - destination:
        host: booking-service
        port:
          number: 8080
Here, we’re making use of the default ingress controller provided by Istio. Moreover, we’ve defined a virtual service to route our requests to the booking-service.
Similarly, we can also define an egress gateway for the outbound traffic from the mesh as well.
Now, we’ve seen how to deploy a simple application on Kubernetes with Istio. But, we are still not making use of any interesting feature that Istio enables for us. In this section, we’ll go through some common use-cases of a service mesh and understand how to use Istio to achieve them for our simple application.
There are several reasons why we may want to handle request routing in a specific manner. For instance, we may deploy multiple versions of a microservice like shipping-service and wish to route only a small percentage of requests to the new version.
We can use the routing rules of the virtual service to achieve this:
apiVersion: networking.istio.io/v1alpha3
kind: VirtualService
metadata:
  name: shipping-service
spec:
  hosts:
    - shipping-service
  http:
  - route:
    - destination:
        host: shipping-service
        subset: v1
      weight: 90
    - destination:
        host: shipping-service
        subset: v2
      weight: 10
---
apiVersion: networking.istio.io/v1alpha3
kind: DestinationRule
metadata:
  name: shipping-service
spec:
  host: shipping-service
  subsets:
  - name: v1
    labels:
      version: v1
  - name: v2
    labels:
      version: v2
The routing rules also allow us to define match conditions based on attributes like a header parameter. Further, the destination field specifies the actual destination for traffic that matches the condition.
A circuit breaker is basically a software design pattern to detect failures and encapsulate the logic of preventing a failure from cascading further. This helps in creating resilient microservice applications that limit the impact of failures and latency spikes.
In Istio, we can use the trafficPolicy configuration in DestinationRule to apply circuit breaking when calling a service like inventory-service:
apiVersion: networking.istio.io/v1alpha3
kind: DestinationRule
metadata:
  name: inventory-service
spec:
  host: inventory-service
  trafficPolicy:
    connectionPool:
      tcp:
        maxConnections: 1
      http:
        http1MaxPendingRequests: 1
        maxRequestsPerConnection: 1
    outlierDetection:
      consecutive5xxErrors: 1
      interval: 1s
      baseEjectionTime: 3m
      maxEjectionPercent: 100
Here, we’ve configured the DestinationRule with maxConnections as 1, httpMaxPendingRequests as 1, and maxRequestsPerConnection as 1. This effectively means that if we exceed the number of concurrent requests by more than 1, the circuit breaker will start to trap some of the requests.
Mutual authentication refers to a situation where two parties authenticate each other at the same time in an authentication protocol like TLS. By default, all traffic between services with proxies uses mutual TLS in Istio. However, services without proxies still continue to receive traffic in plain text.
While Istio automatically upgrades all traffic between services with proxies to mutual TLS, these services can still receive plain-text traffic. We have an option to enforce mutual TLS mesh-wide with a PeerAuthentication policy:
apiVersion: "security.istio.io/v1beta1"
kind: "PeerAuthentication"
metadata:
  name: "default"
  namespace: "istio-system"
spec:
  mtls:
    mode: STRICT
We also have options to enforce mutual TLS per namespace or service instead of mesh-wide. However, a service-specific PeerAuthentication policy takes precedence over the namespace-wide policy.
JSON Web Token (JWT) is a standard for creating data whose payload holds JSON that asserts a number of claims. This has come to be widely accepted for passing the identity and standard or custom claims of authenticated users between an identity provider and a service provider.
We can enable authorization policy in Istio to allow access to a service like booking-service based on JWT:
apiVersion: security.istio.io/v1beta1
kind: AuthorizationPolicy
metadata:
  name: require-jwt
  namespace: default
spec:
  selector:
    matchLabels:
      app: booking-service
  action: ALLOW
  rules:
  - from:
    - source:
       requestPrincipals: ["[email protected]/[email protected]"]
Here, the AuthorizationPolicy enforces all requests to have a valid JWT with requestPrincipal set to a specific value. Istio creates the requestPrincipal attribute by combining the claims iss and sub of JWT.
So, we’ve seen by now how a service mesh like Istio makes our life easier to handle a number of common concerns in a distributed architecture like microservices. But in spite of everything, Istio is a complex system that increases the complexity of the resulting deployment. Like every other technology, Istio is not a silver bullet and must be used with due considerations.
While we’ve seen enough reasons to use a service mesh, let’s cite some reasons which may prompt us against using it:
Hence, as we can see, the story of a service mesh is not all about benefits, but that doesn’t mean they aren’t true. The important thing for us is to carefully evaluate our requirements and the complexity of our application, and then weigh the benefits of a service mesh against their added complexity.
While Istio is quite popular and backed by some of the leaders in the industry, it’s certainly not the only option available. While we can’t do a thorough comparison here, let’s go through a couple of these options, Linkerd and Consul.
Linkerd is an open-source service mesh that has been created for the Kubernetes platform. It’s also quite popular and has the status of an incubating project in CNCF at present. Its working principles are similar to any other service mesh like Istio. It also makes use of TCP proxies to handle the mesh traffic. Linkerd uses a micro-proxy that is written in Rust and known as the Linkerd-proxy.
Overall, Linkerd is less complex than Istio, considering that it only supports Kubernetes. But, apart from that, the list of features that are available in Linkerd is very similar to those available in Istio. The core architecture of Linkerd also closely resembles that of Istio. Basically, Linkerd comprises three primary components: a user interface, a data plane, and a control plane.
Consul is an open-source implementation of service mesh from HashiCorp. It has the benefit of integrating well with the suite of other infrastructure management products from HashiCorp to provide wider capabilities. The data plane in Consul has the flexibility to support a proxy as well as a native integration model. It comes with a built-in proxy but can work well with Envoy as well.
Apart from Kubernetes, Consul is designed to work with other platforms like Nomad. Consul works by running the Consul agent on every node to perform health checks. These agents talk to one or more Consul servers that store and replicate data. While it provides all the standard features of a service mesh like Istio, it’s a more complex system to deploy and manage.
To sum up, in this tutorial, we went through the basic concepts of the service mesh pattern and the features that it provides us. In particular, we went through the details of Istio. This covered the core architecture of Istio and its basic components. Further, we went through the details of installing and using Istio for some of the common use-cases.