

Learn through the super-clean Baeldung Pro experience:
>> Membership and Baeldung Pro.
No ads, dark-mode and 6 months free of IntelliJ Idea Ultimate to start with.
Last updated: July 20, 2024
Learn through the super-clean Baeldung Pro experience:
>> Membership and Baeldung Pro.
No ads, dark-mode and 6 months free of IntelliJ Idea Ultimate to start with.
Docker has become an essential tool for software developers and IT professionals to build, ship, and run applications efficiently. Further, it enables developers to package an application with all its dependencies into a standardized unit called a container. These containers can run consistently on almost any infrastructure, drastically simplifying development and deployment.
In this tutorial, we’ll provide a guide on how to install Docker on the three major operating systems:
We’ll cover the system requirements, installation steps, and post-installation configuration.
Before we dive into the installation process, let’s first understand what Docker is and how it works. Docker is based on the concept of containerization.
From the user standpoint, containers are similar to virtual machines but they are much more lightweight and efficient. Unlike virtual machines, containers only need the application code, libraries, dependencies, and configuration files, eliminating the need for a separate guest operating system, hypervisor, or emulation. Furthermore, containers utilize the same kernel and resources as the host machine, but they maintain isolation from both each other and the host.
In addition, containerization enables developers to create and run applications that are portable, scalable, and consistent across different platforms and environments. For instance, we can run the same container on our laptop, on a cloud server, or on a Raspberry Pi, without worrying about compatibility issues or the performance overhead.
Docker is one of the most popular and widely used tools for containerization. It provides a platform and a set of tools that make it easy to create, manage, and run containers. There are several benefits Docker provides by enabling containerization:
Finally, isolated containers enhance security by limiting access to the underlying system and preventing application conflicts.
We can use Docker for various purposes and scenarios:
Now, let’s discuss the system requirements for installing Docker.
Before installing Docker on our machine, we need to ensure that our system meets the minimum hardware and software requirements.
Docker needs a 64-bit processor that supports hardware virtualization.
We can check if our CPU supports hardware virtualization on Windows:
C:\Users\abdul>systeminfo | findstr /I /C:"Virtualization"
                           Virtualization Enabled In Firmware: Yes
This shows that our CPU supports the virtualization feature.
Similarly, we can check the support on Linux:
$ grep -E --color 'vmx|svm' /proc/cpuinfoThis command searches for CPU features related to hardware virtualization. Specifically, it looks for two key features:
These features indicate whether hardware virtualization support is present on the CPU. In this case, if our CPU supports Intel VT-x, the vxm feature is highlighted in the output. If it supports AMD-V, the svm feature is highlighted instead.
Finally, we can do the same on macOS:
% sysctl -a | grep machdep.cpu.features
machdep.cpu.features: FPU VME DE PSE TSC MSR PAE MCE CX8 APIC SEP MTRR PGE MCA CMOV PAT PSE36 CLFSH DS AC ... VMX ...
The command outputs a list of supported CPU features. We’re interested in VMX.
In addition to the CPU requirements, Docker also needs around 2GB of RAM. However, the more RAM we have, the better performance we’ll get.
We can check how much RAM we have on Windows:
C:\Users\abdul>systeminfo | findstr /I /C:"Total Physical Memory"
Total Physical Memory:     8,084 MB
Running this code snippet shows that we have 8GB of RAM on our system.
Similarly, we can check on Linux using the free command:
$ free -m
               total        used        free      shared  buff/cache   available
Mem:            7824        4832        1363         455        1628        2240
Swap:           2047        1546         501
The value of Mem: total is the RAM we have.
Finally, we can do the same for Mac:
% sysctl -n hw.memsize
8589934592
Thus, we have the RAM value in bytes.
For Windows, we need Windows 10 Home, Pro, Enterprise, or Education, build 19044 or higher.
So, let’s check our Windows version and build:
C:\Users\abdul>winverThis code snippet displays the About Windows dialog box, providing information about the installed version of Windows.
This dialog typically includes details such as the Windows edition, version number, and OS build number.
Furthermore, if we are using a Linux machine, we need a 64-bit version of one of the supported Linux distributions:
We can also check our Linux distribution and version by running the lsb_release command:
$ lsb_release -a
Distributor ID: Ubuntu
Description:    Ubuntu 22.04.2 LTS
Release:        22.04
Codename:       jammy
In the code snippet, the -a option instructs the command to display all available information about the Linux distribution installed on the system.
Finally, Docker supports Docker Desktop on the most recent versions of macOS.
While Docker itself is the core requirement, additional components are essential for a smooth installation in some cases:
Notably, macOS doesn’t usually require any additional software dependencies to install Docker.
Docker Desktop is an easy-to-use application that enables us to run Docker containers on our Windows machine. It comprises two packages:
Further, it provides a graphical user interface (GUI) for managing our containers, images, networks, and volumes.
To install Docker Desktop for Windows, we first download the installer from the official Docker website.
Specifically, the installer is a .exe file that has a size of about 500 MB.
To begin with, we double-click the installer file that we downloaded. A User Account Control (UAC) prompt asking for permission to run the installer should display. To continue with the installation, we will click Yes.
By default, Docker Desktop is going to be installed at C:\Program Files\Docker\Docker.
Next, a prompt window will display asking us to choose the configuration options:
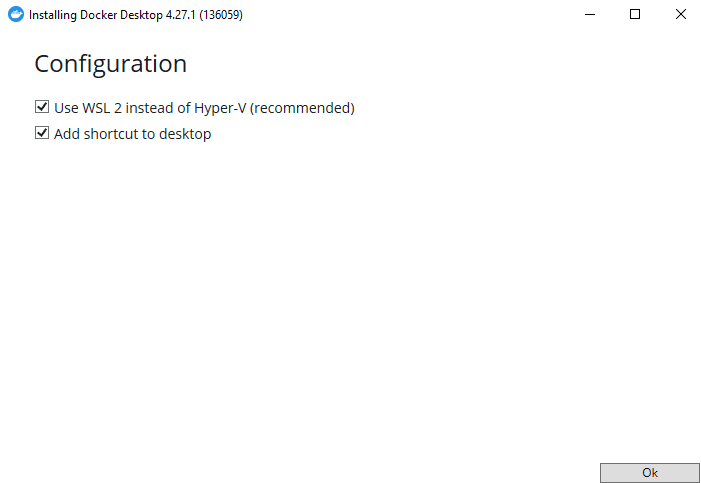
We can leave the default options and click Ok to continue:
The installer starts copying the files and installing the components:
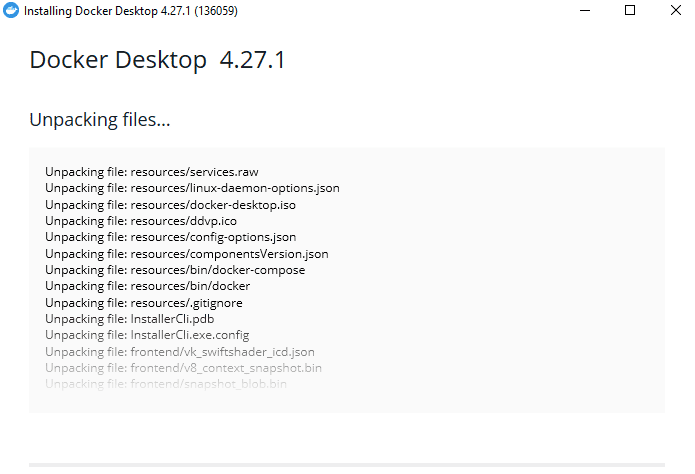
This may take a few minutes depending on our system speed.
Finally, the installer displays a completion screen and asks us to restart our computer to apply the changes:
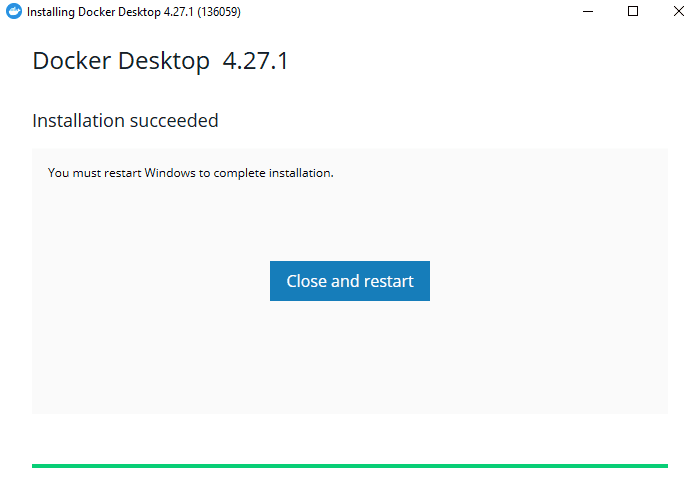
After our computer restarts, we should see a Docker icon in our system tray.
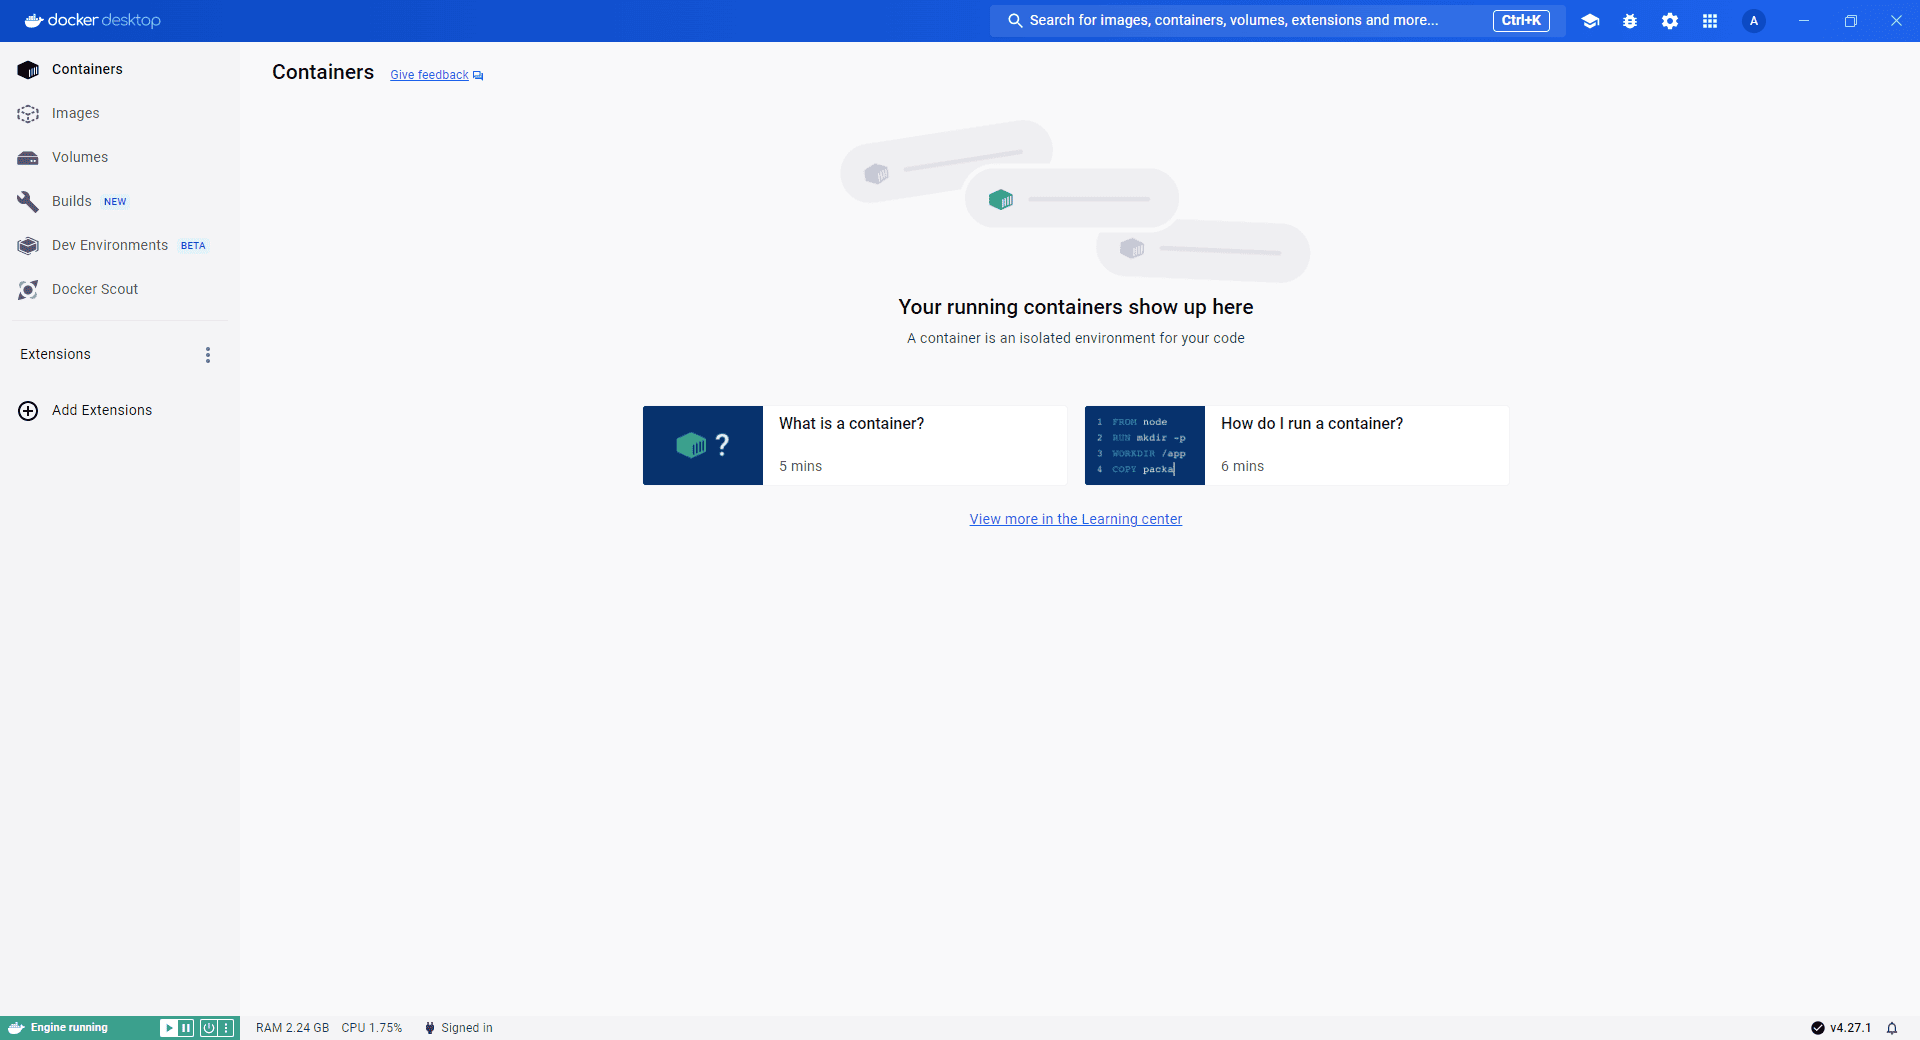
Here is what the Docker Dashboard looks like:
Alternatively, we can install Docker using the Windows Command Prompt after downloading the installer file:
start /w "" "Docker Desktop Installer.exe" installIn the code snippet above, the start command starts a separate process for running the Docker Desktop Installer.
After installing Docker Desktop for Windows, we can configure and customize various options and preferences for our Docker environment.
To access the settings menu, we left-click on the Settings icon on the Dashboard:

The settings menu has several tabs, each with different options and features:
We can apply the changes by clicking on the Apply & Restart button at the bottom of the menu.
Now, let’s see how we can install Docker on a Linux system. We’ll be using the 64-bit version of the latest LTS version of Ubuntu, Ubuntu Jammy Jellyfish 22.04. Notably, the use of the latest LTS version is an official prerequisite for installing Docker Desktop on Ubuntu.
First, we may have to update our system’s package index and install the required dependencies:
$ sudo apt-get update
$ sudo apt-get install ca-certificates curl
In the code snippet above, installing the ca-certificates package ensures that our system has a set of trusted CA (Certificate Authority) certificates which are necessary for establishing secure connections over HTTPS. Further, we use the curl package to transfer data to or from a server.
Now, we create the /etc/apt/keyrings directory using the install command:
$ sudo install -m 0755 -d /etc/apt/keyringsThe -m option in the code snippet above specifies the permissions. In this case, we give the owner full permissions to the directory, while the owning group and others can’t write to it.
Also, we use this directory to store the Docker’s official GPG key files in the next step.
After creating the /etc/apt/keyrings directory, we can then add Docker’s official GPG key to verify the authenticity of the packages:
$ sudo curl -fsSL https://download.docker.com/linux/ubuntu/gpg -o /etc/apt/keyrings/docker.ascThus, we save the downloaded GPG key file as docker.asc in the /etc/apt/keyrings directory.
Next, we set the permissions of the GPG key file:
$ sudo chmod a+r /etc/apt/keyrings/docker.ascThis should add read permissions for all users over the Docker GPG key file.
Finally, we can set up the Docker repository for Ubuntu:
$ echo \
  "deb [arch=$(dpkg --print-architecture) signed-by=/etc/apt/keyrings/docker.asc] https://download.docker.com/linux/ubuntu \
  $(. /etc/os-release && echo "$VERSION_CODENAME") stable" | \
  sudo tee /etc/apt/sources.list.d/docker.list > /dev/null
$ sudo apt-get update
This command creates a new repository configuration file for Docker in the /etc/apt/sources.list.d directory, enabling apt to retrieve Docker packages from the specified repository. Then, we again update the package index.
While Docker Desktop includes Docker Engine among its packages, Docker Engine can also be installed separately. Further, Docker Desktop stores containers and images in a separate location within the virtual machine to avoid conflicts with Docker Engine. Therefore, installing Docker Desktop doesn’t mean that Docker is on our Linux machine. Rather, it means that Docker has been set up on a virtual machine.
Notably, Docker Engine has three main parts:
The CLI uses Docker APIs to interact with the Docker daemon through CLI commands. But the daemon for the Docker Desktop is inside the virtual machine.
We can install Docker Engine on our Ubuntu system after we’ve set up the Docker’s package repository:
$ sudo apt install docker-ce docker-ce-cli containerd.ioThis code snippet will install the Docker Engine daemon, the CLI, and the container runtime that starts and runs our containers.
It’s usually a good idea to stop Docker Engine when using Docker Desktop to avoid conflicts:
$ sudo systemctl stop docker docker.socket containerd
Also, we can switch between Docker Engine and Docker Desktop using the docker context use command if we have both installed on our machine:
$ docker context use default
default
Current context is now "default"
From the code snippet above, using the default context will enable us to interact with the Docker Engine.
We can also interact with the Docker Desktop:
$ docker context use desktop-linux
desktop-linux
Current context is now "desktop-linux"
Now, the current context is the Docker Desktop.
If we want to install Docker Desktop for Ubuntu, we need to download the installer from the official Docker website for Ubuntu. This file is a .deb file with a size of about 300 MB.
After, we can install the package using the apt-get command:
$ sudo apt-get install ./docker-desktop-4.27.2-amd64.deb
In this case, we can safely ignore the error message about unsandboxed download that appears at the end of the installation.
After installing Docker Desktop for Ubuntu, we usually need to perform some tasks to make the most of it.
Firstly, we may want to add our user to the docker group to run docker commands without sudo:
$ sudo usermod -aG docker $USERThe -a option of usermod indicates that the user should be added to the specified group without removing them from any other groups. Of course, -G docker specifies that the user should be added to the docker group. For the change to take effect, we have to log out and log back in.
Also, we have to initialize pass for credential management to securely store and retrieve our Docker registry credentials. In fact, without doing this, we won’t be able to sign in to Docker Desktop. We can initialize pass by using a GPG key.
Now, let’s generate a GPG key:
$ gpg --generate-key
...

GnuPG needs to construct a user ID to identify your key.

Real name: Abdulhameed
Email address: [email protected]
You selected this USER-ID:
    "Abdulhameed <[email protected]>"

Change (N)ame, (E)mail, or (O)kay/(Q)uit? O
...

pub   rsa3072 2024-02-10 [SC] [expires: 2026-02-09]
      <generated gpg-id public key>
uid                      Abdulhameed <[email protected]>
sub   rsa3072 2024-02-10 [E] [expires: 2026-02-09]
By running the command above, gpg prompts us to provide information for generating the key:
After that, we can initialize pass using the generated public key:
$ pass init <our_generated_gpg-id_public_key>
mkdir: created directory '/home/abdulhameed/.password-store/'
Password store initialized for <our_generated_gpg-id_public_key>
We can now sign in to Docker Desktop successfully.
Finally, we can install Docker on macOS. Similar to the installation packages for other operating systems discussed above, Docker Desktop for Mac also includes Docker Compose, a tool that helps us define and run multi-container applications.
To install Docker Desktop for Mac, we first download the installer from the Docker website. There are two versions of the installer, depending on the type of chip our Mac has:
We can check out chip type by clicking the Apple menu and selecting About This Mac. We’ll be using a Mac with an Intel chip.
Further, the installer file has a .dmg extension and is about 600 MB in size.
To install Docker Desktop for Mac, we first open the installer by double-clicking the .dmg file:
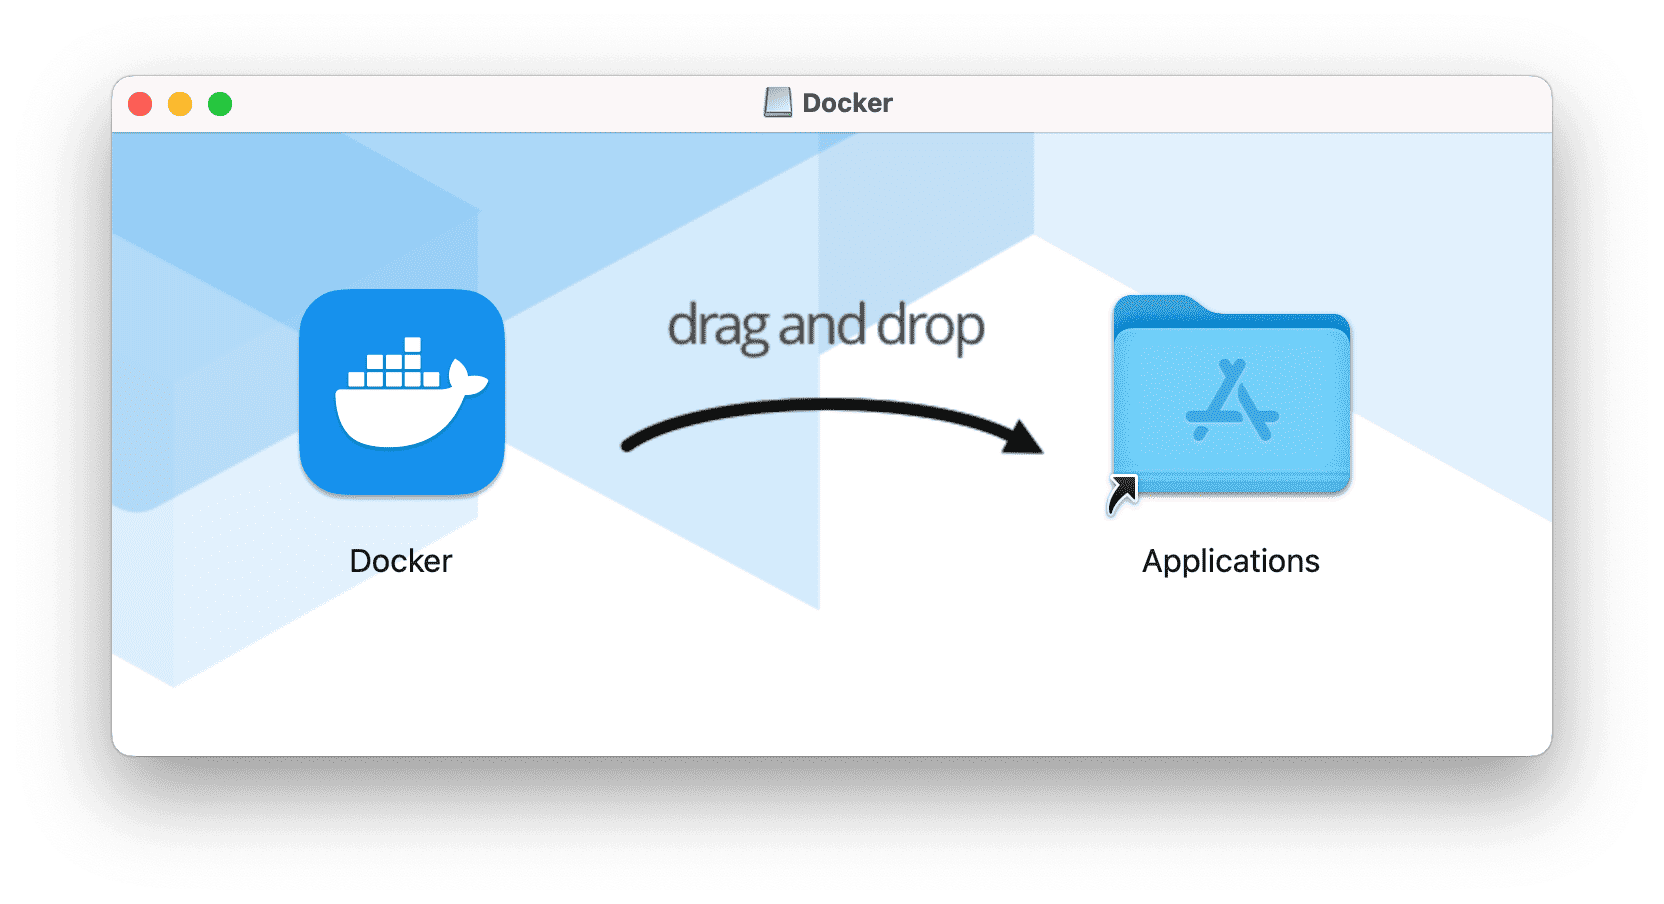
Now, we drag the Docker icon to the Applications folder.
Next, we open the Docker app from the Applications folder. We may see a security prompt asking for permission to open the app. If needed, we click Open to proceed. The Docker Subscription Service Agreement window should display:

Next, we accept the Docker Subscription Service Agreement. Similar to the other OS discussed above, Docker Desktop won’t run if we don’t agree to the terms. This leads us to the next window:
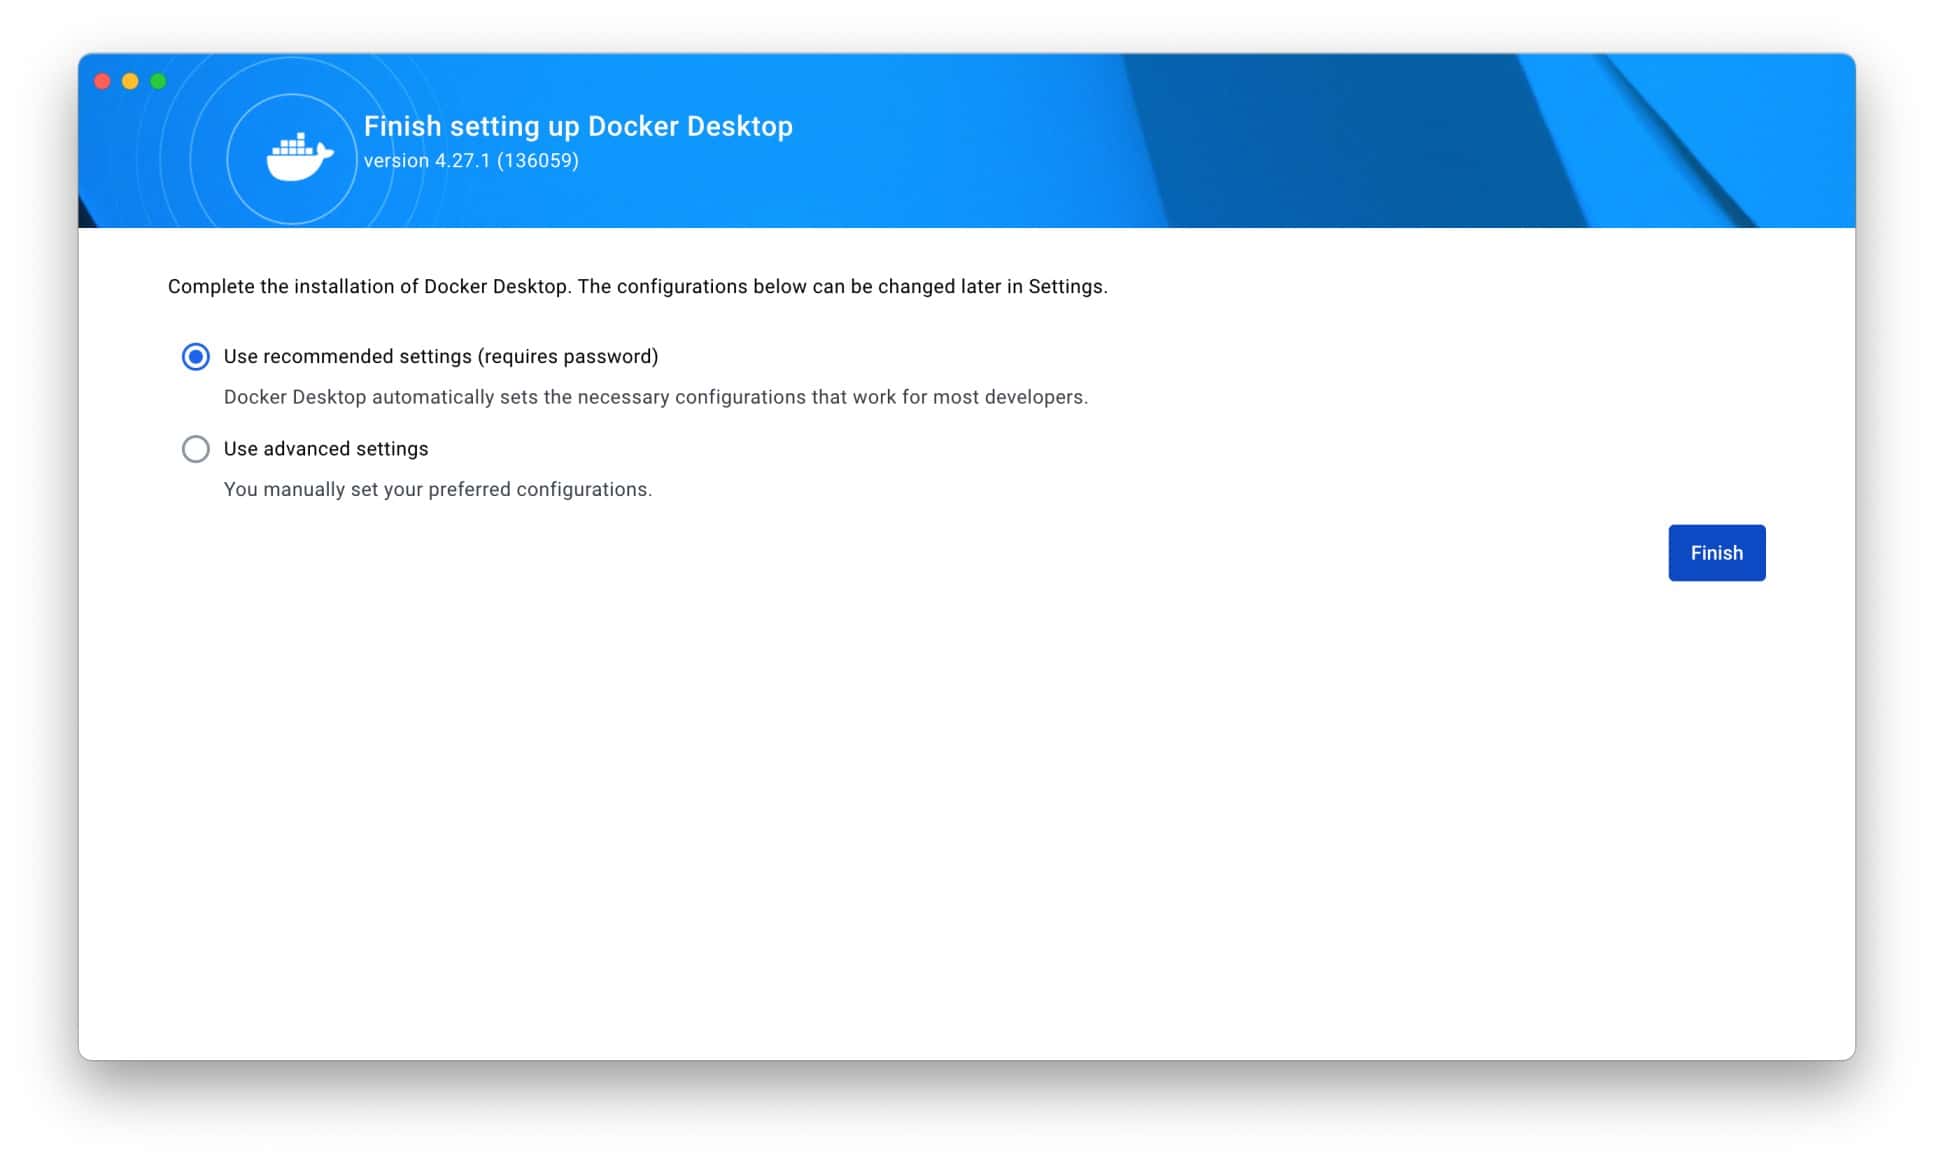
We can choose the Use recommended settings option. This will enable the Docker Desktop to set the necessary configuration itself. Finally, we click the Finish button to conclude the installation.
Docker is a powerful tool that enables us to create, run, and manage containers on our machines. With Docker, we can build, test, and deploy applications faster and easier.
In this article, we learned how to install Docker on Windows, Linux, and macOS. We’ve also seen some of the benefits and use cases of Docker in software development and deployment.