

Learn through the super-clean Baeldung Pro experience:
>> Membership and Baeldung Pro.
No ads, dark-mode and 6 months free of IntelliJ Idea Ultimate to start with.
Learn through the super-clean Baeldung Pro experience:
>> Membership and Baeldung Pro.
No ads, dark-mode and 6 months free of IntelliJ Idea Ultimate to start with.
As more and more applications are deployed using Docker, it’s essential that we understand some basic principles of its ecosystem. While the available tooling makes it easy to package and deploy applications, at some point, we may need to troubleshoot some aspects of our deployment.
One of the more common tasks with debugging deployments is examining and comparing images. In this tutorial, we’ll look at the structure of Docker images and how to see the differences between the two images.
As some background, Docker images are the instructions for how to create a container. We can think of them as the complete set of files and directories required to run an application inside a container. This includes the operating system, 3rd party libraries, and our application code.
Under the hood, these images are essentially just tar files. When building the images, we are creating different layers within it. Each layer is a collection of files and directories.
Typically, we start with an existing image and add to it. For example, to build a Spring Boot application as an image, we’d start with an existing OpenJDK Docker image. This contains the operating system and JDK files required to run any Java application. From there, we’d add our own Java files, usually the application’s fat jar, along with any required 3rd party libraries.
At the end of the build, we have a single image containing all the files necessary to run our application. Next, we’ll look at how to examine a single image.
There are a few different ways to examine an image. Let’s start by finding all the images in our local repo:
$ docker image ls
spring-petclinic    2.7.0-SNAPSHOT    0f9d2d05687b   2 months ago    266MB
spring-petclinic    2.6.0-SNAPSHOT    1d79d5bd7779   3 months ago    265MB
With the list of available images, we can now look at a specific one.
The first thing we can do is run the inspect command:
$ docker inspect 0f9d2d05687b
[
    {
        "Id": "sha256:0f9d2d05687b8c816cbf54f63cf7e5aa7144d28e1996d468bfaf555a3882610a",
        "RepoTags": [
            "spring-petclinic:2.7.0-SNAPSHOT"
        ],
        "Architecture": "amd64",
        "Os": "linux",
        "Size": 266141567,
        "VirtualSize": 266141567,
        ...
    }
]
This command gives us lots of details about the image, including when it was created, the different layers inside it, and more.
It doesn’t, however, tell us much about the contents inside. For that, we must first save the image to the file system:
$ docker save 0f9d2d05687b > 0f9d2d05687b.tarThis command will save the image as a tar file. Now we can use the familiar tar command to examine it:
$ tar tvf 0f9d2d05687b.tar
drwxr-xr-x  0 0      0           0 Dec 31  1979 02805fa4a4f35efdcf3804bc1218af1bc22d28ee521cc944cab5cac5dbe5abfe/
-rw-r--r--  0 0      0           3 Dec 31  1979 02805fa4a4f35efdcf3804bc1218af1bc22d28ee521cc944cab5cac5dbe5abfe/VERSION
-rw-r--r--  0 0      0         477 Dec 31  1979 02805fa4a4f35efdcf3804bc1218af1bc22d28ee521cc944cab5cac5dbe5abfe/json
-rw-r--r--  0 0      0        1024 Dec 31  1979 02805fa4a4f35efdcf3804bc1218af1bc22d28ee521cc944cab5cac5dbe5abfe/layer.tar
drwxr-xr-x  0 0      0           0 Dec 31  1979 0f915e8772f0e40420852f1e2929e4ae9408327cbda6c546c71cca7c3e2f094a/
-rw-r--r--  0 0      0           3 Dec 31  1979 0f915e8772f0e40420852f1e2929e4ae9408327cbda6c546c71cca7c3e2f094a/VERSION
-rw-r--r--  0 0      0         477 Dec 31  1979 0f915e8772f0e40420852f1e2929e4ae9408327cbda6c546c71cca7c3e2f094a/json
-rw-r--r--  0 0      0     3622400 Dec 31  1979 0f915e8772f0e40420852f1e2929e4ae9408327cbda6c546c71cca7c3e2f094a/layer.tar
The tar command can list and extract specific files from the image, depending on what information we are looking for.
So far, we’ve looked at the structure of an image and how to inspect it. Next, let’s look at how we can compare two images and find their differences.
Depending on what information we want to compare, there are different tools that can help. As we saw above, the built-in image command can give us the size and date information.
But if we want to compare the contents of two images, we need to use a third-party tool. Below, we’ll look at a couple of them.
One such tool is Google’s container-diff. Despite its name, it can compare various aspects of two images and provide a nicely formatted report.
For example, let’s compare the two Spring pet clinic images from the earlier example:
$ /usr/local/bin/container-diff diff \
daemon://spring-petclinic:2.6.0-SNAPSHOT \
daemon://spring-petclinic:2.7.0-SNAPSHOT \
--type=file
This gives us the differences in the files of each image.
The output is generally broken into three sections. First, it tells which files exist in the first image, but not in the second:
/workspace/BOOT-INF/lib/byte-buddy-1.12.10.jar                                                    3.7M
/workspace/BOOT-INF/lib/classgraph-4.8.139.jar                                                    551.7K
/workspace/BOOT-INF/lib/ehcache-3.10.0.jar                                                        1.7M
/workspace/BOOT-INF/lib/h2-2.1.212.jar                                                            2.4M
/workspace/BOOT-INF/lib/hibernate-core-5.6.9.Final.jar                                            7.1M
/workspace/BOOT-INF/lib/jackson-annotations-2.13.3.jar                                            73.9K
Next, it tells us which files exist in the second image, but not in the first:
These entries have been deleted from spring-petclinic:2.6.0-SNAPSHOT:
FILE                                                                        SIZE
/workspace/BOOT-INF/lib/byte-buddy-1.11.22.jar                              3.5M
/workspace/BOOT-INF/lib/classgraph-4.8.115.jar                              525.4K
/workspace/BOOT-INF/lib/ehcache-3.9.9.jar                                   1.7M
/workspace/BOOT-INF/lib/h2-1.4.200.jar                                      2.2M
/workspace/BOOT-INF/lib/hibernate-core-5.6.7.Final.jar                      7.1M
/workspace/BOOT-INF/lib/jackson-annotations-2.13.2.jar                      73.9K
In this case, the two sections combined can tell us very quickly how the dependencies have changed between each version of the application.
And finally, the last section tells which files exist in both, but are different:
These entries have been changed between spring-petclinic:2.6.0-SNAPSHOT and spring-petclinic:2.7.0-SNAPSHOT:
FILE                                                                                                 SIZE1        SIZE2
/layers/config/metadata.toml                                                                         16.6K        1.9K
/workspace/META-INF/maven/org.springframework.samples/spring-petclinic/pom.xml                       13.3K        13.3K
/workspace/BOOT-INF/classes/org/springframework/samples/petclinic/owner/OwnerController.class        7.8K         7.7K
/workspace/org/springframework/boot/loader/ExecutableArchiveLauncher.class                           6.6K         7.5K
/workspace/org/springframework/boot/loader/JarLauncher.class                                         3.9K         2.5K
/workspace/BOOT-INF/classpath.idx                                                                    3.2K         3.2K
/workspace/org/springframework/boot/loader/data/RandomAccessDataFile$FileAccess.class                3.2K         3.2K
/workspace/BOOT-INF/classes/db/h2/data.sql                                                           2.8K         3K
/workspace/org/springframework/boot/loader/data/RandomAccessDataFile$DataInputStream.class           2.6K         2.7K
This section makes it very easy to identify any specific classes and properties files that have changed between the two versions.
Another great open source tool for inspecting Docker images is dive. Inspecting images with dive gives us a more traditional view of its contents because it understands how to examine each layer inside the image. This allows it to present each image using a traditional file system tree:
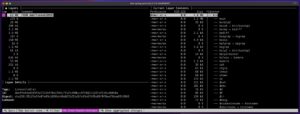
Using the keyboard, we can navigate through each layer of the image and see exactly which files it added, modified, or removed.
While the dive tool does not natively support comparing images, we can manually do that by simply running it on two terminals side-by-side:
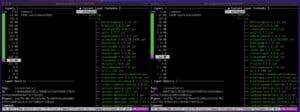
In this manner, we can see which layers are the same (based on size), and for the different ones, we can see which files are different.
In this article, we looked at the structure of Docker images and saw various ways to inspect them. While the Docker client contains some tools for inspecting single images, comparing two images requires using a 3rd party tool.
Google’s container-diff is one option built specifically for comparing images. And while the dive utility is great for inspecting the layer of a single image, it can also be used to identify differences by simply running it against two images at the same time.