
1. Overview
Every Spring web application needs a way to take an incoming HTTP request, route it to the right Java method, and turn that method’s result into an HTTP response. The annotations that wire all of this up are the core Spring MVC annotations, and they work the same way whether we’re building a REST API or a more traditional, server-rendered MVC application.
In this lesson, we’ll take a closer, deliberate look at the controller-defining and request-mapping annotations we’ve already been using.
The relevant module we need to import when starting this lesson is: controller-basics-start.
If we want to reference the fully implemented lesson, we can import: controller-basics-end.
2. Controller Annotations: @Controller vs @RestController
Let’s start with the primary annotations that actually define our controllers: @Controller and @RestController. We’ve already used both earlier in the course, the first in our MVC application, and the second when we implemented a simple REST controller, but we never stopped to look at the difference between them.
Both annotations mark a class as a web controller, the component that handles incoming requests. They’re stereotype annotations, specializations of Spring’s @Component, so the controller is also a Spring bean. The stereotype gives the class additional meaning, clearly indicating that it’s a controller rather than just any component.
The difference between them comes down to the response style. The @Controller annotation doesn’t make any assumption about the kind of application we’re building. It works equally well for a traditional MVC application that returns view names and for a REST API that returns data.
When we’re building a REST API, though, we typically want to marshal our responses and resources directly to the HTTP response body. That requires the @ResponseBody annotation, and adding it to each and every handler method quickly gets repetitive.
That’s exactly where @RestController comes in: it bundles @Controller and @ResponseBody into a single annotation, so @ResponseBody is applied by default and we don’t have to add it manually every time.
3. The ProjectController Starting Point
Let’s open ProjectController, which we’ve already worked on earlier in the course.
@RestController
@RequestMapping(value = "/projects")
public class ProjectController {

    private IProjectService projectService;

    public ProjectController(IProjectService projectService) {
        this.projectService = projectService;
    }

    // findOne(...) and create(...), the two existing endpoints
}
The class is already annotated with @RestController and @RequestMapping. It already declares two endpoints: a findOne method that retrieves a project by its id, and a create method that creates a new project.
We’ll use findOne as our example throughout the rest of the lesson.
4. Mapping Requests With @RequestMapping
Once we’ve defined our controller, the natural next step is to start defining mappings, and that’s the job of @RequestMapping. It connects an HTTP request to a handler method, mapping that method to an HTTP verb, a request path, and a few other details about the request.
Using an annotation and really understanding it are two very different things, so let’s have a closer look at where @RequestMapping sits in our controller. It’s defined not on an individual method, but at the base controller level. That’s interesting, because the mapping logically belongs on a handler method, so why do we have it on the class?
The reason is that Spring lets us combine multiple @RequestMapping instances across levels and merges them behind the scenes to form the final mapping for each method. When we define a mapping at the controller level, it applies to every method in the controller as a baseline of common configuration, which we can then refine at the method level.
We can see this refinement in action in the findOne method. The class-level annotation sets the base path to /projects, and the method-level annotation sets it to /{id}, so Spring combines them into /projects/{id}:
@GetMapping(value = "/{id}")
public ProjectDto findOne(@PathVariable Long id) {
    Project entity = projectService.findById(id)
        .orElseThrow(() -> new ResponseStatusException(HttpStatus.NOT_FOUND));
    return convertToDto(entity);
}
Notice that this method doesn’t use @RequestMapping directly. It uses @GetMapping instead, which leads us to the shorthand annotations.
5. Shorthand Mapping Annotations
Spring MVC introduced a set of shorthand annotations to simplify the common case. They don’t do anything more than pre-select the HTTP verb for a @RequestMapping: we just pick the annotation for the verb we want, and the mapping is wired to that verb.
There’s one shorthand for each of the common HTTP verbs:
- @GetMapping
- @PostMapping
- @PutMapping
- @DeleteMapping
In our controller, findOne uses @GetMapping and create uses @PostMapping.
But why do the shorthands work in place of @RequestMapping? Because they’re @RequestMapping under the hood. If we step into @GetMapping, we see that it’s meta-annotated with @RequestMapping, and that its default method is GET:
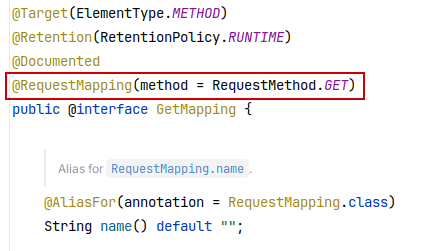
So the shorthands aren’t a separate mechanism; they’re just a cleaner spelling of @RequestMapping.
To make that concrete, since @GetMapping is really a @RequestMapping, we could replace findOne‘s annotation with the raw, fully spelled-out form and it would behave identically:
@RequestMapping(method = RequestMethod.GET, value = "/{id}")
public ProjectDto findOne(@PathVariable Long id) {
    Project entity = projectService.findById(id)
        .orElseThrow(() -> new ResponseStatusException(HttpStatus.NOT_FOUND));
    return convertToDto(entity);
}
Both forms map the same request to the same method. The shorthand is simply cleaner and easier to read, which is exactly why we reach for it by default.
6. Narrowing the Mapping
The composition we’ve explored isn’t limited to the path. Whatever we declare at the class level, such as an HTTP method, a header, or a parameter, combines with what each method declares in the same way. This lets us further restrict which requests match a handler method, going from a broad mapping to a very specific one.
To be clear, the snippets below are illustrative examples of what’s possible. We’re not changing our findOne method, which stays a plain @GetMapping(value = “/{id}”); we’re just looking at the extra attributes we could add to a mapping when we need them.
6.1. Narrowing by Header
Let’s say we want a method to serve only JSON, and not XML or any other format. We can require a specific request header by setting the headers attribute on the mapping:
headers = "accept=application/json"
With this in place, the request must carry an Accept header of application/json for the mapping to match. Requests asking for any other representation simply won’t be routed to this method.
6.2. Narrowing by Content Type
For content-type narrowing specifically, Spring offers two more focused attributes, consumes and produces. The consumes attribute restricts the request body’s media type, while produces restricts the representation the method returns:
produces = "application/json"
This achieves the same JSON-only effect as the header example above. Notice we don’t have to name the header here, since produces already knows it maps to the Accept header, just as consumes maps to Content-Type. These attributes are a bit more restrictive, and more expressive, than the generic headers attribute.
6.3. Narrowing by Parameter
We can also narrow a mapping based on the request’s query parameters, using the params attribute:
params = "paramKey=paramValue"
This means the request must include that exact parameter key and value to match. If the request doesn’t carry the specified parameter, it simply won’t map to this method.
Taken together, these attributes show how flexible request mappings are. We can keep a mapping broad, or make it as fine-grained as we need, and Spring’s ability to compose these annotations is what makes the mechanism so powerful.
7. Trying Out the API
Let’s put the real endpoint to work. After starting the application, we can open a browser and navigate to:
http://localhost:8080/projects/1
Since none of the narrowing attributes from the previous section are applied to findOne, this plain request matches the /projects/{id} mapping and returns the project resource, along with its associated tasks:
{
  "id": 1,
  "name": "Project 1",
  "dateCreated": "2019-06-13",
  "tasks": [
    {
      "id": 3,
      "name": "Task 3",
      "description": "Task 3 Description",
      "dateCreated": "2019-06-13",
      "dueDate": "2019-07-13",
      "status": null
    },
    {
      "id": 1,
      "name": "Task 1",
      "description": "Task 1 Description",
      "dateCreated": "2019-06-13",
      "dueDate": "2019-07-13",
      "status": null
    },
    {
      "id": 2,
      "name": "Task 2",
      "description": "Task 2 Description",
      "dateCreated": "2019-06-13",
      "dueDate": "2019-06-15",
      "status": null
    }
  ]
}
We get back a project with id equal to 1, shaped according to our ProjectDto. This confirms that the composed /projects/{id} route works end to end, with the broad mapping we started from.
8. Conclusion
In this lesson, we’ve looked at the core annotations that turn a plain class into a Spring web controller and route requests to its methods. The annotations are deliberately layered: a controller-defining annotation establishes the bean and its response style, while a baseline mapping on the class is refined by leaner, verb-specific mappings on each method. That composition extends to headers, content types, and parameters as well, not just the path.
The takeaway is that we control exactly how specific a mapping is simply by choosing which attributes to add. We’ll build on these foundations as we continue developing our controller.