
1. Overview
In this lesson, we’ll implement two-factor authentication (2FA) in our Spring Security application using a soft token approach. Two-factor authentication adds an extra layer of security by requiring users to provide something they know (their password) and something they have (a time-based code from their phone).
We’ll explore what 2FA is, the different options available for implementing it, and then build a complete soft token solution using Spring Security and the Google Authenticator app. By the end of this lesson, our login flow will require users to enter a verification code generated by an authenticator app on their phone.
The relevant module we need to import when starting this lesson is: two-factor-soft-token-start.
If we want to reference the fully implemented lesson, we can import: two-factor-soft-token-end.
2. What Is Two-Factor Authentication?
Two-factor authentication is based on a simple but powerful principle: requiring two different types of credentials to verify a user’s identity.
The first authentication factor is “something you know”, such as a password. The second factor is “something you have”, which is a physical object that only you possess. This could be a phone, a hardware token, or even a fingerprint (which can be thought of as something you physically have with you at all times).
The security benefit is straightforward. If an attacker obtains your password through a data breach, a phishing attack, or another method, they still cannot access the account. Without the second factor, the physical device, they are locked out.
This extra layer of security has made 2FA widely adopted across major platforms. For any system holding critical or sensitive data, two-factor authentication has become essential.
3. Available Options for the Second Factor
Let’s look at the common options for implementing the second factor.
The most common approach uses the user’s phone. SMS codes are one-time codes sent via text message. This works with any phone, not just smartphones. However, SMS has security concerns such as SIM swapping attacks. Authenticator apps, such as Google Authenticator, generate time-based codes. This requires a smartphone but is more secure than SMS since it doesn’t rely on the cellular network.
Another option is hardware tokens. Dedicated devices such as RSA SecurID generate one-time codes. These are highly secure but require distributing physical hardware to users, which adds cost and logistics complexity.
Biometric options include fingerprint readers and other methods that represent “something you are”, rather than “something you have”. Although increasingly common on mobile devices, they require specialized hardware.
For this lesson, we’ll implement a soft token solution using Google Authenticator. This approach uses TOTP (Time-Based One-Time Password), where the authenticator app generates a new code every 30 seconds. The code is synchronized with our server using a shared secret, eliminating the need for network communication during authentication.
4. Understanding the Authentication
To add 2FA support, we need to extend Spring Security’s authentication flow. Let’s recall how the UsernamePasswordAuthenticationFilter works.
When a user submits the login form, the filter:
- Extracts the username and password from the request
- Creates an Authentication object with these credentials
- Passes the Authentication object to the AuthenticationManager
The key extension point for our purposes is the setDetails() method. Before the filter hands off to the AuthenticationManager, it calls setDetails() to attach additional information to the authentication request:
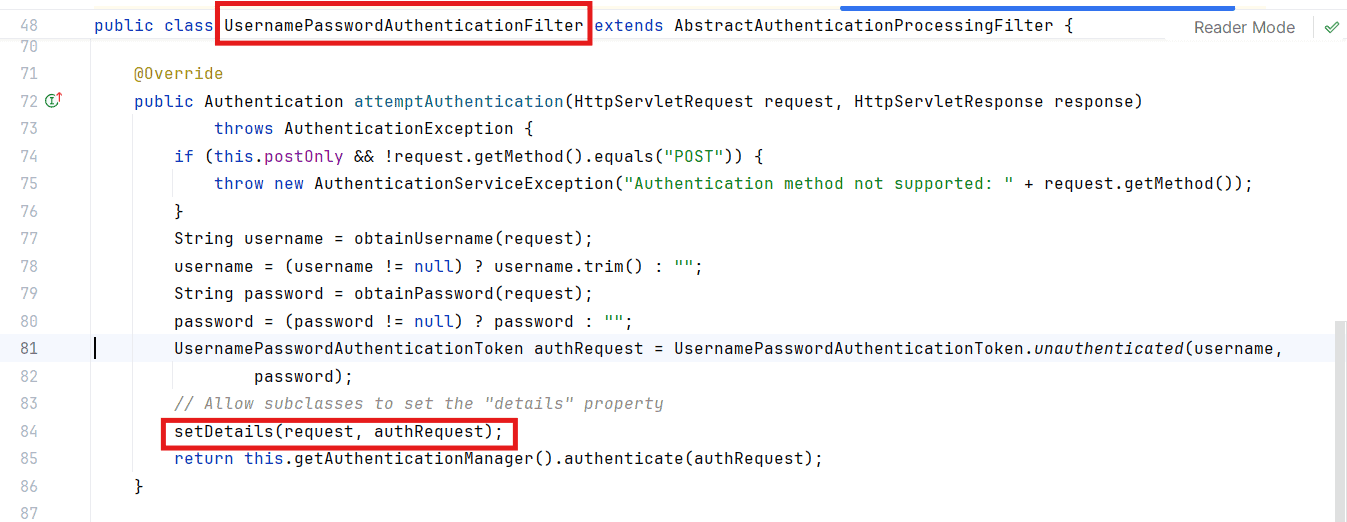
By default, Spring Security attaches a WebAuthenticationDetails object containing the remote IP address and session ID. We can customize this to include our verification code by providing a custom AuthenticationDetailsSource.
5. Creating the Custom WebAuthenticationDetails
Let’s start by creating a class to hold our verification code alongside the standard authentication details.
We’ll create a new class CustomWebAuthenticationDetails in the com.baeldung.lss.security package:
public class CustomWebAuthenticationDetails extends WebAuthenticationDetails {

    private final String verificationCode;

    public CustomWebAuthenticationDetails(HttpServletRequest request) {
        super(request);
        verificationCode = request.getParameter("code");
    }

    public String getVerificationCode() {
        return verificationCode;
    }
}
This class extends WebAuthenticationDetails, which means it retains all the standard information (remote address, session ID) while adding our verification code.
In the constructor, we call the parent constructor to initialize the standard details, then extract the “code” parameter from the HTTP request. The getVerificationCode() method allows our authentication provider to retrieve this value later.
6. Creating the Custom AuthenticationDetailsSource
Next, we need a factory class that Spring Security will use to create our custom details object for each authentication request.
Let’s create CustomWebAuthenticationDetailsSource in the same package:
@Component
public class CustomWebAuthenticationDetailsSource
        implements AuthenticationDetailsSource<HttpServletRequest, WebAuthenticationDetails> {

    @Override
    public WebAuthenticationDetails buildDetails(HttpServletRequest context) {
        return new CustomWebAuthenticationDetails(context);
    }
}
This class implements AuthenticationDetailsSource and simply returns a new instance of our CustomWebAuthenticationDetails for each request. The @Component annotation makes it available for injection into our security configuration.
7. Adding the Required Libraries
Before we can validate verification codes and generate QR codes, we need a couple of libraries. Let’s add them to our pom.xml:
<dependency>
    <groupId>org.jboss.aerogear</groupId>
    <artifactId>aerogear-otp-java</artifactId>
    <version>${aerogear-otp.version}</version>
</dependency>

<dependency>
    <groupId>com.google.zxing</groupId>
    <artifactId>core</artifactId>
    <version>${zxing.version}</version>
</dependency>
<dependency>
    <groupId>com.google.zxing</groupId>
    <artifactId>javase</artifactId>
    <version>${zxing.version}</version>
</dependency>
This step adds the following dependencies: aerogear-otp-java, google.zxing:core, and google.zxing:javase.
The aerogear-otp-java library provides the Totp class for generating and verifying time-based one-time passwords. TOTP works by combining a shared secret with the current time to generate a code. Since both the server and the authenticator app use the same secret and at the same time (within a tolerance window), they generate matching codes.
The ZXing (“Zebra Crossing”) library will handle QR code generation. We’ll use it to generate a QR code image server-side that users can scan with their authenticator app during registration.
8. Modifying the User Entity
Each user needs a unique secret that will be shared with their authenticator app. Let’s update the User entity.
First, let’s add the new field and import:
import org.jboss.aerogear.security.otp.api.Base32;
Then we add the secret field to the class:
private String secret;

// getters, setters
Next, let’s create a no-argument constructor that generates a random secret:
public User() {
    super();
    this.secret = Base32.random();
}
The Base32.random() method generates a cryptographically secure random string in Base32 encoding, which is the format expected by authenticator apps.
With these changes, every new user will automatically get a unique secret generated when the User object is instantiated. This secret will be persisted in the database and used for TOTP verification.
9. Creating the Custom AuthenticationProvider
Next, we will implement a custom authentication provider that validates the username, password, and verification code.
Let’s create CustomAuthenticationProvider in the com.baeldung.lss.security package:
@Component
public class CustomAuthenticationProvider implements AuthenticationProvider {

    @Autowired
    private UserRepository userRepository;

    @Autowired
    private PasswordEncoder encoder;

    @Override
    public Authentication authenticate(Authentication auth) throws AuthenticationException {
        String username = auth.getName();
        String password = auth.getCredentials().toString();
        String verificationCode = ((CustomWebAuthenticationDetails) auth.getDetails())
                .getVerificationCode();

        User user = userRepository.findByEmail(username);
        if ((user == null) || !encoder.matches(password, user.getPassword())) {
            throw new BadCredentialsException("Invalid username or password");
        }

        Totp totp = new Totp(user.getSecret());
        try {
            if (!totp.verify(verificationCode)) {
                throw new BadCredentialsException("Invalid verification code");
            }
        } catch (Exception e) {
            throw new BadCredentialsException("Invalid verification code");
        }

        return new UsernamePasswordAuthenticationToken(
                user, password, Arrays.asList(new SimpleGrantedAuthority("ROLE_USER")));
    }

    @Override
    public boolean supports(Class<?> authentication) {
        return authentication.equals(UsernamePasswordAuthenticationToken.class);
    }
}
Let’s walk through the authenticate() method step by step.
First, we extract the three pieces of information we need: the username, password, and verification code. Notice how we cast auth.getDetails() to our CustomWebAuthenticationDetails to access the verification code.
Next, we validate the username and password. We look up the user by email and check if the provided password matches the stored (encoded) password. If either check fails, we throw a BadCredentialsException.
Then we validate the verification code using the TOTP library. We create a Totp instance with the user’s secret and call verify() with the provided code. The library handles the time-based calculation and allows for a small tolerance window (typically one code before and after the current one).
Notice that we use generic error messages throughout. This is an important security practice – we don’t want to reveal to an attacker which specific field was incorrect. Whether the username, password, or verification code is wrong, the error message should be the same.
Finally, if all validation passes, we return a UsernamePasswordAuthenticationToken with the authenticated user and their granted authorities.
The supports() method tells Spring Security that this provider handles UsernamePasswordAuthenticationToken authentication requests.
10. Security Configuration Changes
Now let’s update our security configuration to use the new components.
We’ll modify LssSecurityConfig to inject our custom provider and details source:
@Autowired
private CustomAuthenticationProvider customAuthenticationProvider;

@Autowired
private CustomWebAuthenticationDetailsSource authenticationDetailsSource;
Next, let’s update the configureGlobal() method to use our custom provider instead of the UserDetailsService:
@Autowired
public void configureGlobal(AuthenticationManagerBuilder auth) throws Exception {
    auth.authenticationProvider(customAuthenticationProvider);
}
We can also remove the UserDetailsService and PasswordEncoder fields and the constructor that was using them, since our CustomAuthenticationProvider handles authentication directly.
Now let’s update the filterChain() method. We need to add the authenticationDetailsSource to the form login configuration and permit access to the /code* paths (which will be used for generating QR codes):
@Bean
public SecurityFilterChain filterChain(HttpSecurity http) throws Exception {
    http
    .authorizeHttpRequests((authorize) -> authorize
            .requestMatchers("/signup", "/user/register", "/code*").permitAll()
            .anyRequest().authenticated())

    .formLogin((form) -> form
            .loginPage("/login").permitAll()
            .loginProcessingUrl("/doLogin")
            .defaultSuccessUrl("/user")
            .authenticationDetailsSource(authenticationDetailsSource))

    .logout((logout) -> logout
            .permitAll().logoutUrl("/logout"))

    .csrf((csrf) -> csrf.disable());

    return http.build();
}
The key addition is .authenticationDetailsSource(authenticationDetailsSource) on the form login configuration. This tells Spring Security to use our custom details source when building the authentication request.
We can now delete the LssUserDetailsService class since it’s no longer needed – our CustomAuthenticationProvider handles user lookup directly.
11. Front-End Changes
To complete our 2FA implementation, we need to update the front-end to collect the verification code and show users how to set up their authenticator app. The following changes are mostly front-end code, so we’ll cover them briefly.
11.1. Login Page Updates
Let’s update loginPage.html to add a verification code field.
First, we update the error message to include the verification code:
<div th:if="${param.error}" class="alert alert-danger">
    Invalid username, password or verification code.
</div>
Then we add the code input field after the password field:
<div class="form-group">
    <label class="control-label col-xs-2" for="code"> Code:</label>
    <div class="col-xs-10">
        <input id="code" type="text" name="code" />
    </div>
    <br/>
    <p class="text-muted col-xs-10">
        Use Google Authenticator app on your phone to obtain the verification Code
    </p>
</div>
Notice the field name is “code” – this matches what our CustomWebAuthenticationDetails extracts from the request.
11.2. QR Code Controller
We need an endpoint that generates the QR code image.
Let’s create VerificationCodeController in the com.baeldung.lss.web.controller package:
@Controller
public class VerificationCodeController {

    public static String APP_NAME = "LearnSpringSecurity";

    @Autowired
    private UserRepository userRepository;

    @RequestMapping(value = "/code", method = RequestMethod.GET, produces = MediaType.IMAGE_PNG_VALUE)
    public ResponseEntity<byte[]> getQRCode(@RequestParam("username") String username)
            throws WriterException, IOException {
        User user = userRepository.findByEmail(username);
        if (user == null) {
            return ResponseEntity.status(HttpStatus.NOT_FOUND).build();
        }

        String otpAuthUrl = String.format("otpauth://totp/%s:%s?secret=%s&issuer=%s",
                APP_NAME, username, user.getSecret(), APP_NAME);

        QRCodeWriter qrCodeWriter = new QRCodeWriter();
        BitMatrix bitMatrix = qrCodeWriter.encode(otpAuthUrl, BarcodeFormat.QR_CODE, 200, 200);

        ByteArrayOutputStream outputStream = new ByteArrayOutputStream();
        MatrixToImageWriter.writeToStream(bitMatrix, "PNG", outputStream);

        return ResponseEntity.ok()
                .contentType(MediaType.IMAGE_PNG)
                .body(outputStream.toByteArray());
    }
}
The controller builds an otpauth:// URL containing the application name, username, and the user’s secret. This is the standard format that authenticator apps understand. It then uses ZXing’s QRCodeWriter to encode this URL into a 200×200 pixel QR code and returns the PNG image bytes directly in the response.
By generating the QR code on the server, we avoid any dependency on external services and have full control over the image generation.
11.3. QR Code Page
After registration, users need to set up their authenticator app by scanning a QR code. Let’s create a new template qrcode.html in the templates folder. The key part of the template is:
<div id="qr">
    <p>Scan this Barcode using Google Authenticator app on your phone to use it later in login
       <a href="https://play.google.com/store/apps/details?id=com.google.android.apps.authenticator2">Android</a> and
       <a href="https://itunes.apple.com/us/app/google-authenticator/id388497605">iPhone</a>
    </p>
    <img th:src="@{/code(username=${user.email})}" alt="QR Code" />
</div>

<a href="/login" class="btn btn-primary">Go to login page</a>
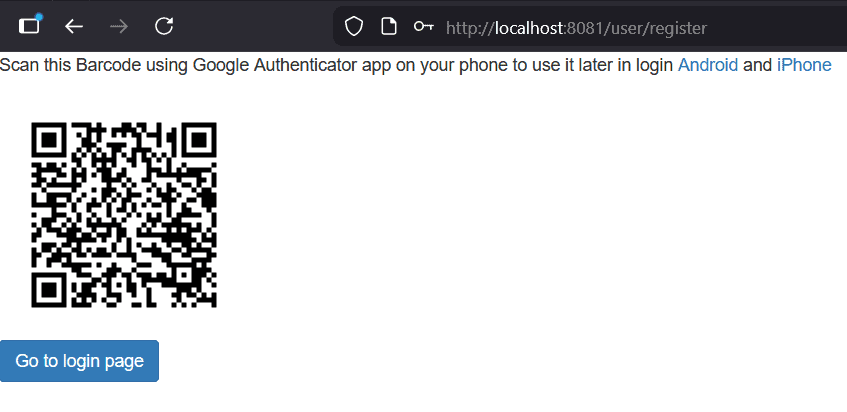
The template also includes the standard HTML boilerplate (DOCTYPE, head with Bootstrap CSS) and Thymeleaf namespace declarations, which are available in the full code module. The important part is the QR code display: we use a Thymeleaf th:src expression to point the img tag at the /code endpoint, passing the user’s email as a query parameter. The page also provides links to download Google Authenticator for both Android and iPhone, and a button to navigate to the login page after setup.
11.4. Registration Controller Update
Finally, let’s update the RegistrationController to redirect to the QR code page after successful registration instead of the login page.
In the registerUser() method, we change the return statement from:
return new ModelAndView("redirect:/login");
to:
return new ModelAndView("qrcode", "user", user);
This ensures new users are shown the QR code page where they can set up their authenticator app before logging in.
12. Testing the Complete Flow
Let’s start the application and verify our implementation works correctly by testing the complete 2FA flow:
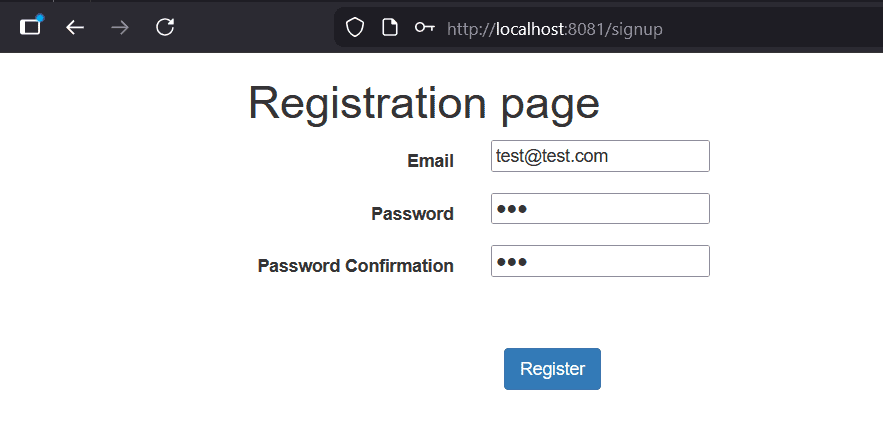
Register a new user: Let’s navigate to /signup and create a new account. After successful registration, we should be redirected to the QR code page:
Set up Google Authenticator: We need to install Google Authenticator on our phone if we haven’t already, then scan the QR code displayed on the page. The app will add an entry for our application:
Test login without code: Let’s try logging in with the correct username and password, but leave the verification code field empty. We should see “Invalid username, password or verification code” message:
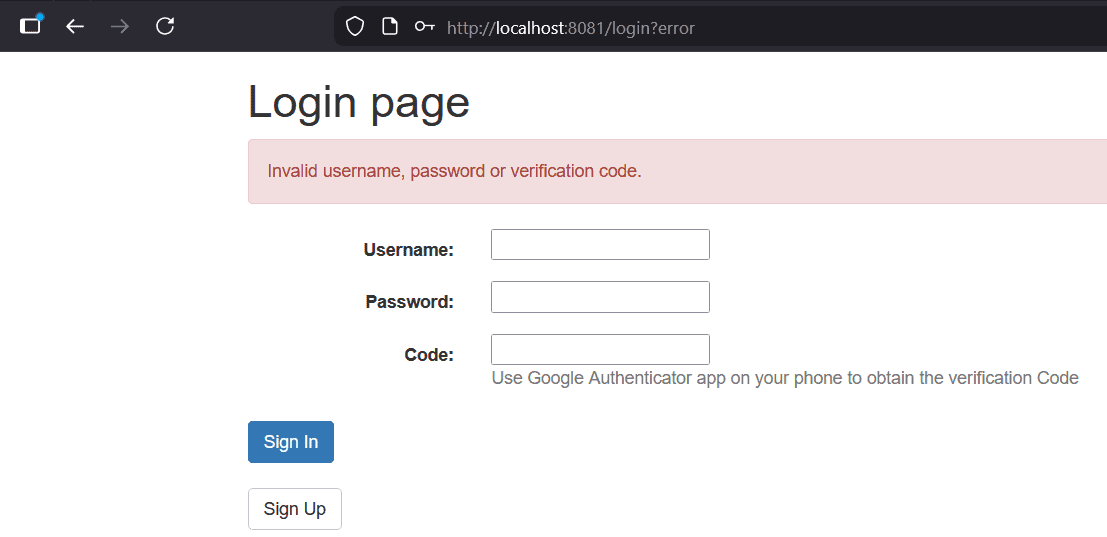
Test login with invalid code: Enter the correct credentials but provide an incorrect verification code. You should see the same generic error message.
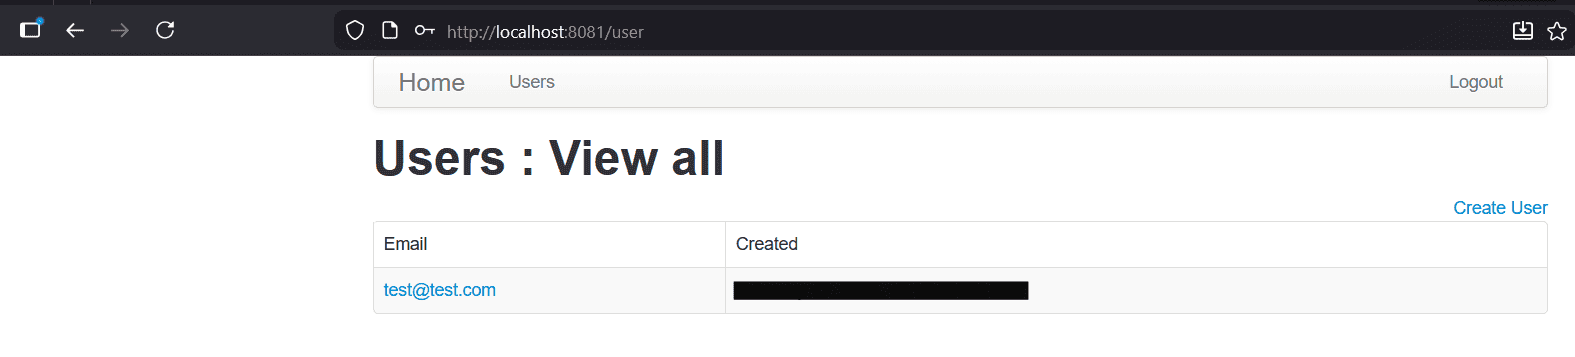
Test login with valid code: Finally, we enter the correct username, password, and the current code shown in Google Authenticator. We should be successfully logged in:
Notice that the error message is always the same regardless of which field is incorrect. This is intentional: revealing which specific credential failed would help attackers narrow down their attacks.
13. Conclusion
In this lesson, we implemented two-factor authentication using a soft token approach with Spring Security. We learned that 2FA adds security by combining “something you know” (password) with “something you have” (authenticator app on your phone).
We extended Spring Security’s authentication flow by creating a custom WebAuthenticationDetails to carry the verification code, a custom AuthenticationDetailsSource to build these details, and a custom AuthenticationProvider to validate all three credentials. The aerogear-otp-java library handles the TOTP algorithm that synchronizes codes between our server and the user’s authenticator app.
The implementation follows security best practices by using generic error messages that don’t reveal which specific credential failed, preventing information disclosure attacks.