
1. Overview
In this lesson, we’ll learn about Appenders and Layouts in Log4j 2 and explore how they enable us to control our application’s logs.
The relevant module we need to import when starting this lesson is: log4j2-appenders-and-layouts-start.
If we want to reference the fully implemented lesson, we can import: log4j2-appenders-and-layouts-end.
2. What Are Appenders and Layouts?
Before we start configuring our logging system, let’s briefly review two of the core building blocks of any logging framework: appenders and layouts.
2.1. Appenders
An Appender is a component we attach to a logger to send log messages to specific destinations like the console, files, databases, or remote network services.
We can configure a single logger to write to multiple appenders simultaneously, and conversely, configure multiple loggers to share the same appender.
Loggers inherit appenders from their parents in the logger hierarchy. This means if we attach an appender to the root logger, all loggers in our application will use it by default, unless we specifically override this behavior.
2.2. Layouts
While an appender knows where to send a log message, a layout determines how that message is formatted. It transforms the raw log event into a configured format before it’s written to its destination.
We associate a layout with an appender. This separation lets us change how logs look without changing where they go, and vice versa.
In other frameworks, these components are often called formatters—the concept is the same, only the terminology differs.
3. Exploring Common Log4j 2 Appenders
Now, let’s open our project and configure a few appenders that Log4j 2 provides out of the box.
3.1. Console Appender
The Console appender is the simplest appender. Under the hood, it prints logs directly to the Java standard I/O console streams provided by the JVM — System.out or System.err.
To configure it in our application, let’s create a log4j2.xml file in our project’s src/main/resources directory:
<Configuration status="WARN">
    <Appenders>
        <Console name="Console" target="SYSTEM_OUT">
        </Console>
    </Appenders>
    <Loggers>
        <Root level="INFO">
            <AppenderRef ref="Console"/>
        </Root>
    </Loggers>
</Configuration>
Here, we define a Console appender to write to the standard output stream (System.out), as specified by the target attribute.. Then, we attach it to the root logger using an AppenderRef element and set its level to INFO.
Note that Log4j 2 allows us to define our configuration in formats such as JSON, YAML, and properties. However, we’ll use the XML format throughout the lesson.
Let’s open our JavaLoggingUnitTest class and add a test case to see this configuration in action:
class JavaLoggingUnitTest {
    private static final Logger logger = LogManager.getLogger(JavaLoggingUnitTest.class);

    @Test
    void whenMessagesLoggedUsingRootLogger_thenMessagesPrintedToConsole() {
        logAtAllLevels(logger);
    }

    private void logAtAllLevels(Logger logger) {
        logger.trace("Sample TRACE log");
        logger.debug("Sample DEBUG log");
        logger.info("Sample INFO log");
        logger.warn("Sample WARN log");
        logger.error("Sample ERROR log");
        logger.fatal("Sample FATAL log");
    }
}
Here, we get an instance of the root logger and use it to log messages at all severity levels. Notice that we extract the logging calls into a helper method, so we can reuse it in subsequent tests.
Now, let’s run the test and check the console output:
Sample INFO log
Sample WARN log
Sample ERROR log
Sample FATAL log
As expected, only messages at the INFO level and above are printed, confirming that our configuration is working.
However, notice that our logs appear as plain text without any metadata, which makes debugging extremely difficult. We’ll solve this problem when we explore Layouts later in the lesson.
3.2. File Appender
While writing logs to the console is great for development, we often need to persist our logs for later analysis.
Log4j 2 provides the File appender, which writes log messages to a specified file on the filesystem.
Let’s update our log4j2.xml to add a File appender along with a dedicated logger that uses it:
<Appenders>
    <!-- ... existing configuration -->
    <File name="LogFile" fileName="logs/app.log" append="true">
    </File>
</Appenders>
<Loggers>
    <!-- ... existing configuration -->
    <Logger name="LoggerWithFileAppender" level="INFO" additivity="false">
        <AppenderRef ref="LogFile"/>
    </Logger>
</Loggers>
Here, we add a File appender and configure it to write logs to an app.log file inside the logs directory. The append attribute controls whether new log entries overwrite the file or are added to the end of it. Setting it to true ensures that logs accumulate across application restarts instead of being replaced.
Additionally, we define a new logger named LoggerWithFileAppender that uses our File appender exclusively. By default, loggers pass their log events up to their parent loggers (and ultimately to the root logger), causing them to appear in multiple appenders. Setting additivity=”false” disables this behavior, preventing events from bubbling up and ensuring that LoggerWithFileAppender writes only to its own appenders.
Now, let’s add a new test case to use our new logger:
@Test
void whenMessagesLoggedUsingLoggerWithFileAppender_thenMessagesWrittenToFile() {
    Logger loggerWithFileAppender = LogManager.getLogger("LoggerWithFileAppender");
    logAtAllLevels(loggerWithFileAppender);
}
Here, we obtain an instance of our newly configured logger using its name, LoggerWithFileAppender. Then, we use it to call our utility method to log messages at all levels.
Let’s execute this test case and look at our project’s updated structure:
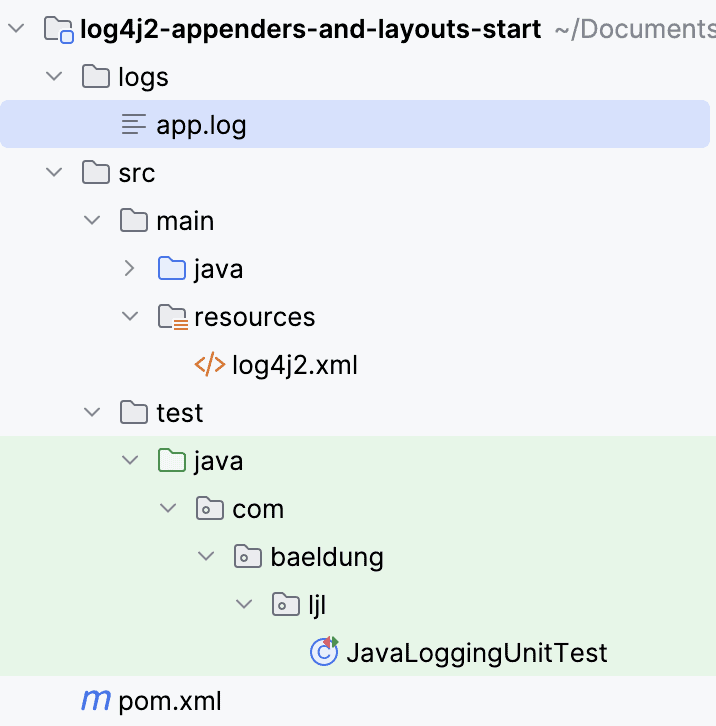
We can see that Log4j 2 creates a new logs directory containing an app.log file in our project’s root (we might need to refresh the IDE’s project explorer to see the new folder).
If we open the file, we’ll see the same log messages that were previously printed to the console.
3.3. RollingFile Appender
As our application runs continuously and generates a large volume of logs, a single log file becomes unmanageably large.
Log4j 2 solves this issue by providing the RollingFile appender, which automatically archives the current log file and starts a new one based on specified criteria, such as file size or time intervals.
Let’s configure a RollingFile appender along with its dedicated logger:
<Appenders>
    <!-- ... existing configuration -->
    <RollingFile name="RollingFile"
      fileName="rolling-logs/app.log"
      filePattern="rolling-logs/app-%i.log">
        <Policies>
            <SizeBasedTriggeringPolicy size="10KB"/>
        </Policies>
    </RollingFile>
</Appenders>
<Loggers>
    <!-- ... existing configuration -->
    <Logger name="LoggerWithRollingFileAppender" level="INFO" additivity="false">
        <AppenderRef ref="RollingFile"/>
    </Logger>
</Loggers>
Here, we add a RollingFile appender and configure it to write logs initially to rolling-logs/app.log.
Then, we use the filePattern attribute to define the naming convention of the new files. The %i placeholder is a counter for an incrementing number. The filePattern can also include other placeholders, such as %d{yyyy-MM-dd}, to add the current date into the file name.
Finally, we configure a SizeBasedTriggeringPolicy and set the size to 10KB to instruct the framework to create a new log file when the previous reaches the configured size limit. Log4j 2 provides several Triggering Policies besides size, such as time-based policies. You can find the full list and examples in the official documentation.
Let’s test this behavior by generating a large amount of logs:
@Test
void whenMessagesLoggedUsingLoggerWithRollingFileAppender_thenMessagesWrittenToFiles() {
    Logger loggerWithRollingFileAppender = LogManager.getLogger("LoggerWithRollingFileAppender");
    for(int i = 0; i < 1000; i++) {
        logAtAllLevels(loggerWithRollingFileAppender);
    }
}
Here, we simply obtain an instance of the new logger and call our helper method inside a loop.
Let’s run the test case and examine our project’s structure again:
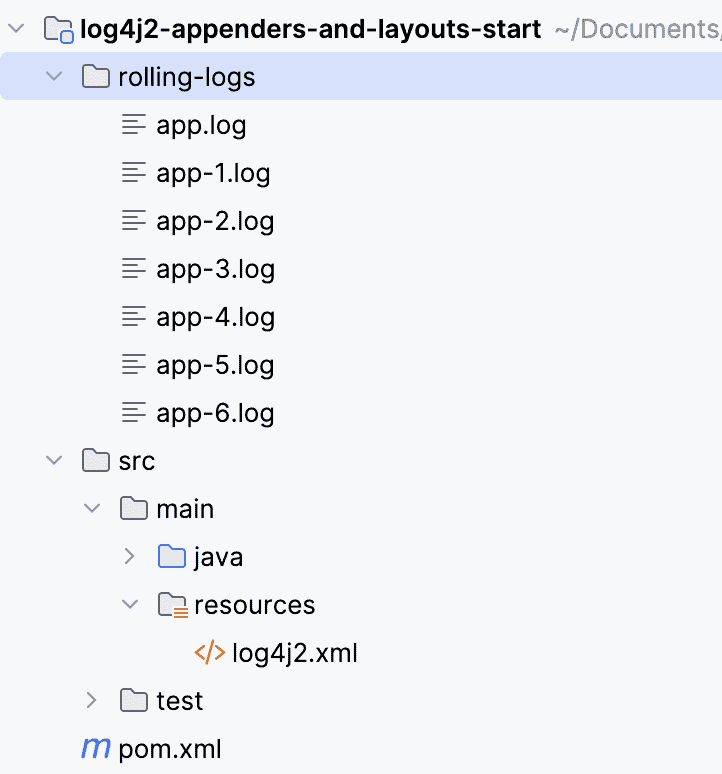
We can see that our configuration works as expected. Log4j 2 creates multiple log files in the rolling-logs directory following the configured naming pattern.
4. Exploring Common Log4j 2 Layouts
Now that we’ve configured where our logs go, let’s control how they look using layouts.
4.1. PatternLayout
The PatternLayout allows us to define a string pattern containing conversion characters that the framework replaces with relevant values.
Let’s enhance our initial Console appender by adding a PatternLayout inside it:
<Console name="Console" target="SYSTEM_OUT">
    <PatternLayout pattern="%d{yyyy-MM-dd HH:mm:ss} [%t] %-5p %c - %m%n"/>
</Console>
Let’s break down the pattern we’ve used:
- %d{yyyy-MM-dd HH:mm:ss}: adds the date and time of the log event as per the specified pattern
- %t: adds the name of the thread
- %-5p: adds the log level, left-padded to 5 characters for alignment
- %c: adds the name of the logger
- %m: adds the actual log message
- %n: adds a newline
Now, let’s rerun our first test case and check the console output:
2025-09-24 21:43:36 [main] INFO  com.baeldung.ljl.JavaLoggingUnitTest - Sample INFO log
2025-09-24 21:43:36 [main] WARN  com.baeldung.ljl.JavaLoggingUnitTest - Sample WARN log
2025-09-24 21:43:36 [main] ERROR com.baeldung.ljl.JavaLoggingUnitTest - Sample ERROR log
2025-09-24 21:43:36 [main] FATAL com.baeldung.ljl.JavaLoggingUnitTest - Sample FATAL log
We now get much more informative logs that are useful for debugging and monitoring.
4.2. JSONTemplateLayout
While text-based logs are human-readable, modern log aggregation and analysis tools often require logs in structured formats.
Log4j 2 provides the JSONTemplateLayout, which formats our logs to JSON. It’s not part of the core Log4j 2 library, so let’s add its dependency to our pom.xml:
<dependency>
    <groupId>org.apache.logging.log4j</groupId>
    <artifactId>log4j-layout-template-json</artifactId>
    <version>${log4j.version}</version>
</dependency>
Next, let’s configure a new File appender:
<Appenders>
    <!-- ... existing configuration -->
    <File name="JsonLogFile" fileName="json-logs/app.json" append="true">
        <JSONTemplateLayout/>
    </File>
</Appenders>
<Loggers>
    <!-- ... existing configuration -->
    <Logger name="LoggerWithJsonFileAppender" level="INFO" additivity="false">
        <AppenderRef ref="JsonLogFile"/>
    </Logger>
</Loggers>
Here, we define a File appender that writes to json-logs/app.json and uses the JSONTemplateLayout.
Now, let’s test our configuration:
@Test
void whenMessagesLoggedUsingLoggerWithJsonFileAppender_thenMessagesWrittenToJsonFile() {
    Logger loggerWithJsonFileAppender = LogManager.getLogger("LoggerWithJsonFileAppender");
    logAtAllLevels(loggerWithJsonFileAppender);
}
Similar to our previous test cases, we get our new logger by its name and use it to log messages at all levels.
Let’s run the test case and verify the existence of the app.json file:
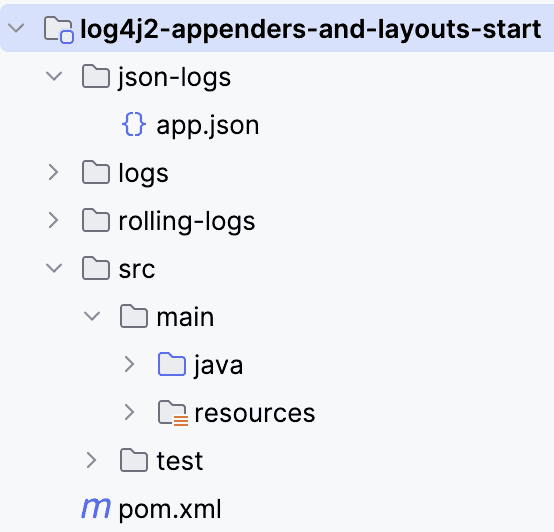
As expected, Log4j 2 creates the required log file. Let’s open it and look at its content:
{"@timestamp":"2025-09-24T16:22:24.390Z","ecs.version":"1.2.0","log.level":"INFO","message":"Sample INFO log","process.thread.name":"main","log.logger":"LoggerWithJsonFileAppender"}
{"@timestamp":"2025-09-24T16:22:24.391Z","ecs.version":"1.2.0","log.level":"WARN","message":"Sample WARN log","process.thread.name":"main","log.logger":"LoggerWithJsonFileAppender"}
{"@timestamp":"2025-09-24T16:22:24.392Z","ecs.version":"1.2.0","log.level":"ERROR","message":"Sample ERROR log","process.thread.name":"main","log.logger":"LoggerWithJsonFileAppender"}
{"@timestamp":"2025-09-24T16:22:24.392Z","ecs.version":"1.2.0","log.level":"FATAL","message":"Sample FATAL log","process.thread.name":"main","log.logger":"LoggerWithJsonFileAppender"}
We can see that each log entry is a self-contained JSON object.
The layout automatically includes important metadata that log aggregation systems like ELK or Splunk can easily parse. Log4j 2 allows us to customize this layout. We can explore the official docs to dig deeper into this.
5. Injecting Context Data in Logs
Log4j 2 provides a Lookup mechanism that lets us reference external values dynamically in our configuration file. Common examples include:
- System Properties: to access Java system properties – ${sys:user.home}, ${sys:java.version}
- Environment Variables: to read OS environment variables – ${env:PATH}, ${env:HOME}
- Log4j 2 Configuration: to access the framework’s internal configuration values – ${log4j:configLocation}, ${log4j:configParentLocation}
In addition to the above, which we can use to access static values, Log4j 2 provides another lookup, the ThreadContext, which allows us to add contextual data that automatically appears in all subsequent logs from the same thread.
This feature is called Mapped Diagnostic Context (MDC) and is particularly useful when debugging issues in multi-user applications where we need to track user actions.
Let’s configure a Console appender that includes MDC data in its pattern:
<Console name="ConsoleWithMDC" target="SYSTEM_OUT">
    <PatternLayout pattern="%d{yyyy-MM-dd HH:mm:ss} [%t] %-5p %c [%X{userName} - %mdc{userId}] - %m%n"/>
</Console>

<Logger name="LoggerWithMDC" level="INFO" additivity="false">
    <AppenderRef ref="ConsoleWithMDC"/>
</Logger>
In the PatternLayout, we use the %X{key} conversion character and its alias %mdc{key} to retrieve values from the MDC for the userName and userId keys.
Now, let’s explore how to populate the MDC:
@Test
void whenMessagesLoggedUsingLoggerWithMDC_thenMessagesContainContextData() {
    Logger loggerWithMDC = LogManager.getLogger("LoggerWithMDC");
    loggerWithMDC.info("Initiating withdrawal request");

    ThreadContext.put("userName", "John Doe");
    ThreadContext.put("userId", UUID.randomUUID().toString());
    loggerWithMDC.info("Initiating withdrawal request");
}
Here, we first log a message normally. Then, we use ThreadContext.put() to add user information to the MDC and log the same message again.
Let’s execute our final test case and examine the console output:
2025-09-24 21:57:28 [main] INFO  LoggerWithMDC [ - ] - Initiating withdrawal request
2025-09-24 21:57:28 [main] INFO  LoggerWithMDC [John Doe - 5d9fd667-ad31-46e5-80b3-b9144691d9db] - Initiating withdrawal request
As we can see, the first log message has empty placeholders since we didn’t populate the MDC. The second log message, however, successfully includes the userName and userId values.
It’s worth taking into account that MDC values are stored per thread, so they automatically apply to all logs from the same thread. In asynchronous or multi-threaded applications, frameworks may need to propagate them explicitly. Once more, we can refer to the official docs to learn more about this useful tool.
6. Conclusion
In this lesson, we’ve explored using Appenders and Layouts in Log4j 2.
We configured the Console appender for local development, the File appender for simple persistence, and the RollingFile appender for log file rotation under load.
Then, we enhanced our logs with layouts, customizing the log format using PatternLayout and performing structured logging with JSONTemplateLayout.
Finally, we explored using MDC to inject our logs with contextual information, making log traceability easier.