1. Introduction
In this tutorial, we’ll understand multiplatform programming in Kotlin. We’ll develop a simple application that will target multiple platforms like JVM, JS, and Native.
This will also help us understand the benefits of multiplatform programming and different use-cases where we can apply them effectively.
Quite often, we write parts of a program that aren’t dependent on the platform where we run them. For instance, we invoke a REST API to fetch some data and apply some additional processing before returning the result. We have to, pretty much, duplicate this code in Java when we target backend, JS when we target web, and Android or iOS when we target mobile platforms.
Wouldn’t it be nice if we could just write our code once and target multiple platforms? Well, this is the fundamental promise of multiplatform programming! Kotlin multiplatform programming is aptly suited to fulfill this promise. We’ll see in this tutorial how.
When we write a program in a high-level language like Java or C, we have to compile it to run on a platform like Windows or Linux. With Java, however, it’s compiled to an intermediate format known as bytecode. This gives Java its famous tagline, “write once, run anywhere”. However, we still need a JVM specific to the native platform to run this bytecode.
Kotlin multiplatform takes this concept a notch higher and promises to run the same code on multiple platforms like JVM, JS, or even Native platforms directly. It does not depend on a virtual machine to be running on the target platform. This makes multiplatform programming one of the key benefits of the Kotlin language.
Also, this drastically reduces the effort needed to write and maintain the same code for different platforms.
3. How Does Kotlin Support It?
Before we proceed to see the magic of multiplatform programming, we should invest some time in understanding how Kotlin actually supports it. This section will cover some of the tools and techniques that Kotlin provides to enable and make it easier to use multiplatform programming.
3.1. Covering the Basics
When we can take some Java code and run it on any JVM, the power behind that comes from the Java compiler that transforms the code into bytecode. That’s what enables different languages to target the same JVM. For instance, we can run Kotlin, Groovy, or Scala code on the same JVM platform. They each come with a compiler capable of producing compatible bytecode.
So, there’s no reason why we can’t come up with compilers that can take the same code and produce formats that different platforms can understand. Of course, this is easier said than done and may not be possible in some cases. In some cases, this may not be compilers, but transpilers, which are nothing but source-to-source translators.
Nevertheless, this is how Kotlin enables multiplatform programming. To make common code work on different platforms, Kotlin provides platform-specific compilers and libraries like Kotlin/JVM, Kotlin/JS, and Kotlin/Native:
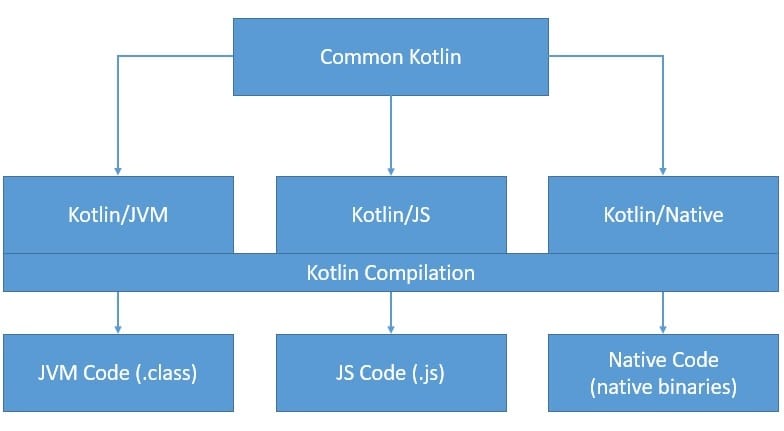
Here, we create reusable parts of the application in common Kotlin, and by virtue of multiplatform programming support, it works on all target platforms. For instance, calling a REST API and fetching some data can be a good candidate to be part of the common.
Kotlin multiplatform organizes the source code in hierarchies that make the dependencies explicit and reuses code between source sets. All platform-specific source sets depend upon the common source set by default:
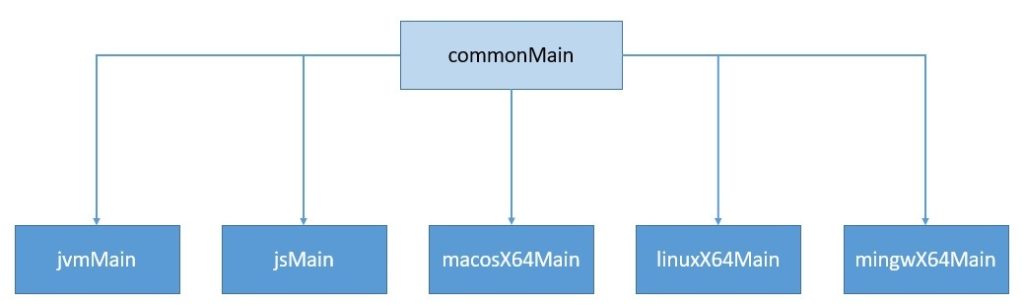
Common code can depend on many libraries that Kotlin provides for typical tasks like making HTTP calls, performing data serialization, and managing concurrency. Further, the platform-specific versions of Kotlin provide libraries we can use to can leverage the platform-specific capabilities of the target platforms.
Hence, we’ve decided to keep the reusable business logic in common and develop parts of the application like the user interface leveraging the native capabilities. Further, Kotlin multiplatform programming allows us to share code among all platforms or share them more selectively:
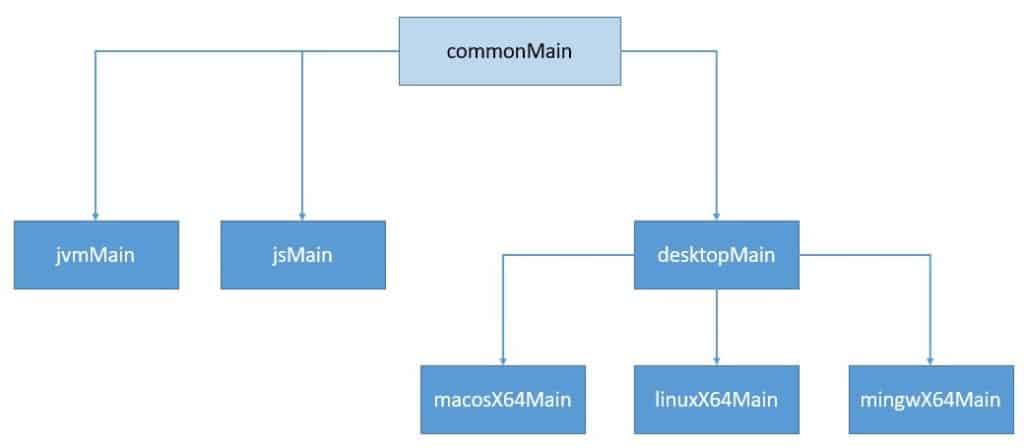
For instance, in the image above, we have common code shared across all platforms, but we also have some common native code shared only across native platforms like Linux, Windows, and macOS.
So far, we’ve seen how Kotlin multiplatform programming allows us to reuse common code across platform-specific source sets. However, in some cases, it may be desirable to define and access platform-specific APIs in common. This is particularly useful for areas where certain common and reusable tasks are specialized and more efficient for leveraging platform-specific capabilities.
Kotlin multiplatform provides the mechanism of expected and actual declarations to achieve this objective. For instance, the common source set can declare a function as expected and the platform-specific source sets will be required to provide a corresponding function with the actual declaration:
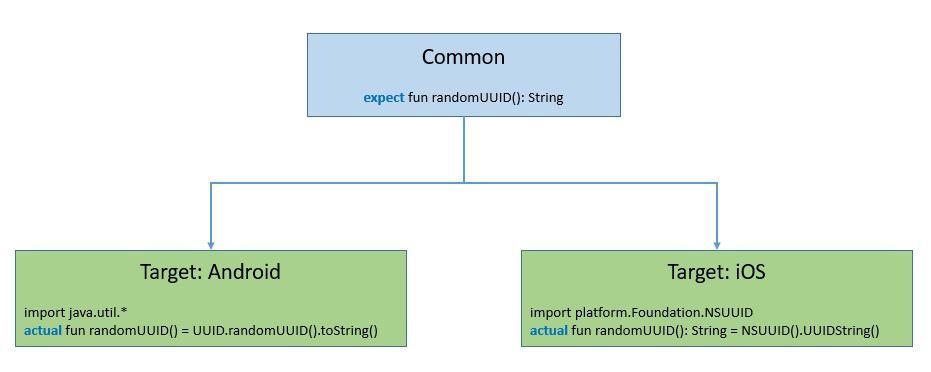
Here, as we can see, we are using a function declared as expected in the common source set. The common code does not care how it’s implemented. So far, the targets provide platform-specific implementations of this function.
We can use these declarations for functions, classes, interfaces, enumerations, properties, and annotations.
Since Kotlin is from JetBrains, who are also pioneers in developing user-friendly IDEs like IntelliJ IDEA, it’s only fair to expect integrated support for multiplatform programming. In fact, IntelliJ IDEA provides several project templates for creating multiplatform projects in Kotlin. This makes the whole process of creating a multiplatform project quite seamless and quick.
When we create a multiplatform project using a project template, it automatically applies the kotlin-multiplatform Gradle plugin:
plugins {
    kotlin("multiplatform") version "1.4.0"
}
This kotlin-multiplatform plugin configures the project for creating an application or library to work on multiple platforms. The configuration, as usual, goes in a file build.gradle or build.gradle.kt, depending upon the DSL we choose:
kotlin {
    jvm {
        withJava()
    }
    js {
        browser {
            binaries.executable()
        }
    }
    sourceSets {
        val commonMain by getting {
            dependencies {
                .....
            }
        }
        val commonTest by getting {
            dependencies {
                .....
            }
        }
        val jvmMain by getting {
            dependencies {
                .....
            }
        }
        val jsMain by getting {
            dependencies {
                .....
            }
        }
    }
}
As we can see in the configuration, we have a “kotlin” extension at the top that includes configurations for targets, source sets, and dependencies.
Further, each target can have one or more compilations. Kotlin multiplatform projects use compilations for producing artifacts. For each target, the default compilations include “main” and “test” compilations for JVM, JS, and Native targets.
This section will put some of the theories that we’ve learned so far into practice. We’ll develop a simple calculator application with some shared code that we’ll reuse across multiple target platforms like JVM, JS, and Native.
We’ll use one of the IDEA project templates to generate a multiplatform library’s skeleton in Kotlin. Let’s have a look at the project template selection wizard in IntelliJ IDEA Community Edition:
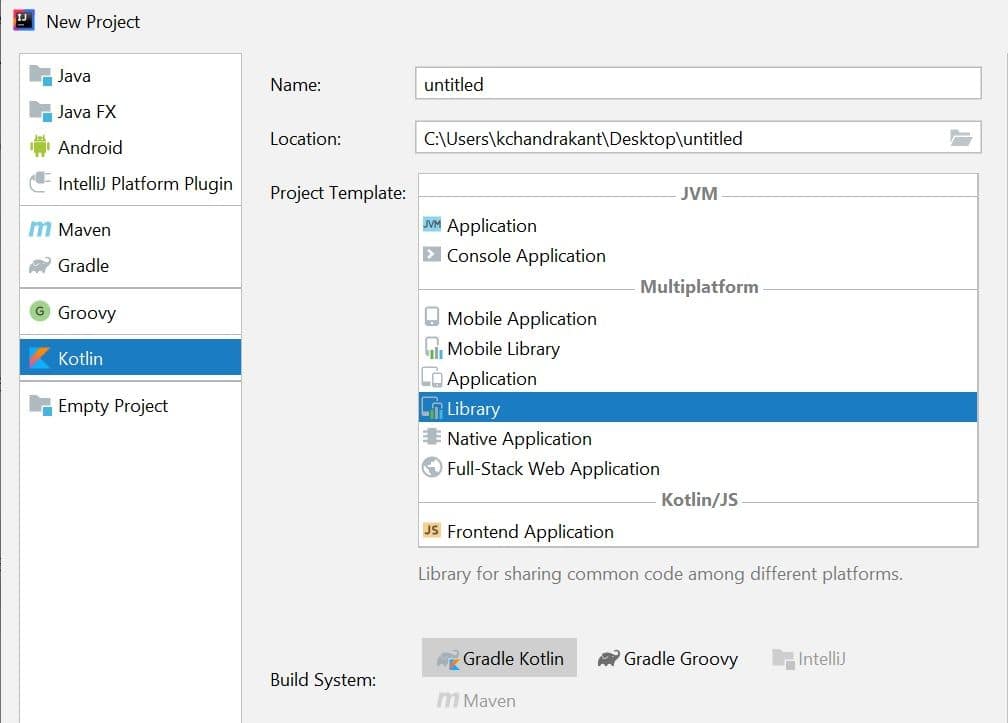
Please note that we can just as easily create skeletons for other types of multiplatform projects like application, mobile library, mobile application, native application, or even a full-stack application. Once we create the Kotlin multiplatform library project using the wizard above, it gives us the default configuration settings and structure of the codebase:
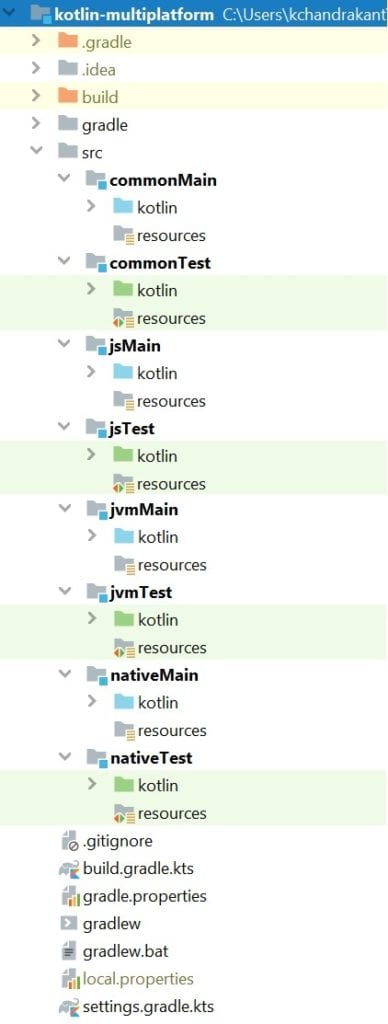
As we can see above, the wizard generates configuration and structure for the common code and targets for JVM, JS, and Native by default. Of course, we can remove targets manually or add additional targets using target presets for the supported platforms.
Moreover, we can change the default target Gradle configuration as necessary. Later, we’ll see how to change these configurations to support a front-end application in the JavaScript module and a command-line application in the Native module.
4.2. Writing Common Code
Once we’ve set up the project structure, it’s time to write some common code that we’ll use in the target platforms later on. The common code resides in the directories commonMain and commonTest in the project structure we created earlier.
We’ll write a simple routine to simulate a calculator in the commonMain:
fun add(num1: Double, num2: Double): Double {
    val sum = num1 + num2
    writeLogMessage("The sum of $num1 & $num2 is $sum", LogLevel.DEBUG)
    return sum
}

fun subtract(num1: Double, num2: Double): Double {
    val diff = num1 - num2
    writeLogMessage("The difference of $num1 & $num2 is $diff", LogLevel.DEBUG)
    return diff
}

fun multiply(num1: Double, num2: Double): Double {
    val product = num1 * num2
    writeLogMessage("The product of $num1 & $num2 is $product", LogLevel.DEBUG)
    return product
}

fun divide(num1: Double, num2: Double): Double {
    val division = num1 / num2
    writeLogMessage("The division of $num1 & $num2 is $division", LogLevel.DEBUG)
    return division
}
As we can see, these are simple Kotlin functions but they’re reusable across multiple platforms. Hence, we greatly benefit from declaring and maintaining them in only one place.
The only interesting thing here is the function writeLogMessage, which we’ve not defined yet. Let’s see how to define it:
enum class LogLevel {
    DEBUG, WARN, ERROR
}

internal expect fun writeLogMessage(message: String, logLevel: LogLevel)
So, here we’ve declared the function writeLogMessage with the keyword expect. As we’ve discussed before, this forces the multiplatform project to look for platform-specific implementations of the function declared with the keyword actual. These declarations are required to have the same name and be present in the same package.
Now, why do we do so with the method writeLogMessage? The rationale basically is that there may be some routine that has a platform-specific dependency. For instance, writing a log can be done more efficiently using some platform-specific capabilities.
The example here is only for demonstration and does not necessarily present a valid case for using expect and actual declarations. Nevertheless, we should be quite cautious and use expect and actual declarations sparingly. Our effort should be to implement as much functionality as possible in the common module itself.
4.3. Writing Tests for Common Code
Let’s write a few tests for our simple calculator functions:
@Test
fun testAdd() {
    assertEquals(4.0, add(2.0, 2.0))
}

@Test
fun testSubtract() {
    assertEquals(0.0, subtract(2.0, 2.0))
}

@Test
fun testMultiply() {
    assertEquals(4.0, multiply(2.0, 2.0))
}

@Test
fun testDivide() {
    assertEquals(1.0, divide(2.0, 2.0))
}
There’s nothing fancy here, and these are pure, simple unit tests that do their work just fine. However, interestingly, when we want to run them, we get a new window in IntelliJ IDEA asking us to select a target:
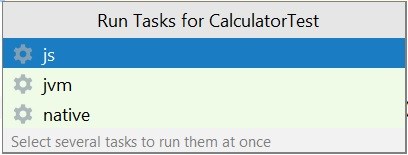
This is understandable as we have to define which target we would like to run our tests in. We can select multiple targets to run our tests in all of them at once.
5. Targeting the JVM With Kotlin/JVM
When Kotlin was started, it was primarily designed for the Java Virtual Machine (JVM) as a target platform. It tried to address some of the challenges that were typical of the Java version of that time. However, Kotlin as a programming language was never bound to JVM and always had intentions to run on multiple platforms.
So, why switch over to Kotlin for server-side programming when we’ve been using Java here for quite some time? While Java in the recent versions has been trying to bridge the gap, it still can not provide some of the benefits that we get from Kotlin straightaway. Kotlin is great for writing concise and expressive code with some cool features like structured concurrency with coroutines.
Moreover, Kotlin provides functions and annotations specific to the Java platform and excellent interoperability with Java. Hence, we can use as much of it or as little as we want. In this section, we’ll see how Kotlin targets the JVM with Kotlin/JVM.
5.1. Kotlin/JVM Compiler
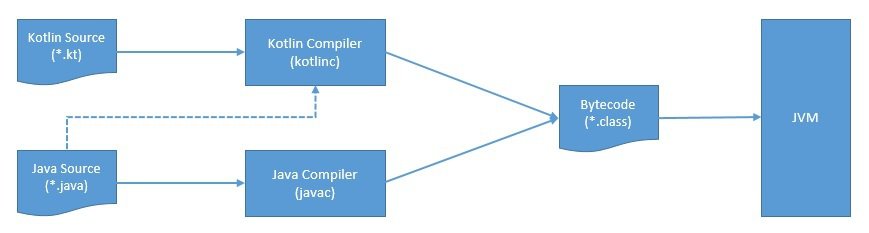
Kotlin comes with a compiler that compiles Kotlin source files into Java class files, which we can run on any JVM. Typically, when we build a Kotlin project like a multiplatform library, it automatically uses this compiler to produce class files. However, we can also use command-line tools like kotlinc and kotlinc-jvm to compile Kotlin source files to class files.
It’s possible to mix Java code with Kotlin, although we should do so only when absolutely necessary. In the JVM module of the multiplatform project, we can write a Kotlin source leveraging some Java libraries or even write a Java source if that makes more sense.
However, the Kotlin compiler only compiles the Kotlin source files and loads any Java references if required from the source directory. Hence, we also need the Java compiler to compile the Java source files we may have:
To allow the multiplatform project to have both Java and Kotlin source files, we need to make necessary changes in the Gradle configuration:
jvm {
    withJava()
}
It’s also possible to generate the class files for a specific version of JVM. By default, it targets Java version 1.6. We can target a Java version like 1.8 by configuring it in the Gradle configuration:
jvm {
    compilations.all {
        kotlinOptions.jvmTarget = "1.8"
    }
}
5.2. Developing and Reusing Code in Kotlin/JVM
We’ll add the code specific to the JVM platform in the jvmMain and jvmTest directories of our project. The first thing that we’ll have to provide in our JVM target is an implementation for the method writeLogMessage:
internal actual fun writeLogMessage(message: String, logLevel: LogLevel) {
    println("Running in JVM: [$logLevel]: $message")
}
There’s nothing special here that draws the benefit of the JVM platform. However, note that we’ve marked this function with the declaration actual.
We’ll write a Java source for this simple application to demonstrate how it can coexist with Kotlin. We’ll write a simple routine that provides a few more mathematical operations leveraging the simple operations from common:
public static Double square(Double number) {
    return CalculatorKt.multiply(number, number);
}
This is a simple Java method that makes use of a function from the common module to work. Please note how we can access the function add in Kotlin as a static method in Java. Note that we never created a class to wrap our function add. But the Kotlin/JVM compiler generates a class by the name of the file and adds the function as a static method.
6. Targeting JavaScript With Kotlin/JS
Next, we’ll see how to target the JavaScript platform from a Kotlin multiplatform project with Kotlin/JS. Before we dig further, let’s spend some time understanding the benefits of JavaScript as a target. JavaScript is fairly popular for writing front-end applications. Part of the reason is that JavaScript has been supported on most popular web browsers since quite early.
The advent of more sophisticated libraries and frameworks like Angular, React, and Vue made it simpler and more intuitive to develop front-end applications. Moreover, the addition of Node.js made JavaScript a popular choice for server-side implementations as well, at least for some use cases. Clearly, JavaScript as a target makes a lot of sense for Kotlin developers.
JetBrains maintains several Kotlin wrappers for popular JavaScript libraries like React, Mocha, and styled-components. These provide convenient abstractions to a Kotlin developer for writing type-safe front-end applications in Kotlin. Moreover, the Gradle plugins provide many essential functionalities like controlling and bundling the application using webpack and adding JavaScript dependencies from npm using yarn.
6.1. Kotlin/JS Compiler
The Kotlin/JS compiler that comes with the Kotlin release converts the Kotlin source into a JavaScript source. We can execute the resulting JavaScript source on any JavaScript engine like the ones that come with web browsers or Node.js. Hence, we can also call the Kotlin/JS compiler a transpiler.
The current Kotlin/JS compiler targets ECMAScript 5 (ES5) and serves as a standard for JavaScript:

The recent releases of Kotlin come with an alternate compiler back-end for Kotlin/JS and Kotlin/JVM, based on an intermediate representation (IR). This is only available as an alpha release as of Kotlin 1.4.0. This is to provide a unified backend based on IR for Kotlin/JVM, Kotlin/JS, and Kotlin/Native.
Basically, instead of generating the JavaScript code directly from the Kotlin source, the IR compiler first transforms the Kotlin source into an intermediate representation (IR). The IR compiler then further compiles these intermediate representations into target representations like JavaScript source.
This allows the IR compiler to perform aggressive optimizations and other things that were difficult with the default compiler. For instance, in the case of Kotlin/JS, it generates lighter executables through dead code elimination and is capable of generating TypeScript files for better interoperability.
We can switch from the default compiler to the IR compiler with a simpler change in the Gradle configuration:
kotlin {
    js(IR) {
    }
}
As we’ve seen before, the Kotlin/JS projects can target two different execution environments. These include web browsers for client-side scripting in a browser and Node.js for server-side scripting outside a browser.
Selecting an execution environment for Kotlin/JS is again a simple change in the Gradle configuration:
kotlin {
    js {
        browser {
        }
    }
}
Thankfully, the Gradle plugin automatically configures its tasks for working with the selected environment allowing us to build, run, and test Kotlin/JS projects without any additional configurations.
6.2. Developing and Reusing Code in Kotlin/JS
For our simple application, we’ll develop a rudimentary front end for our calculator using React. The code for the JavaScript target will reside in the directories jsMain and jsTest.
As before, the first thing we have to add is the implementation of the function writeLogMessage, marking it with the declaration actual:
internal actual fun writeLogMessage(message: String, logLevel: LogLevel) {
    when (logLevel) {
        LogLevel.DEBUG -> console.log("Running in JS: $message")
        LogLevel.WARN -> console.warn("Running in JS: $message")
        LogLevel.ERROR -> console.error("Running in JS: $message")
    }
}
Next, we’ll have to add the necessary front-end dependencies in the Gradle configuration:
val jsMain by getting {
    dependencies {
        implementation("org.jetbrains.kotlinx:kotlinx-html-js:0.7.2")
        implementation("org.jetbrains:kotlin-react:16.13.1-pre.110-kotlin-1.4.10")
        implementation("org.jetbrains:kotlin-react-dom:16.13.1-pre.110-kotlin-1.4.10")
        implementation("org.jetbrains:kotlin-styled:1.0.0-pre.110-kotlin-1.4.10")
    }
}
These are basically the Kotlin wrapper that will allow us to write React code in Kotlin.
Well, the first thing we need in React is a simple HTML file to anchor the root element that React can target:
<!DOCTYPE html>
<html lang="en">
<head>
    <meta charset="UTF-8">
    <title>JS Client</title>
</head>
<body>
<script src="kotlin-multiplatform.js"></script>
<div id="root"></div>
</body>
</html>
Next, we’ll write a simple function to render our React application on this root element:
fun main() {
    window.onload = {
        render(document.getElementById("root")) {
            child(Calculator::class) {
                attrs {
                    value = "0"
                }
            }
        }
    }
}
Since we’ll pass properties to our component and we expect it to maintain a state, we need to define them in Kotlin:
external interface CalculatorProps : RProps {
    var value: String
}

data class CalculatorState(val value: String) : RState
Lastly, we have to write the Calculator class that will define the component we want to load:
@JsExport
class Calculator(props: CalculatorProps) : RComponent<CalculatorProps, CalculatorState>(props) {

    init {
        state = CalculatorState(props.value)
    }

    override fun RBuilder.render() {
        styledLabel {
            css {
            }
            + "Enter a Number: "
        }
        styledInput {
            css {
            }
            attrs {
                type = InputType.number
                value = state.value
                onChangeFunction = { event ->
                    setState(
                        CalculatorState(value = (event.target as HTMLInputElement).value)
                    )
                }
            }
        }
        styledDiv {
            css {
            }
            +"Square of the Input: ${
                multiply(state.value.toDouble(), state.value.toDouble())}"
        }
    }
}
This is a straightforward React component that defines input and updates the local state with the value we enter. Further, it uses the function product we have in the common module to calculate the square and present it back in the component.
The Gradle plugin comes with the support of webpack-dev-server to serve the generated JavaScript artifacts. We can run the following task to run the Kotlin/JS project:
gradlew jsRun
Then we can access our simple application using any browser:
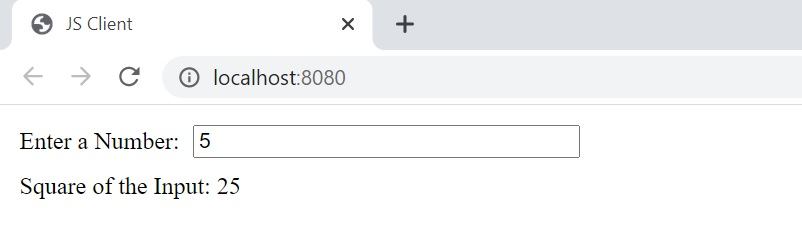
We have deliberately left out the styling, but it fully supports CSS, and we can create as fancy an interface as we like. We’ll make a simple change in the Gradle configuration to enable webpack’s CSS and style loaders:
browser {
    commonWebpackConfig {
        cssSupport.enabled = true
    }
}
7. Targeting Native With Kotlin/Native
Native platforms are perhaps the most diverse and complicated to support for Kotlin. Kotlin/Native attempts to compile the Kotlin source directly to native binaries specific to the supported target platform. But, what is the benefit of going to these lengths?
Imagine that we’re developing a desktop application that we intend to run on Linux, Windows, or macOS. Of course, one way is to develop them separately for each platform, but it’s not difficult to understand the waste of effort here. We can also develop it to run on a virtual machine like JVM, but then we need such a machine to be available on all the native platforms.
Wouldn’t it be nice if we could just write the application once and generate platform-specific binaries to run them anywhere without any dependencies? This is what Kotlin/Native promises to provide for several native platforms.
Moreover, it can be applied to many other use-cases, like developing a mobile application for multiple platforms. A single mobile application running on Android and iOS can save us quite a lot of effort to learn multiple platform-specific libraries and maintain them over time.
7.1. Kotlin/Native Compiler
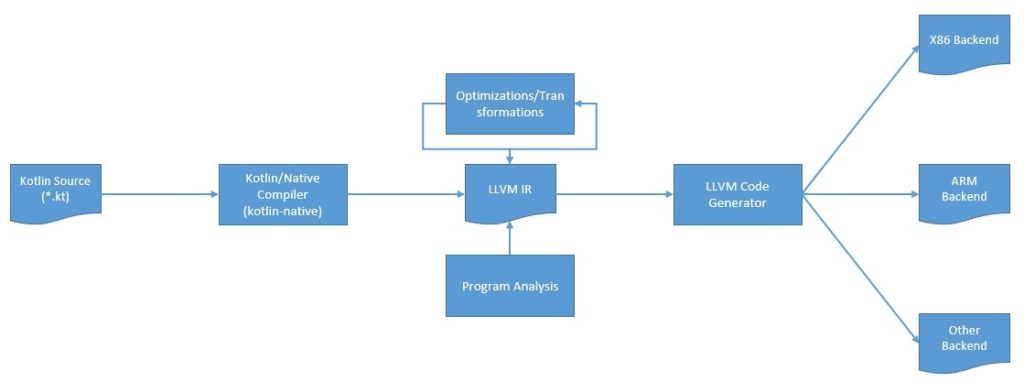
Kotlin/Native provides an LLVM based backend for the Kotlin/Native compiler and native implementations of the Kotlin standard library. The Kotlin/Native compiler itself is known as Konan. LLVM is basically a compiler infrastructure that we can use to develop a front end for any programming language and a back end for any instruction set architecture.
It provides a portable, high-level assembly language optimized for various transformations that serve as a language-independent intermediate representation. Originally implemented for C and C++, today there are several languages with a compiler that supports LLVM, including Kotlin:
Kotlin/Native supports a number of platforms that we can conveniently select through the Gradle configuration:
- Linux (x86_64, arm32, arm64, MIPS, MIPS little-endian)
- Windows (mingw x86_64, x86)
- Android (arm32, arm64, x86, x86_64)
- iOS (arm32, arm64, simulator x86_64)
- macOS (x86_64)
- tvOS (arm64, x86_64)
- watchOS (arm32, arm64, x86)
- WebAssembly (wasm32)
Now, we should notice that in our Gradle configuration, there is a check for the host operating system to see if it’s supported or not:
kotlin {
    val hostOs = System.getProperty("os.name")
    val isMingwX64 = hostOs.startsWith("Windows")
    val nativeTarget = when {
        hostOs == "Mac OS X" -> macosX64("native")
        hostOs == "Linux" -> linuxX64("native")
        isMingwX64 -> mingwX64("native")
        else -> throw GradleException("Host OS is not supported in Kotlin/Native.")
    }
}
When developing a multiplatform project using the IntelliJ IDEA project template, this is taken care of by default.
7.2. Developing and Reusing Code in Kotlin/Native
As we’ve seen earlier, developing multiplatform mobile applications is perhaps one of Kotlin/Native’s primary use cases. However, it’s more detailed to cover the nuances of developing and testing the actual applications for Android or iOS. Hence, we’ll restrict our application to a simple command-line application for the Windows target platform.
Earlier, we developed a user interface to calculate the square of a number leveraging the simple operations from the common module. It’s logical to extend that and create a command-line application to perform the same.
Following the convention, the code for the Native target will reside in the directories nativeMain and nativeTest. First, let’s add an implementation for the function writeLogMessage for the Native platform marking it with the declaration actual:
internal actual fun writeLogMessage(message: String, logLevel: LogLevel) {
    println("Running in Native: [$logLevel]: $message")
}
Next, we need to define an entry point for our application in the Gradle configuration:
nativeTarget.apply {
    binaries {
        executable {
            entryPoint = "com.baeldung.kotlin.multiplatform.main"
        }
    }
}
Lastly, we need to define the main function, which will actually drive our command-line application:
fun main() {
    println("Enter a Number:")
    val number = readLine()!!.toInt()
    println("Square of the Input: ${multiply(number, number)}")
}
There’s nothing special happening here because we’re leveraging the function product that we defined earlier in the common module.
We can see this in action by executing the generated executable from the command prompt in Windows:

Similarly, if we build this application on a different platform like Linux or macOS, it will generate the executable for those platforms that we can run natively without any other dependencies.
8. Conclusion
In this tutorial, we learned about the basics of multiplatform programming and how Kotlin supports it. We developed a simple multiplatform project using the IntelliJ IDEA project templates. This allowed us to create a common module in Kotlin.
Further, we reused the code from this common module in Kotlin/JS for developing a React-based user interface and in Kotlin/Native for developing a command-line application for Windows.
As always, the code for the examples is available over on GitHub.

