

Yes, we're now running our only Summer Sale. All Courses are 30% off until 20th July, 2026:
Creating a Web Application With Ktor and Thymeleaf
Last updated: May 20, 2025
Learn through the super-clean Baeldung Pro experience:
>> Membership and Baeldung Pro.
No ads, dark-mode and 6 months free of IntelliJ Idea Ultimate to start with.
1. Overview
Thymeleaf is a server-side Java template engine that works in both web and non-web environments. Ktor is a framework for building asynchronous server-side and client-side applications written in Kotlin.
In this tutorial, we’ll create a web application with a list of students and their report cards with grades. Since Ktor provides support for JVM templating engines, we’ll build an HTML UI using Thymeleaf and Bootstrap.
2. Setup Dependencies
For this application, we need to add the Ktor Server Core, Netty, Thymeleaf, and StatusPages dependencies using Gradle:
implementation("io.ktor", "ktor-server-core", "2.3.11")
implementation("io.ktor", "ktor-server-netty", "2.3.11")
implementation("io.ktor", "ktor-server-thymeleaf-jvm", "2.3.11")
implementation("io.ktor","ktor-server-status-pages", "2.3.11")
3. Ktor and Thymeleaf Setup
Now we can create our main() function:
fun main() {
    embeddedServer(Netty, port = 8080, host = "0.0.0.0") {
    }.start(wait = true)
}
This creates a Netty server at localhost using port 8080.
3.1. Template Resolver
Then, let’s create an extension function for our Application:
fun Application.configureTemplating() {
    install(Thymeleaf) {
        setTemplateResolver(ClassLoaderTemplateResolver().apply {
            prefix = "templates/"
            suffix = ".html"
            characterEncoding = "utf-8"
        })
    }
}
This configures Thymeleaf as the template resolver and sets a resource folder called “templates” for our HTML files.
3.2. Routing
The first route of our application is the index.html page that we can map in the “/” route. It’s also an extension function for the Application:
fun Application.configureRouting() {
    routing {
        get("/") {
            call.respond(ThymeleafContent("index", mapOf("message" to "Hello World")))
        }
    }
}
We also mapped the String “Hello World” in a key called “message”. This is a way for our Ktor/Kotlin code to interact with the UI.
Let’s create a basic HTML template called index.html and use the th:text Thymeleaf tag to display the message. This file should be in the resources/templates folder that we configured earlier.
<!DOCTYPE html >
<html xmlns:th="http://www.thymeleaf.org">
    <head>
        <meta charset="UTF-8">
    </head>
    <body>
        <p th:text="${message}" />
    </body>
</html>
Now we can add both functions we’ve created in the embbedServer configuration:
fun main() {
    embeddedServer(Netty, port = 8080, host = "0.0.0.0") {
        configureTemplating()
        configureRouting()
    }.start(wait = true)
}
If we run our application and access http://localhost:8080/ in the browser, we should be able to see the “Hello World” message.
4. Displaying a List of Students
We’ll start our report card application by displaying a list of students. Let’s create a Student class:
data class Student(
  val id: String,
  val firstName: String,
  val lastName: String
) {
    val fullName: String
        get() = "$firstName $lastName"
}
The fullName property can also be accessed by Thymeleaf templates. Since we won’t be using any database for this application, we use a Kotlin object to keep our data:
object DataHolder {

    fun getStudentList() = listOf(
        Student(
          id = "1",
          firstName = "Michael",
          lastName = "Smith"
        ),
        Student(
          id = "2",
          firstName = "Mary",
          lastName = "Johnson"
        ),
        Student(
          id = "3",
          firstName = "John",
          lastName = "Doe"
        )
    )
}
The route now can call the DataHolder object and map it to a key called studentList:
get("/") {
    call.respond(ThymeleafContent("index", mapOf("studentList" to DataHolder.getStudentList())))
}
We can use the th:each tag to iterate over the students list in an ul tag:
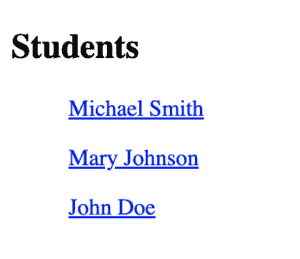
<h2>Students</h2>
<ul th:each="student : ${studentList}">
    <a th:href="@{'report-card/'+${student.id}}" th:text="${student.fullName}" />
</ul>
We’re using a th:href tag to redirect to a new page using a student’s id attribute. The report card page will be created in the next section.
Then, if we run the application, we can see our list displaying like this:
5. A Submission Form for Student Grades
The form that we’ll use is a report card for submitting the student’s grades. So, first, let’s create the GradeValue enum:
enum class GradeValue(val displayValue: String) {
    A("A"),
    A_PLUS("A+"),
    A_MINUS("A-"),
    B("B"),
    B_PLUS("B+"),
    B_MINUS("B-"),
    C("C"),
    C_PLUS("C+"),
    C_MINUS("C-"),
    D("D"),
    D_PLUS("D+"),
    D_MINUS("D-"),
    F("F"),
    EMPTY("")
}
Then, let’s use it to create a Grade class:
data class Grade (
  val id: String,
  val subject: String,
  var gradeValue: GradeValue? = GradeValue.EMPTY
)
It’s important to use var instead of val for the value attribute since we’ll change its value.
Let’s add an attribute gradeList in the Student class:
val gradeList: List<Grade>In the DataHolder object, we can create a function:
private fun createGradeList() = listOf(
  Grade(id = "1", subject = "Reading"),
  Grade(id = "2", subject = "Writing"),
  Grade(id = "3", subject = "Science"),
  Grade(id = "4", subject = "Mathematics"),
)
And use it in each student on our list:
Student(
  id = "1",
  firstName = "Michael",
  lastName = "Smith",
  gradeList = createGradeList()
)
Also, in the DataHolder, let’s create a new function for getting a student from the list based on its id:
fun findStudentById(id: String?) = getStudentList().first { student -> student.id == id }5.1. Report Card Route
Let’s add a new route for a new page:
get("/report-card/{id}") {
    call.respond(
      ThymeleafContent("report-card",
        mapOf(
          "student" to DataHolder.findStudentById(call.parameters["id"]),
          "gradeOptionList" to GradeValue.entries
        )
      )
    )
}
In this route, we’re using the new function findStudentById() and getting the id parameter from the route itself in the call object.
5.2. Report Card Page
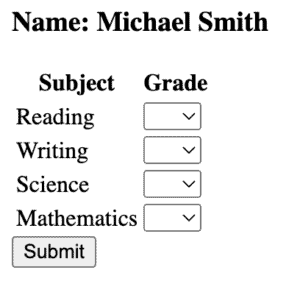
Let’s create a new HTML page named report-card.html in the templates folder and create a form inside the <body> tag:
<form action="#" th:action="@{'~/report-card/'+${student.id}}" method="post"><h3>Name: <span th:text="${student.fullName}"/></h3>
    <table>
        <thead>
            <tr>
                <th>Subject</th>
                <th>Grade</th>
            </tr>
        </thead>
        <tbody>
            <tr th:each="grade : ${student.gradeList}">
                <td th:text="${grade.subject}"></td>
                <td>
                    <select th:name="${grade.id}">
                        <option th:each="gradeOption : ${gradeOptionList}"
                                th:value="${gradeOption}"
                                th:text="${gradeOption.displayValue}"
                          th:selected="${grade.gradeValue == gradeOption}"/>
                    </select>
                </td>
            </tr>
        </tbody>
    </table>
    <button type="submit">Submit</button>
</form>
In the form, we’re using the th:action to handle the submission. The “~” signal in the action URL means that we’re using a server-relative URL.
The th:each usage in a table is pretty similar to the List that we used before, and we can use the th:text to display text. For the input, we’re using a select option tag with the GradeValue enum.
To get the values from the Table, we need to use the th:name tag.
This is what our form looks like:
5.3. Handling Form Submission
Let’s create a function to update the grades from a student in the DataHolder object:
fun updateGrades(studentId: String?, parameters: Parameters) {
    findStudentById(studentId)
      .gradeList.forEach { grade ->
        grade.apply {
            gradeValue = parameters[grade.id]?.let { GradeValue.valueOf(it) }
        }
    }
}
Now, we can use it in a new route to handle the Form POST:
post("/report-card/{id}") {
    val parameters = call.receiveParameters()
    DataHolder.updateGrades(call.parameters["id"], parameters)
    call.respondRedirect("/", false)
}
This route updates the grades and redirects to the student list page.
6. Error Handling
To handle errors from our application, we’ll use StatusPages, which is a Ktor plugin to properly handle exceptions and status codes. Let’s create an extension function to configure it:
fun Application.configureStatusPages() {
    install(StatusPages) {
        status(HttpStatusCode.NotFound) { call, _ ->
            call.respond(ThymeleafContent("error404", mapOf("message" to "Sorry! Page was not found.")))
        }
    }
}
The status function will handle any status code 404 (not found) and send it to our error page. Let’s create an error404.html file with the following body:
<body>
    <h2>Error</h2>
    <p th:text="${message}" />
</body>
Now, if we try to access any invalid path, we should see the error page:

7. Bootstrap
Now that our application is functional, let’s apply some styles using Bootstrap and Thymeleaf class tags. Let’s add the link tag inside the head tag:
<head>
    <title>Students</title>
    <link href="https://cdn.jsdelivr.net/npm/[email protected]/dist/css/bootstrap.min.css"
          rel="stylesheet"
          integrity="sha384-T3c6CoIi6uLrA9TneNEoa7RxnatzjcDSCmG1MXxSR1GAsXEV/Dwwykc2MPK8M2HN"
          crossorigin="anonymous">
</head>
And the script tag to the body tag:
<body>
...
<script src="https://cdn.jsdelivr.net/npm/[email protected]/dist/js/bootstrap.bundle.min.js"
        integrity="sha384-C6RzsynM9kWDrMNeT87bh95OGNyZPhcTNXj1NW7RuBCsyN/o0jlpcV8Qyq46cDfL"
        crossorigin="anonymous"/>
</body>
This step is the same for both index and report-card pages.
7.1. Class Append
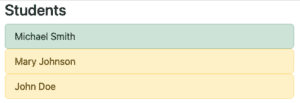
Let’s put our list inside a div with the container class and put a list-group class in the ul tag:
<div class="container">
    <h2>Students</h2>
    <ul th:each="student : ${studentList}" class="list-group">
        <a th:href="@{'report-card/'+${student.id}}"
           th:text="${student.fullName}"
           th:classappend="${student.hasAllGrades} ? list-group-item-success : list-group-item-warning"
           class="list-group-item list-group-item-action"/>
    </ul>
</div>
The th:classappend tag can add classes dynamically. We’re using it with a conditional to change the color line if the student has all grades already. Let’s create this function in the Student class:
val hasAllGrades: Boolean
    get() = gradeList.firstOrNull { grade -> grade.value.isBlank() } == null
That’s how our list should look like now:
7.2. Form Styles
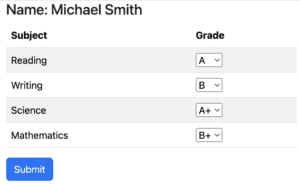
There are some Bootstrap tags we can use to stylize our form and table:
<div class="container">
    <form action="#" th:action="@{'~/report-card/'+${student.id}}" method="post">
        <h3>Name: <span th:text="${student.fullName}"/></h3>
        <table class="table table-striped">
            <thead>
            <tr>
                <th>Subject</th>
                <th>Grade</th>
            </tr>
            </thead>
            <tbody>
            <tr th:each="grade : ${student.gradeList}">
                <td th:text="${grade.subject}"></td>
                <td>
                    <select th:name="${grade.id}">
                        <option th:each="gradeOption : ${gradeOptionList}"
                                th:value="${gradeOption}"
                                th:text="${gradeOption.displayValue}"
                                th:selected="${grade.gradeValue == gradeOption}"/>
                    </select>
                </td>
            </tr>
            </tbody>
        </table>
        <button type="submit" class="btn btn-primary">Submit</button>
    </form>
</div>
And, after we select some grades, the result now should be:
8. Conclusion
In this article, we created a Ktor application with a Thymeleaf UI. Our application lacks persistence, which could be achieved using the Exposed library, for example. Thymeleaf is a good choice for server-side render templating for Ktor because it’s a solid, well-known template engine, and it’s listed in the Ktor documentation as a supported template engine. We also were able to easily integrate Bootstrap and make our web application look more production-ready.
The code backing this article is available on GitHub. Once you're logged in as a Baeldung Pro Member, start learning and coding on the project.