

Learn through the super-clean Baeldung Pro experience:
>> Membership and Baeldung Pro.
No ads, dark-mode and 6 months free of IntelliJ Idea Ultimate to start with.
Last updated: March 18, 2024
Learn through the super-clean Baeldung Pro experience:
>> Membership and Baeldung Pro.
No ads, dark-mode and 6 months free of IntelliJ Idea Ultimate to start with.
In this tutorial, we’ll see what raster and vector graphics are, how they work and how they’re different.
Raster graphics are the format that most people will traditionally think of when talking about computer graphics. This is the format computer monitors work with, and thus, video cards ultimately have to produce.
Raster images represent our picture as a grid of picture elements – or pixels. When seen together, these pixels are all given a specific colour, and the picture is the product of all these pixels.
The first thing that we need to do is to define the size of our picture. This is the number of pixels wide and high that our image will be. For example, we might define our image as 640 x 480, meaning it’s 640 pixels wide and 480 pixels tall. We can consider this the canvas on which we’ll draw our picture.
Once we have a canvas, drawing our image simply gives each of our pixels the correct colour. Drawing tools have many ways to achieve this, but ultimately they all come down to giving every one of our pixels a colour. Our image is the overall product of all these pixels when seen together.
For example, if we want to draw a smiley face. We start by defining a canvas size – for example, 10 pixels by 10 pixels. We then colour some of these pixels black and other pixels yellow, and the rest can be set to white as a background:
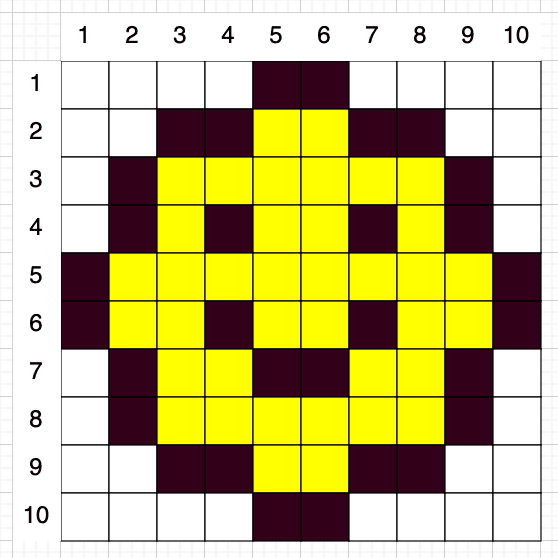
As we can see, this is visibly a smiley face though it’s very blocky, and it’s impossible to give it any real detail. In particular, if we want to display the same image only larger – e.g. zoomed in or stretched to fit a larger screen – then the lack of detail will be exaggerated, and the image will look even more blocky.
We can improve this by having a higher resolution image – that is, drawing the same image on a much larger canvas, which gives us more pixels to define our image. The more pixels we work with, the more detail we can put into our image.
However, the more pixels we have, the larger our image is to store on disk and in memory. This, in turn, can make our pictures harder to work with, both in terms of rendering them onto the screen and in terms of actually manipulating them. We need to decide on this trade-off when doing drawings like this – the balance between image resolution and the cost of working with the images.
Ultimately, a raster image is nothing more than a grid of pixels. Anything we want to do to manipulate these images can ultimately only work at this level.
Certain manipulations are relatively easy. For example, changing the colour of our smiley face from yellow to red would be a case of changing every yellow pixel in the appropriate area.
Other manipulations are much harder. For example, if we wanted to replace the smile with a frown, then we’d have to draw over what’s there essentially. We don’t have the information about what was underneath the smile anymore, so we would have to determine what to do. For human artists, this is relatively simple, but for a computer program, this is much harder.
This is exactly the same image as we drew above but represented in a very different way.
Vector images will also have a canvas to work on, but the canvas isn’t a specific size. Instead, we will work in terms of arbitrary units. For example, it could be percentages where the canvas is 100% in each direction.
We also need a set of actions that we can perform on the image. For example, above, we saw instructions for drawing circles, curves and filling areas. We’d also want to be able to draw lines at least and possibly many other shapes as well. All of these will be in terms of our arbitrary units. For example, above, we saw us describing a circle centred at the midpoint of the canvas – 50% x 50%.
Often we’ll want to draw shapes for which we don’t have suitable actions. In those cases, we have to make do with the actions that we do have. For example, if there’s no action for drawing a rectangle, we’d need to draw it as 4 different lines instead.
Unlike raster images, vector images don’t suffer from any resolution problems. Because our drawing instructions are in terms of our arbitrary canvas, applying them to a real canvas is nothing more than calculating the correct units. For example, if we wanted to draw our face on a canvas that was 500 x 500 pixels, our circle would be centred at 250 x 250 and 250 pixels in radius. The actual rendering process will handle this with the appropriate level of detail.
Because our vector images are instructions, manipulating the image is significantly easier. We can make changes by changing some of our list’s instructions, adding new ones to an appropriate place, or removing some.
However, because a vector image is a list of instructions, we make the image more complicated every time we add it to this list. This can make it harder to render the final result but also larger to store and more difficult to change. Conversely, anything we do to manipulate a raster image will not impact the overall complexity since it’s just changing the colour of existing pixels.
We’re also limited by the set of instructions that we can perform. If we don’t have suitable instructions, we’ll have to make do with alternative ones, which can lead to increased complexity in our image. For example, if every rectangle needs to be drawn as 4 lines, this is 4 times the number of instructions, which is more to store and more to render.
Here we’ve seen some details about how raster and vector graphics work, including how they differ. Next time there’s a need to choose how to store and render some images and consider these details when deciding.