

Learn through the super-clean Baeldung Pro experience:
>> Membership and Baeldung Pro.
No ads, dark-mode and 6 months free of IntelliJ Idea Ultimate to start with.
Learn through the super-clean Baeldung Pro experience:
>> Membership and Baeldung Pro.
No ads, dark-mode and 6 months free of IntelliJ Idea Ultimate to start with.
In this tutorial, we’ll look at QR codes, also known as Quick Response codes. We’ll be looking into how they work and a tiny part of how to decode them.
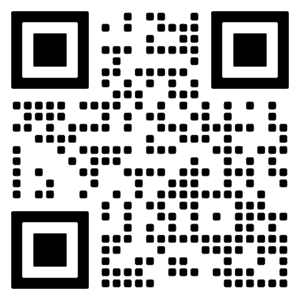
QR Codes are similar in concept to barcodes, only working in two dimensions instead of only one. Where barcodes are a series of dark and light bars of varying widths, QR codes are instead a grid of dark and light dots.
Because of how QR codes work, we need a more sophisticated means to read them. We can no longer rely on simply reading a straight line of bars to decode them and instead need to read the entire 2D grid. This means we need something with a real camera instead of just a scanning laser. However, modern technology means these cameras are ubiquitous – smartphones, for example, have helped ensure that many people have this ability in their pockets.
So, what can we do with them? The potential capacity and reliability of QR codes allow for many uses. As with traditional barcodes, we can use them for product codes and representing simple pieces of information. But we can do so much more as well. For example, using them to represent URLs is very common, which gives an extensive range of uses. We can also use them to share configuration settings – e.g., connecting to WiFi networks.
QR codes support several different sizes, also known as versions. The largest supported QR code is version 40, which is  dots on each side. The number of dots on each side of the QR code is
  . So the most minor supported QR code is
  dots on each side.
We also have support for error correction built into the encoded QR code. This allows for some of the code to be unreadable but for the entire code to still work. We have four different levels of error correction that can be supported:
| Error Correction Level | Error Correction Capabilities |
|---|---|
| Low (L) | 7% of data bytes can be restored |
| Medium (M) | 15% of data bytes can be restored |
| Quartile (Q) | 25% of data bytes can be restored |
| High (H) | 30% of data bytes can be restored |
Depending on our grid size, the data format they’re using, and error correction details, we can feasibly store up to 7,089 characters in a single QR code. For example, in a  grid, using the lowest possible error correction, we can store the following:
| Data Format | Number of Characters |
|---|---|
| Data Format | Number of Characters |
| Numeric | 7,089 |
| Selected Alphanumeric | 4,296 |
| ISO/IEC 8859-1 | 2,953 |
| Shift JIS X 0208 | 1,817 |
Let’s have a look at how to decode a QR code. We won’t go into all the details – the error correction processing is very involved. But we’ll see enough to be able to understand how it all fits together:
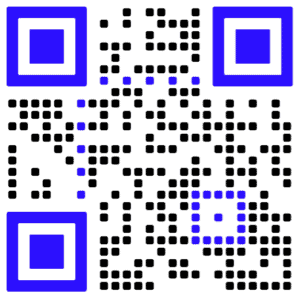
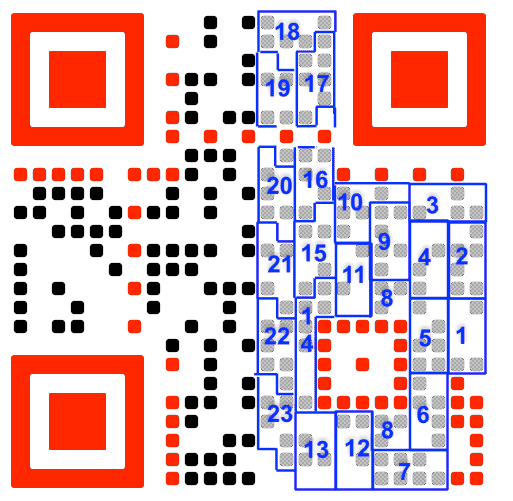
The first thing we need to do is orient the QR code correctly. Three of the four corners have timing patterns – a  square of dark dots with a smaller square inside it and a light border around them. The corner without one of these should be the bottom right. Then we have some regularly spaced dots joining these, which allows the reader to know how big our dots are.
There’s also an alignment pattern towards the bottom right corner, allowing the reader to detect any distortion in the code. On larger QR codes, there may be a number of these alignment patterns located in various places on the code:
Next, we need to know what version QR code we’re looking at. For this, we need to count the number of dots across and reverse what we saw earlier. In this case, we have a  QR code. From this, we can get the version using
  . So now we know we have a version 2 QR code.
Larger QR codes – version 7 and above, so at least 45 dots across – will have additional sections with the version number encoded in it, again to allow for redundancy if the code is damaged.
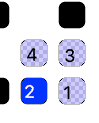
After this, we need to determine the format information. This will tell us the error correction level and a mask pattern that the underlying data is combined with. This mask is to help break up solid areas so they don’t get confused with any of the unique patterns in the QR code. This information is contained in the dots around the top-left corner. The same data is then repeated adjacent to the top-right corner and bottom-left corner in case the top-right corner isn’t viable:
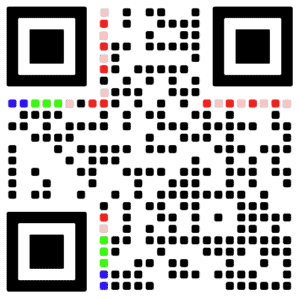
From this, the blue dots are our error correction level, the green dots are our mask, and the red dots are used as error correction for the format data. We’ll ignore the error correction details here, but the other two we can use as lookups to see precisely what’s going on.
The error correction level gives us one of 4 values:
| Pattern | Error Correction Level |
|---|---|
| Dark, Dark | Low (L) |
| Dark, Light | Medium (M) |
| Light, Dark | Quartile (Q) |
| Light, Light | High (H) |
In this case, our dots are both dark. This means the error correction level for the QR code is set to Low.
The mask pattern can be looked up similarly. This gives us details of a masking formula, expressed in terms of the coordinates of the dots in the QR code, to determine which dots are masked:
| Pattern | Mask Formula |
|---|---|
| Dark, Dark, Dark | x mod 3 = 0 |
| Dark, Dark, Light | (x + y) mod 3 = 0 |
| Dark, Light, Dark | (x + y) mod 2 = 0 |
| Dark, Light, Light | y mod 2 = 0 |
| Light, Dark, Dark | ((xy mod 3) + xy) mod 2 = 0 |
| Light, Dark, Light | ((xy mod 3) + x + y) mod 2 = 0 |
| Light, Light, Dark | (x/2 + y/3) mod 2 = 0 |
| Light, Light, Light | (xy mod 2) + (xy mod 3) = 0 |
Every dot in our masked QR code will be inverted, whereas all the other dots in the QR code will be left alone.
Our mask pattern was described by three dark dots, which means that we’ll be using  . This means that every third column will be masked – 0, 3, 6, 9, etc. This, in turn, means that when we’re decoding our data, we need to invert any dots on every third column.
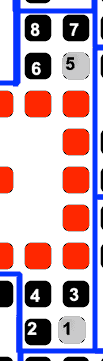
Now that we have all of the QR code control sequences, we can start looking at the actual data. A QR code will comprise several data sections – at least 1, but potentially many. Each of these will begin with a particular sequence that tells us the encoding of that section. We start in the bottom right corner and work our way through the dots in the code in a particular sequence:
Remember that these are masked, and our mask formula was . This means that the very last column needs to be inverted since it corresponds with our mask:
We’ve also indicated here the order to read the dots so that we can decode them. So our encoding decodes to Light, Dark, Light, Light. We can then look this up to see what this means:
| Pattern | Mask Formula |
|---|---|
| Light, Light, Light, Dark | Numeric |
| Light, Light, Dark, Light | Alphanumeric |
| Light, Dark, Light, Light | Byte encoding |
| Dark, Light, Light, Light | Kanji encoding |
| Light, Light, Dark, Dark | Structured append |
| Light, Dark, Dark, Dark | ECI |
| Light, Dark, Light, Dark | FNC1 in first position |
| Dark, Light, Light, Dark | FNC1 in second position |
| Light, Light, Light, Light | End of message |
So we can see that our QR code is encoded as “Byte encoding”.
Next, we need to know the length of this data block. We work this out by taking several dots, defined by the encoding type and the QR code version, and treating that as a binary number:
| Encoding | Versions 1-9 | Versions 10-26 | Versions 27-40 |
|---|---|---|---|
| Numeric | 10 | 12 | 14 |
| Alphanumeric | 9 | 11 | 13 |
| Byte | 8 | 16 | 16 |
| Kanji | 8 | 10 | 12 |
So, because we have a version 2 QR code and a byte encoding, we have 8 bits for our length. Again, these are masked, so we need to take that into account when understanding them:

This gives us a value of  , or 23 characters.
Now we’re at the point of actually decoding the data. The number of bits that we need for each character depends on our encoding but not on our version, so this is a straight lookup:
| Encoding | Number of Bits |
|---|---|
| Numeric | 10 bits per 3 digits |
| Alphanumeric | 11 bits per 2 characters |
| Byte | 8 bits per character |
| Kanji | 13 bits per character |
So in our case, it’s a straight 8 bits per character. We then follow a snake pattern starting from the end of the length block:
The red dots in this aren’t part of the data and are highlighted to exclude them. Our data are the dots surrounded in blue borders and numbered in the order they need to be read. All of the other dots are outside of this data section. Most of them are used for error correction, but in larger QR codes, they may be additional data sections.
Understanding each block depends on the direction that we’re reading in, as follows:
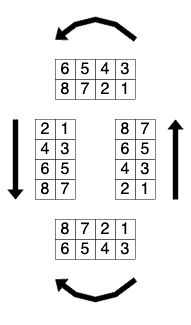
This equates to reading all of the dots in two concurrent columns, reading those columns from right to left and moving in the direction we’re going. This is important when we get to areas that don’t quite fit the patterns, as we’ll see soon.
We must also remember to apply our mask to the dots as we decode them. So, for example, after we’ve applied the mask and determined which bit is which, the first block is:
This is then  , which is byte
  . This is the ASCII code for “h”, so we now know the first character is an “h”. Following this same process, the next few blocks are “t”, “t”, “p”, “:”, “/” and “/”.
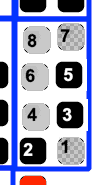
Then we get to an interesting case. Block 8 is split into two parts by the alignment pattern. However, we skip over this and keep reading:
Reading this gives us  , which is byte
  . This is the ASCII code for “w”, which we can take as the next character.
The next exciting block is number 10. This one changes direction in the middle of the block, but we can follow it around as it does this. After unmasking it and following it around, we get the following:
Reading this gives us again, which is byte . This is the ASCII code for “w”, which we can take as the next character.
If we continue decoding the blocks, we’ll eventually get the complete message – “http://www.baeldung.com”.
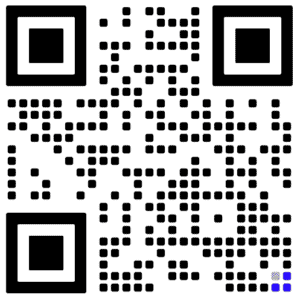
After this, we would start a new data section. If we continue decoding this, we’ll find the encoding type is “End of message”, which tells us that we’ve now decoded all of the data from the QR code.
Because a QR code can contain configuration settings or arbitrary URLs, this opens them up as a potential security concern. We should be cautious about exactly what codes we scan and what we scan them with.
For example, malicious actors can plant QR codes in public places – billboards, shopping centres, etc. – that will take unsuspecting users to a malicious site. Or to connect their phone to an adversarial WiFi network whereby the attacker can capture everything the compromised phone is doing.
However, this doesn’t mean we should never use or trust them. It just means that we need to be careful. For example, in the same way that we wouldn’t open a suspicious URL sent to us in an email, we shouldn’t unthinkingly open a URL that we scanned from a public QR code.
Here we’ve looked at what a QR code is, how they’re composed and how to decode the data from them. Next time you need to represent some information, why not investigate if using a QR code might help?