

Yes, we're now running our only Summer Sale. All Courses are 30% off until 20th July, 2026:
Including Animations Into LaTeX Beamer Presentations
Last updated: May 20, 2025
Learn through the super-clean Baeldung Pro experience:
>> Membership and Baeldung Pro.
No ads, dark-mode and 6 months free of IntelliJ Idea Ultimate to start with.
1. Introduction
In this tutorial, we’ll describe what are animations in LaTeX. We’ll then demonstrate how to include different animations into our LaTeX Beamer.
2. LaTeX Beamer
LaTeX Beamer is a widely used document class for creating presentations that can be used in academic and professional settings. While there is other presentation software, LaTeX Beamer allows us to create visually-appealing and consistent presentations. It also supports the use of external packages.
One of the key benefits of using LaTeX Beamer is that we can create simple and complex formulas, add tables, and create illustrations to describe special concepts.
2.1. Advantages of LaTeX Beamer
LaTeX Beamer has many benefits, including:
- consistency: LaTeX Beamers provides consistent styles across all slides. For example, we can use variables to define keywords and use this defined variable throughout our presentation. This ensures that the usage of the keyword is uniform.
- high-quality presentation: we can create high-quality presentations with crisp texts and vector graphics (used for scaling without loss of resolution or quality)
- personalization: LaTeX Beamer allows us to make a wide range of customization. The customization includes drawing unique figures or illustrations, colors, layouts, and many more
- compatibility: LaTeX Beamer is supported on different operating systems, making it versatile and suitable for several purposes
- LaTeX integration: we can use the features of LaTeX, such as writing complex equations, creating tables, and other advanced features in LaTeX Beamer. This feature makes LaTeX Beamer desirable to LaTeX users.
LaTeX Beamer generates a PDF document that can be opened on different platforms.
3. Animations
Animation is the process of creating an illusion of motion or movement and rapidly showing a sequence of static figures that are (slightly) different. Including animations in LaTeX Beamer can make our presentation more visually appealing and capture the attention of our audience. For example, to advertise a new vehicle, including animation of the product would capture the attention of our audience more and raise their curiosity about the product. Animations in LaTeX Beamer can be a series of text, images, videos, or GIFs.
Animations can be extremely useful when we have several static images we want to show in our presentation. Suppose we have ten static images, we can show these images as an illusion of movement instead of showing the images individually. This makes it more captivating than showing the ten images separately.
4. Including Animations in LaTeX Beamer
LaTeX Beamer is a powerful software for generating quality presentations, and it supports adding various animations. We can include the following file formats:
- static images or PNGs
- text
- videos or GIFs
To start, we’ll use the animate package in LaTeX together with the \animategraphics command to insert animation into Beamer. Furthermore, if we need to include vector graphics in our Beamer, we’ll need the tikz package as well. Let’s load the necessary packages:
\usepackage{animate}
\usepackage{tikz}
4.1. Animations with PNG
To insert a GIF into our slide, we’ll start by using a series of static images to create the illusion of movement. The image files must be named with the same name, followed by a series of unique numbers starting from 0 (or any other number). For example, three images can be named as: image-0, image-1, and image-2. Naming these images in this format is important to ensure LaTeX Beamer is able to read the images serially. We can use the following command to include animation:
\animategraphics[options]{fr}{animation_filename}{first_image}{last_image}The parameters of this command are:
- options: we can specify [autoplay, loop] to customize the behavior of our animation. The autoplay ensures the images play automatically, and loop ensures that once the images start moving, it continues in a loop (without stopping), just like a GIF
- fr: is the frame rate
- animation_filename: we must specify the animation filename without its extension and without the number, i.e., image-
- first_image: is the number of the first image, in this case, we’ll specify 0 since the first image is named image-0
- last_image: is the number of the image. The last image is named image-2, this means we will specify 2 as the last_image
when we compile our LaTeX Beamer file (in .tex extension), the animation will be included in our presentation. As a demonstration, suppose we have four images, namely: effects-0, effects-1, effects-2, and effects-3 (all in PNG extension):
\documentclass{beamer}
\usepackage{animate}
\begin{document}
\begin{frame}{GIFs in Beamer}
\centering
\animategraphics[autoplay,loop,width=4cm]{10}{fig/effects-}{0}{3}
\end{frame}
\end{document}
This will create and include a GIF file of the form:
We can also specify how fast we want the images’ movement to be.
Furthermore, if we have many images of around 100, and numbered from 0 to 99. We may want to include only the last three images (i.e., image-97, image-98, and image-99). We can do this by writing 97 as our first image and 99 as the last. This ensures that LaTeX Beamer reads only these three images. The command for this would be:
\documentclass{beamer}
\usepackage{animate}
\begin{document}
\begin{frame}{Select last three images only}
\animategraphics[autoplay,loop]{10}{images-}{97}{99}
\end{frame}
\end{document}
with options set as autoplay and loop, and frame rate as 10.
4.2. Animations with Text
We can also use texts to make animations in LaTeX Beamer. When we have multiple lines of text, we can reveal these texts line by line using the pause command. For example, the following lines of code:
\begin{document}
\begin{frame}{Pause text}
	This first line will appear in this slide \pause
	the second text will be partially visible \pause
	And this last text will then appear
\end{frame}
\end{document}
would generate the output: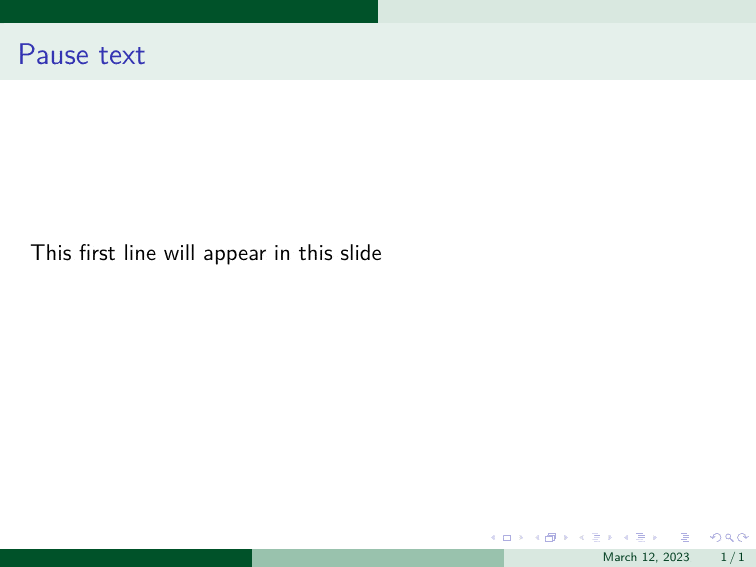
The pause command is useful when we have numerous texts in our presentation. Instead of displaying all the texts in one slide, we can simply add a pause command after every line of text.
4.3. Animations with GIF and Video
LaTeX Beamer supports both video and GIF files. We can use the multimedia package to embed either GIF or video files. The \movie command, together with multimedia, will insert a GIF file:
\documentclass{beamer}
\usepackage{multimedia}
\begin{document}
\movie[options]{optional text}{GIF filename}
\end{document}
The parameters of the \movie command are:
- options: the options include autostart, loop, width, and so on
- optional text: this will be displayed before the video or GIF start
- GIF filename: is the name of the GIF filename
To embed a video file, we’ll modify the \movie command as:
\movie[options]{optional text}{Video filename}From the options, we can specify the width and height of the GIF or video file in our presentation. If we don’t want to include optional text, we can simply leave the curly bracket empty, i.e., { }.
Once we compile our LaTeX Beamer, the GIF or video will be embedded. During the presentation, when we get to the GIF or video-embedded slide, we simply click on it to play the file.
5. Benefit of Including Animations in LaTeX Beamer
Including animations in LaTeX Beamer has several benefits, including:
- storytelling: instead of describing a complex technique using words, we can add powerful animations to better illustrate the technique
- better-audience engagement: adding animations to our presentation help to capture our audience’s attention
- creativity: animations add an element of creativity to our presentation
- enhance presentation: animations help to enhance the quality of our presentation
LaTeX Beamer supports external packages that help to create animations, making it suitable for several purposes, such as scientific talks, business presentations, among many others.
6. Conclusion
In this article, we described the concepts of LaTeX Beamer and animations. We show various files we can include in our presentation. Lastly, we discuss some benefits of animations.