

Yes, we're now running our only Summer Sale. All Courses are 30% off until 20th July, 2026:
Learn through the super-clean Baeldung Pro experience:
>> Membership and Baeldung Pro.
No ads, dark-mode and 6 months free of IntelliJ Idea Ultimate to start with.
1. Introduction
Recently, LaTeX became a relevant tool to write texts. With LaTeX, writers can concentrate on the content instead of the format of their manuscripts.
TikZ, in turn, is a LaTeX package to create graphic elements with LaTeX. In short, TikZ is a powerful tool that enables users to draw almost anything from scratch using vectors.
In this way, users can explore the TikZ capacities to create images for multiple purposes besides only including them in their LaTeX writeups. To make holistic use of these images, we can convert TikZ defined images to other popular image file formats.
In this tutorial, we’ll learn a technique to convert TikZ defined images to these other image file formats. First, we’ll see how to code and compile a LaTeX/TikZ image. Thus, we’ll see a tool and the process to convert the LaTeX/TikZ output to an image file format.
2. Preparing the LaTeX/TikZ Image
Let’s consider an example .tex document defining a TikZ image. The following algorithm shows the LaTeX/TikZ code of our example document:
(1) \documentclass{standalone}
(2) \usepackage{tikz}
(3) \begin{document}
(4) \begin{tikzpicture}
(5) \filldraw[red] (0,0) circle (100pt);
(6) \end{tikzpicture}
(7) \end{document}
To create a standalone image with LaTeX/TikZ, first, we should define the document class. So, it is a suitable option to choose a document class that fits the LaTeX output (the PDF file) to our image. An example of such a document class is the standalone class. This definition locates at line 1 of the algorithm.
Next, we should insert the line importing the TikZ package as in line 2 of the algorithm.
After defining these lines, we can open our document environment (line 3). Thus, we can open our TikZ image environment (line 4).
So, the following lines contain the definition of the aimed image. The image definition uses the TikZ graphic commands set. In our example, we will only draw a red circle (line 5).
Finally, we close the TikZ image (line 6) and the LaTeX document (line 7) environments.
After defining the LaTeX/TikZ image, we compile it and generate the standard LaTeX output: a PDF file. This PDF file, in turn, contains our image.
The following image summarizes the process:
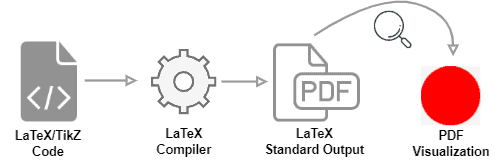
Next, we’ll learn how to convert this file into an image format in the following subsection.
3. Converting the LaTeX/TikZ PDF to Image
There exist multiple ways to convert the LaTeX standard output (PDF) to an image file. In this tutorial, however, we’ll use the ImageMagick tool technique.
We choose the ImageMagick tool because it is a free and simple program that provides versions to several operational systems, such as Windows, Linux, and macOS.
First, we must download and install the program (if requested, select the checkbox of “Install legacy utilities”). Furthermore, make sure that ImageMagick’s scripts are on the PATH of your operational system.
Next, we must install the GhostScript PDF interpreter. The ImageMagick tool employs GhostScript to process PDF files.
With the previous steps ready, we can convert the PDF with our image to an image file. Among the supported formats by ImageMagick are PNG (.png), JPG (.jpg), and SVG (.svg). In our examples, let’s call the chosen format of EXT (.ext).
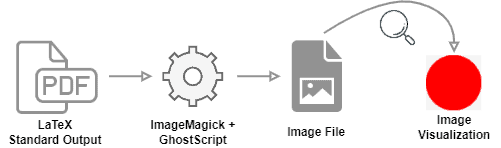
The most straightforward conversion is executed through the following command:
convert src/path/image.pdf dst/path/image.extIn this way, the following image shows the general process of converting the LaTeX output (PDF) into an image file format:
Finally, the ImageMagick tool provides several options to modify the image while converting it. We can use these options by adding flags in the command line, such as -quality, -density, and -resize.
4. Conclusion
In this tutorial, we learned how to export LaTeX/TikZ defined images to image file formats. At first, we saw how to define a standalone image using LaTeX and TikZ. Then, we investigated a technique to convert the LaTeX output (PDF) to image file formats with the Image Magick tool.
We can conclude that LaTeX/TikZ is a versatile tool for producing vectorial graphic elements. Furthermore, with the proper converting tools, these graphic elements are employable for several purposes as images.