1. Overview
Stripe is a cloud-based service that enables businesses and individuals to receive payments over the internet and offers both client-side libraries (JavaScript and native mobile) and server-side libraries (Java, Ruby, Node.js, etc.).
Stripe provides a layer of abstraction that reduces the complexity of receiving payments. As a result, we don’t need to deal with credit card details directly – instead, we deal with a token symbolizing an authorization to charge.
In this tutorial, we will create a sample Spring Boot project that allows users to input a credit card and later will charge the card for a certain amount using the Stripe API for Java.
2. Dependencies
To make use of the Stripe API for Java in the project, we add the corresponding dependency to our pom.xml:
<dependency>
    <groupId>com.stripe</groupId>
    <artifactId>stripe-java</artifactId>
    <version>4.2.0</version>
</dependency>
We can find its latest version in the Maven Central repository.
For our sample project, we will leverage the spring-boot-starter-parent:
<parent>
    <groupId>org.springframework.boot</groupId>
    <artifactId>spring-boot-starter-parent</artifactId>
    <version>2.7.2</version>
</parent>
We will also use Lombok to reduce boilerplate code, and Thymeleaf will be the template engine for delivering dynamic web pages.
Since we are using the spring-boot-starter-parent to manage the versions of these libraries, we don’t have to include their versions in pom.xml:
<dependency>
    <groupId>org.springframework.boot</groupId>
    <artifactId>spring-boot-starter-web</artifactId>
</dependency>
<dependency>
    <groupId>org.springframework.boot</groupId>
    <artifactId>spring-boot-starter-thymeleaf</artifactId>
</dependency>
<dependency>
    <groupId>org.projectlombok</groupId>
    <artifactId>lombok</artifactId>
</dependency>
Note that if you’re using NetBeans, you may want to use Lombok explicitly with version 1.16.16, since a bug in the version of Lombok provided with Spring Boot 1.5.2 causes NetBeans to generate a lot of errors.
3. API Keys
Before we can communicate with Stripe and execute credit card charges, we need to register a Stripe account and obtain secret/public Stripe API keys.
After confirming the account, we will log in to access the Stripe dashboard. We then choose “API keys” on the left side menu:
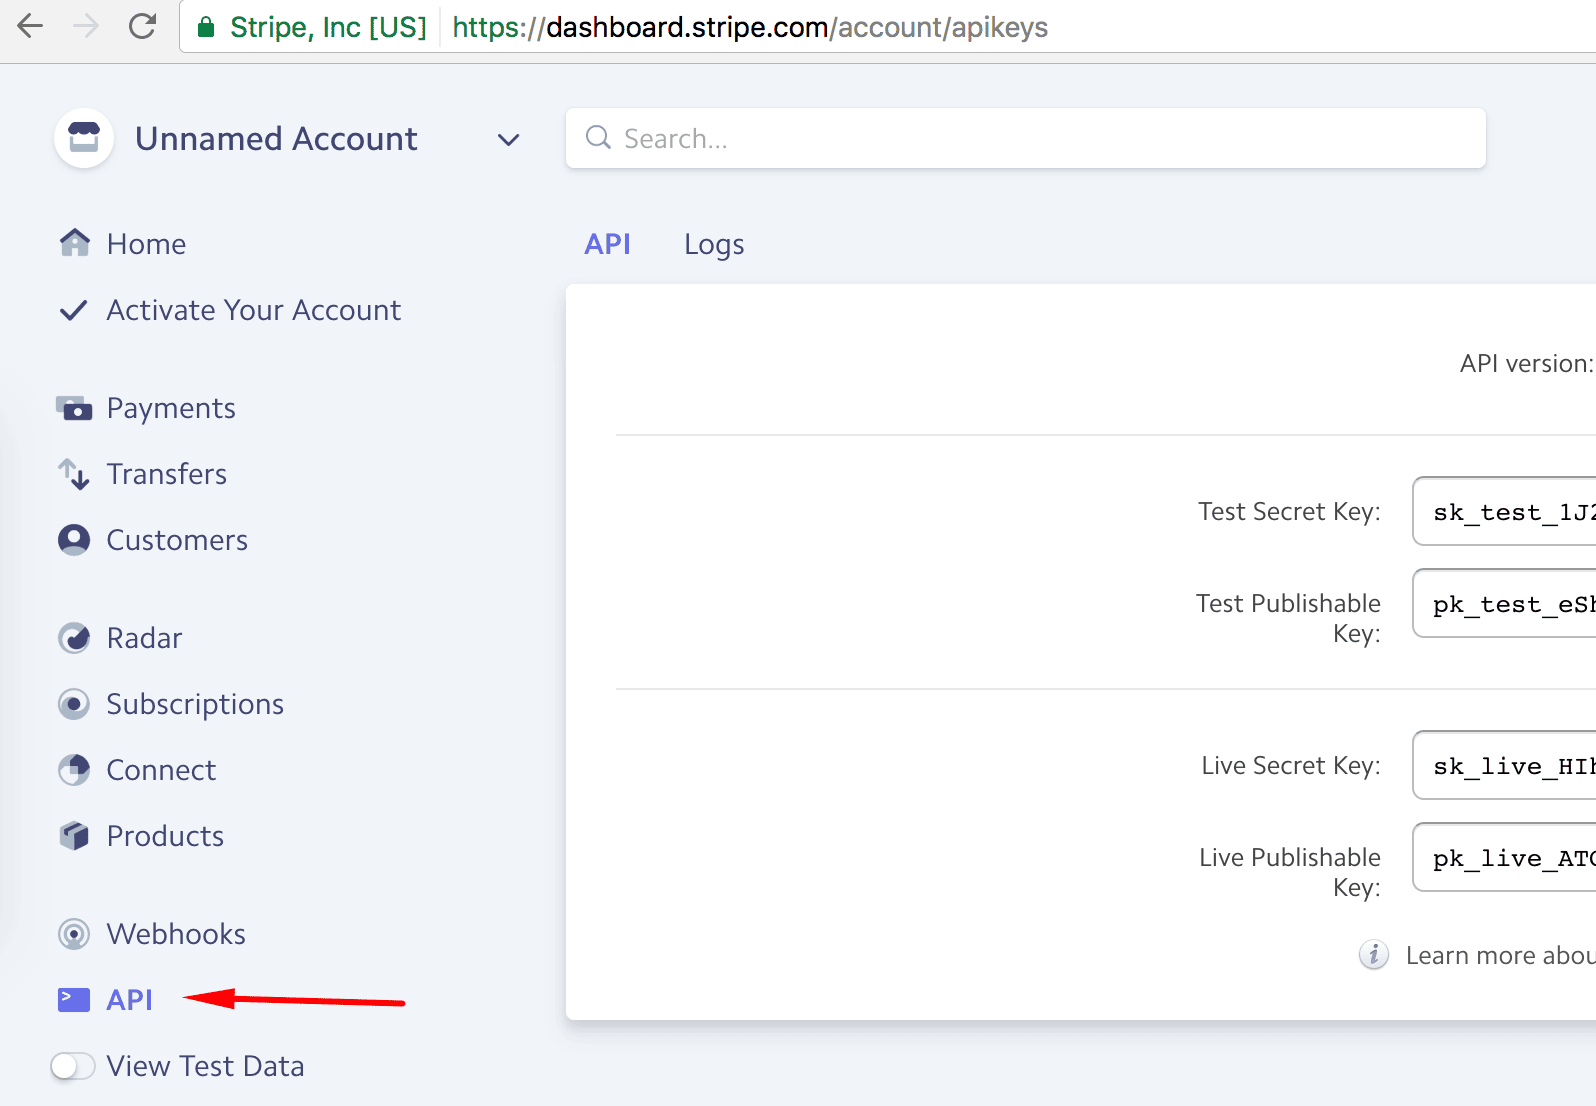
There will be two pairs of secret/public keys — one for test and one for live. Let’s leave this tab open so that we can use these keys later.
4. General Flow
The charge of the credit card will be done in five simple steps, involving the front-end (run in a browser), back-end (our Spring Boot application), and Stripe:
- A user goes to the checkout page and clicks “Pay with Card”.
- A user is presented with Stripe Checkout overlay dialog, where fills the credit card details.
- A user confirms with “Pay <amount>” which will:
- Send the credit card to Stripe
- Get a token in the response which will be appended to the existing form
- Submit that form with the amount, public API key, email, and the token to our back-end
- Our back-end contacts Stripe with the token, the amount, and the secret API key.
- Back-end checks Stripe response and provide the user with feedback of the operation.

We will cover each step in greater detail in the following sections.
Stripe Checkout is a customizable, mobile ready, and localizable widget that renders a form to introduce credit card details. Through the inclusion and configuration of “checkout.js“, it is responsible for:
- “Pay with Card” button rendering

- Payment overlay dialog rendering (triggered after clicking “Pay with Card”)

- Credit card validation
- “Remember me” feature (associates the card with a mobile number)
- Sending the credit card to Stripe and replacing it with a token in the enclosing form (triggered after clicking “Pay <amount>”)
If we need to exercise more control over the checkout form than is provided by Stripe Checkout, then we can use Stripe Elements.
Next, we will analyze the controller that prepares the form and then the form itself.
5.1. Controller
Let’s start by creating a controller to prepare the model with the necessary information that the checkout form needs.
First, we’ll need to copy the test version of our public key from the Stripe dashboard and use it to define STRIPE_PUBLIC_KEY as an environment variable. We then use this value in the stripePublicKey field.
We’re also setting currency and amount (expressed in cents) manually here merely for demonstration purposes, but in a real application, we might set a product/sale id that could be used to fetch the actual values.
Then, we’ll dispatch to the checkout view which holds the checkout form:
@Controller
public class CheckoutController {

    @Value("${STRIPE_PUBLIC_KEY}")
    private String stripePublicKey;

    @RequestMapping("/checkout")
    public String checkout(Model model) {
        model.addAttribute("amount", 50 * 100); // in cents
        model.addAttribute("stripePublicKey", stripePublicKey);
        model.addAttribute("currency", ChargeRequest.Currency.EUR);
        return "checkout";
    }
}
Regarding the Stripe API keys, you can define them as environment variables per application (test vs. live).
As is the case with any password or sensitive information, it is best to keep the secret key out of your version control system.
The “Pay with Card” button and the checkout dialog are included by adding a form with a script inside, correctly configured with data attributes:
<form action='/charge' method='POST' id='checkout-form'>
    <input type='hidden' th:value='${amount}' name='amount' />
    <label>Price:<span th:text='${amount/100}' /></label>
    <!-- NOTE: data-key/data-amount/data-currency will be rendered by Thymeleaf -->
    <script
       src='https://checkout.stripe.com/checkout.js'
       class='stripe-button'
       th:attr='data-key=${stripePublicKey},
         data-amount=${amount},
         data-currency=${currency}'
       data-name='Baeldung'
       data-description='Spring course checkout'
       data-image
         ='https://www.baeldung.com/wp-content/themes/baeldung/favicon/android-chrome-192x192.png'
       data-locale='auto'
       data-zip-code='false'>
   </script>
</form>
The “checkout.js” script automatically triggers a request to Stripe right before the submit, which then appends the Stripe token and the Stripe user email as the hidden fields “stripeToken” and “stripeEmail“.
These will be submitted to our back-end along with the other form fields. The script data attributes are not submitted.
We use Thymeleaf to render the attributes “data-key“, “data-amount“, and “data-currency“.
The amount (“data-amount“) is used only for display purposes (along with “data-currency“). Its unit is cents of the used currency, so we divide it by 100 to display it.
The Stripe public key is passed to Stripe after the user asks to pay. Do not use the secret key here, as this is sent to the browser.
6. Charge Operation
For server-side processing, we need to define the POST request handler used by the checkout form. Let’s take a look at the classes we will need for the charge operation.
6.1. ChargeRequest Entity
Let’s define the ChargeRequest POJO that we will use as a business entity during the charge operation:
@Data
public class ChargeRequest {

    public enum Currency {
        EUR, USD;
    }
    private String description;
    private int amount;
    private Currency currency;
    private String stripeEmail;
    private String stripeToken;
}
6.2. Service
Let’s write a StripeService class to communicate the actual charge operation to Stripe:
@Service
public class StripeService {

    @Value("${STRIPE_SECRET_KEY}")
    private String secretKey;

    @PostConstruct
    public void init() {
        Stripe.apiKey = secretKey;
    }
    public Charge charge(ChargeRequest chargeRequest)
      throws AuthenticationException, InvalidRequestException,
        APIConnectionException, CardException, APIException {
        Map<String, Object> chargeParams = new HashMap<>();
        chargeParams.put("amount", chargeRequest.getAmount());
        chargeParams.put("currency", chargeRequest.getCurrency());
        chargeParams.put("description", chargeRequest.getDescription());
        chargeParams.put("source", chargeRequest.getStripeToken());
        return Charge.create(chargeParams);
    }
}
As was shown in the CheckoutController, the secretKey field is populated from the STRIPE_SECRET_KEY environment variable that we copied from the Stripe dashboard.
Once the service has been initialized, this key is used in all subsequent Stripe operations.
The object returned by the Stripe library represents the charge operation and contains useful data like the operation id.
6.3. Controller
Finally, let’s write the controller that will receive the POST request made by the checkout form and submit the charge to Stripe via our StripeService.
Note that the “ChargeRequest” parameter is automatically initialized with the request parameters “amount“, “stripeEmail“, and “stripeToken” included in the form:
@Controller
public class ChargeController {

    @Autowired
    private StripeService paymentsService;

    @PostMapping("/charge")
    public String charge(ChargeRequest chargeRequest, Model model)
      throws StripeException {
        chargeRequest.setDescription("Example charge");
        chargeRequest.setCurrency(Currency.EUR);
        Charge charge = paymentsService.charge(chargeRequest);
        model.addAttribute("id", charge.getId());
        model.addAttribute("status", charge.getStatus());
        model.addAttribute("chargeId", charge.getId());
        model.addAttribute("balance_transaction", charge.getBalanceTransaction());
        return "result";
    }

    @ExceptionHandler(StripeException.class)
    public String handleError(Model model, StripeException ex) {
        model.addAttribute("error", ex.getMessage());
        return "result";
    }
}
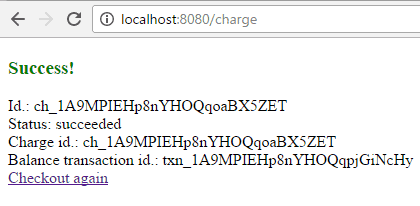
On success, we add the status, the operation id, the charge id, and the balance transaction id to the model so that we can show them later to the user (Section 7). This is done to illustrate some of the contents of the charge object.
Our ExceptionHandler will deal with exceptions of type StripeException that are thrown during the charge operation.
If we need more fine-grained error handling, we can add separate handlers for the subclasses of StripeException, such as CardException, RateLimitException, or AuthenticationException.
The “result” view renders the result of the charge operation.
7. Showing the Result
The HTML used to display the result is a basic Thymeleaf template that displays the outcome of a charge operation. The user is sent here by the ChargeController whether the charge operation was successful or not:
<!DOCTYPE html>
<html xmlns='http://www.w3.org/1999/xhtml' xmlns:th='http://www.thymeleaf.org'>
    <head>
        <title>Result</title>
    </head>
    <body>
        <h3 th:if='${error}' th:text='${error}' style='color: red;'></h3>
        <div th:unless='${error}'>
            <h3 style='color: green;'>Success!</h3>
            <div>Id.: <span th:text='${id}' /></div>
            <div>Status: <span th:text='${status}' /></div>
            <div>Charge id.: <span th:text='${chargeId}' /></div>
            <div>Balance transaction id.: <span th:text='${balance_transaction}' /></div>
        </div>
        <a href='/checkout.html'>Checkout again</a>
    </body>
</html>
On success, the user will see some details of the charge operation:
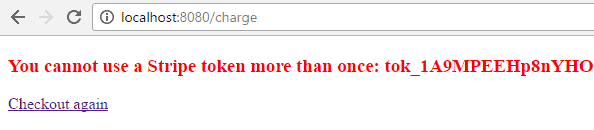
On error, the user will be presented with the error message as returned by Stripe:
8. Conclusion
In this tutorial, we’ve shown how to make use of the Stripe Java API to charge a credit card. In the future, we could reuse our server-side code to serve a native mobile app.
To test the entire charge flow, we don’t need to use a real credit card (even in test mode). We can rely on Stripe testing cards instead.
The charge operation is one among many possibilities offered by the Stripe Java API. The official API reference will guide us through the whole set of operations.
The sample code used in this tutorial can be found in the GitHub project.


