1. Overview
On refactoring.com, we read that “refactoring is a disciplined technique for restructuring an existing body of code, altering its internal structure without changing its external behavior.”
Typically, we might want to rename variables or methods, or we may want to make our code more object-oriented by introducing design patterns. Modern IDEs have many built-in features to help us achieve these kinds of refactoring objectives and many others.
In this tutorial, we’ll focus on refactoring in Eclipse, a free popular Java IDE.
Before we start any refactoring, it’s advisable to have a solid suite of tests so as to check that we didn’t break anything while refactoring.
2. Renaming
2.1. Renaming Variables and Methods
We can rename variables and methods by following these simple steps:
-
- Select the element
- Right-click the element
- Click the Refactor > Rename option
- Type the new name
- Press Enter
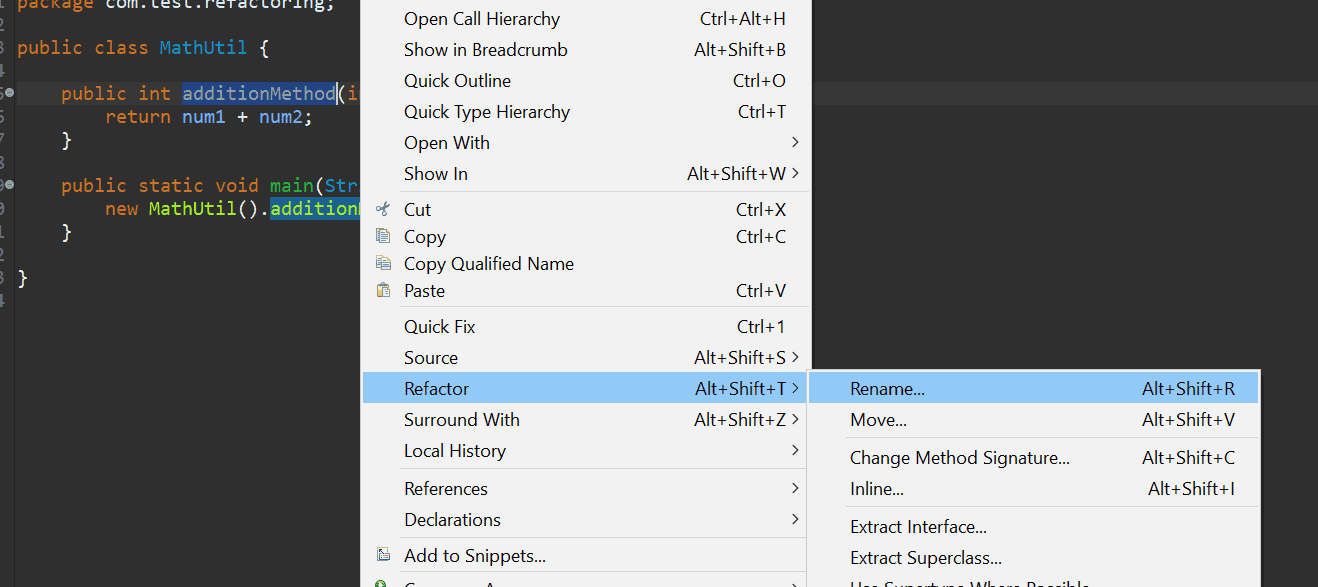
We can also perform the second and third steps by using the shortcut key, Alt+Shift+R.
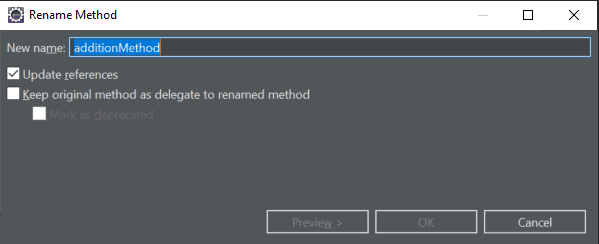
When the above action is performed, Eclipse will find every usage of that element in that file and replace them all in place.
We can also use an advanced feature to update the reference in other classes by hovering over the item when the refactor is on and clicking on Options:
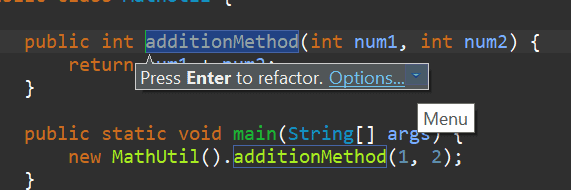
This will open up a pop-up where we can both rename the variable or method and have the option to update the reference in other classes:
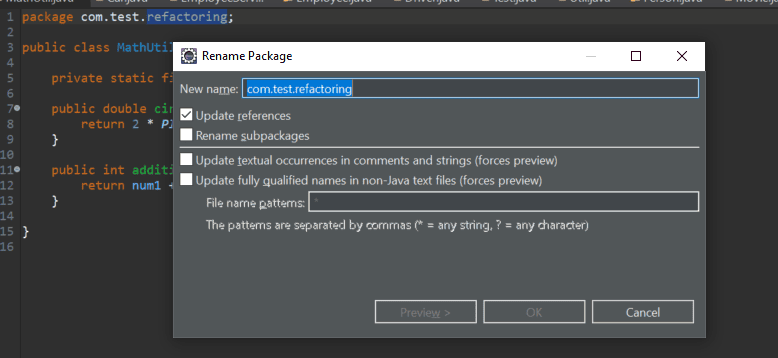
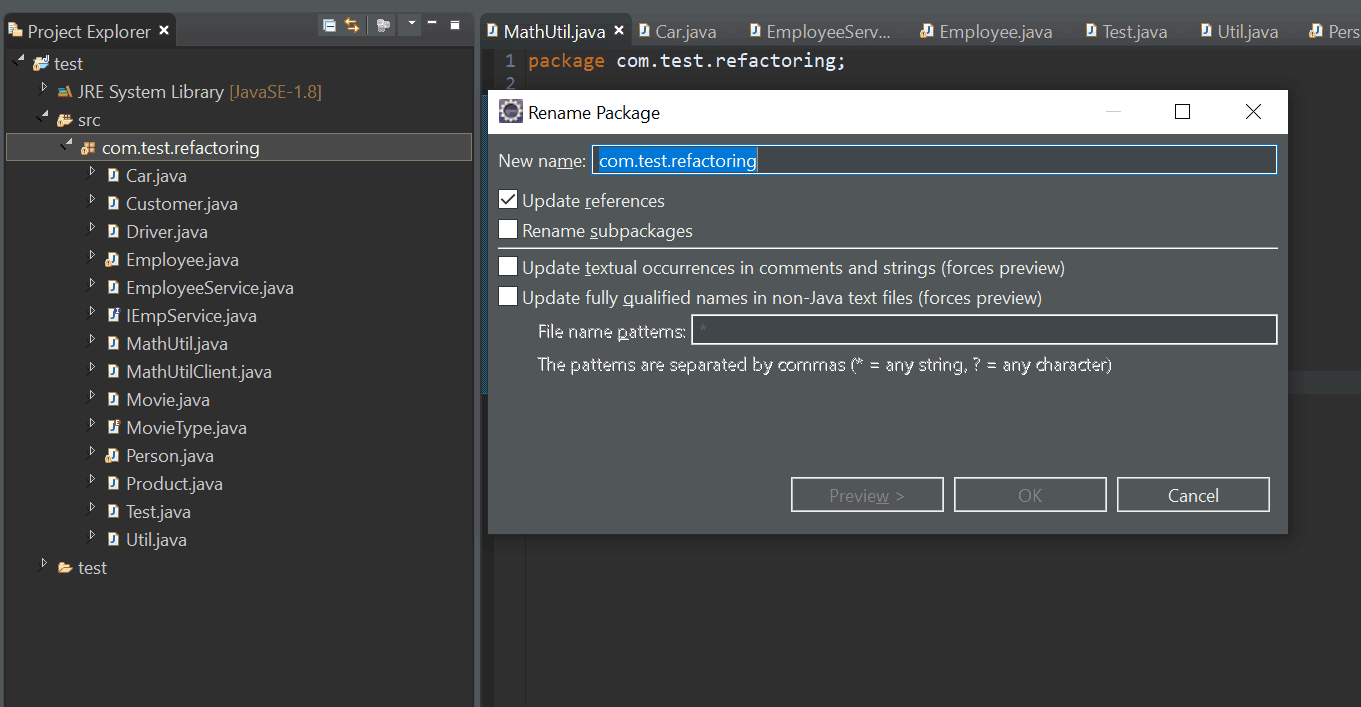
2.2. Renaming Packages
We can rename a package by selecting the package name and performing the same actions as in the previous example. A pop-up will appear right away where we can rename the package, with options like updating references and renaming subpackages.
We can also rename the package from the Project Explorer view by pressing F2:
2.3. Renaming Classes and Interfaces
We can rename a class or interface by using the same actions or just by pressing F2 from Project Explorer. This will open up a pop-up with options to update references, along with a few advanced options:

Now, let’s talk about extraction. Extracting code means taking a piece of code and moving it.
For example, we can extract code into a different class, superclass or interface. We could even extract code to a variable or method in the same class.
Eclipse provides a variety of ways to achieve extractions, which we’ll demonstrate in the following sections.
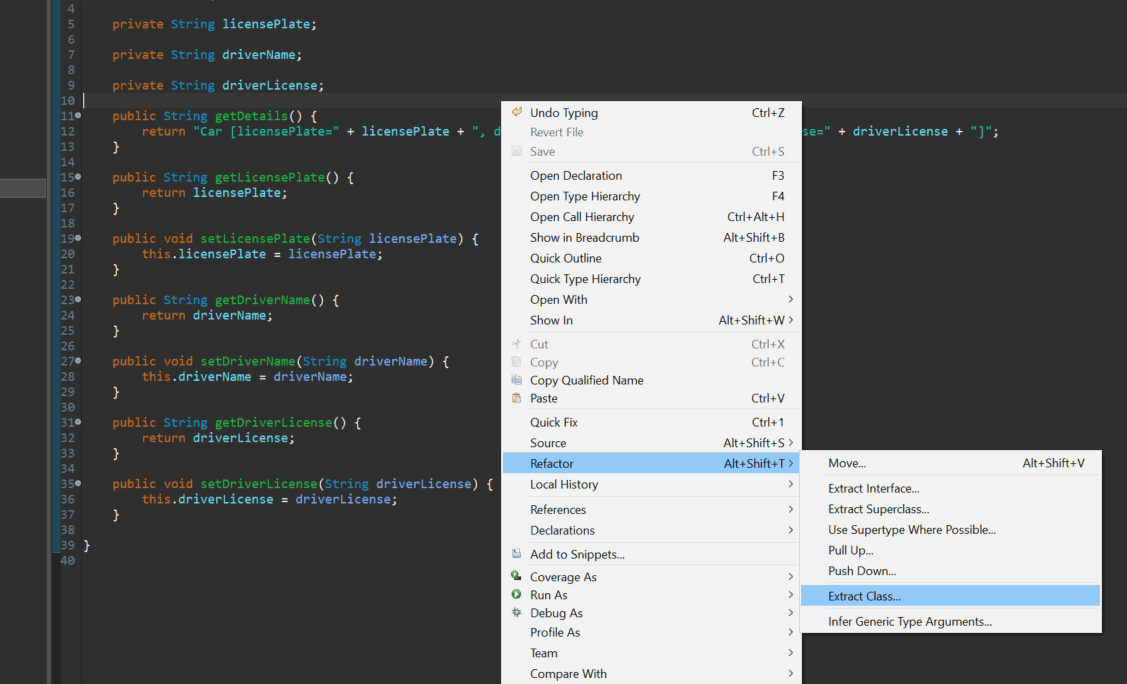
Suppose we have the following Car class in our codebase:
public class Car {

    private String licensePlate;
    private String driverName;
    private String driverLicense;

    public String getDetails() {
        return "Car [licensePlate=" + licensePlate + ", driverName=" + driverName
          + ", driverLicense=" + driverLicense + "]";
    }

    // getters and setters
}
Now, suppose we want to extract out the driver details to a different class. We can do this by right-clicking anywhere within the class and choosing the Refactor > Extract Class option:
This will open up a pop-up where we can name the class and select which fields we want to move, along with few other options:
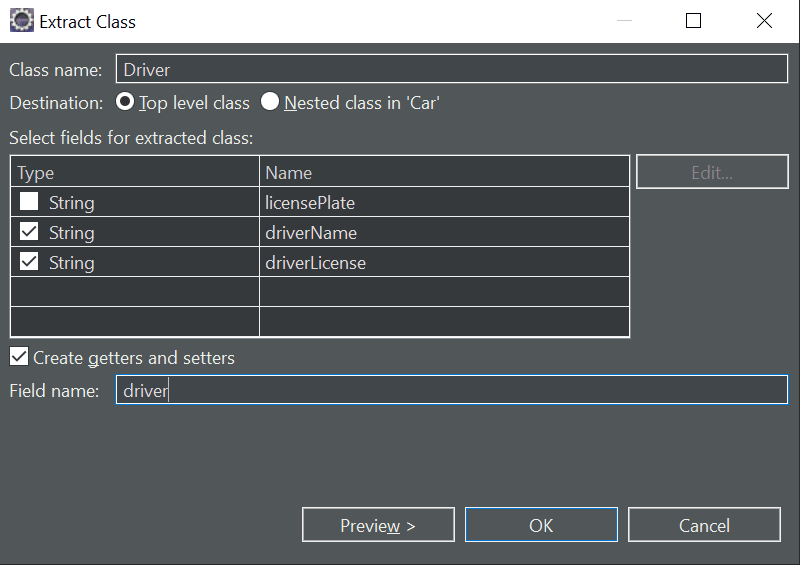
We can also preview the code before moving forward. When we click OK, Eclipse will create a new class named Driver, and the previous code will be refactored to:
public class Car {

    private String licensePlate;

    private Driver driver = new Driver();

    public String getDetails() {
        return "Car [licensePlate=" + licensePlate + ", driverName=" + driver.getDriverName()
          + ", driverLicense=" + driver.getDriverLicense() + "]";
    }

    //getters and setters
}
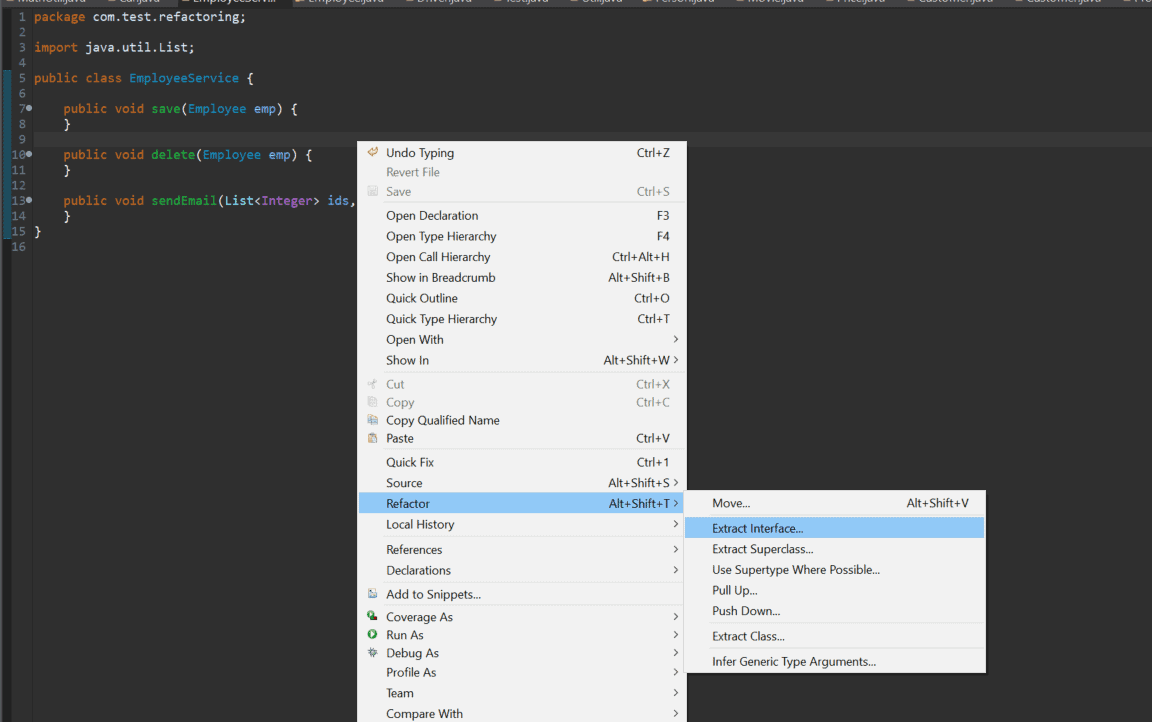
We can also extract an interface in a similar fashion. Suppose we have the following EmployeeService class:
public class EmployeeService {

    public void save(Employee emp) {
    }

    public void delete(Employee emp) {
    }

    public void sendEmail(List<Integer> ids, String message) {
    }
}
We can extract an interface by right-clicking anywhere within the class and choosing the Refactor > Extract Interface option, or we can use the Alt+Shift+T shortcut key command to bring up the menu directly:
This will open up a pop-up where we can enter the interface name and decide which members to declare in the interface:
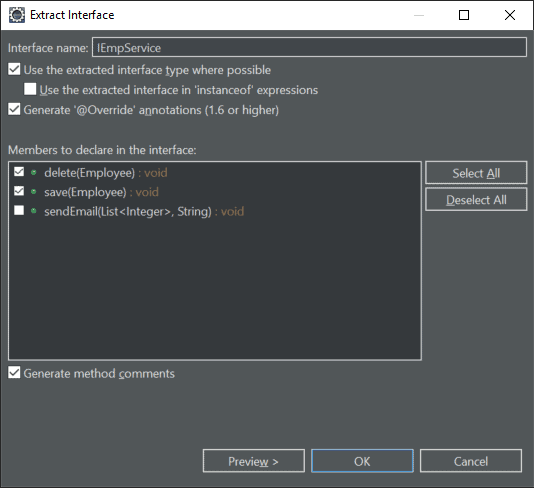
As a result of this refactoring, we’ll have an interface IEmpService, and our EmployeeService class will be changed as well:
public class EmployeeService implements IEmpService {

    @Override
    public void save(Employee emp) {
    }

    @Override
    public void delete(Employee emp) {
    }

    public void sendEmail(List<Integer> ids, String message) {
    }
}
Suppose we have an Employee class containing several properties that aren’t necessarily about the person’s employment:
public class Employee {

    private String name;

    private int age;

    private int experienceInMonths;

    public String getName() {
        return name;
    }

    public int getAge() {
        return age;
    }

    public int getExperienceInMonths() {
        return experienceInMonths;
    }
}
We may want to extract the non-employment-related properties to a Person superclass. To extract items to a superclass, we can right-click anywhere in the class and choose the Refactor > Extract Superclass option, or use Alt+Shift+T to bring up the menu directly:
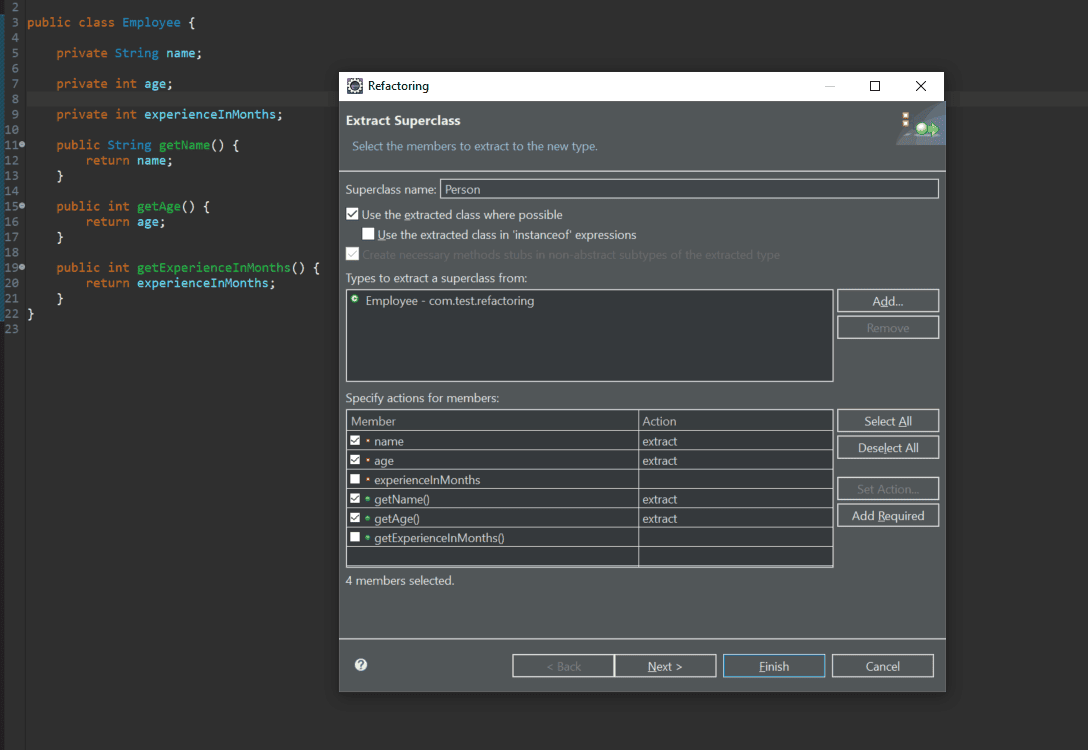
This will create a new Person class with our selected variables and method, and the Employee class will be refactored to:
public class Employee extends Person {

    private int experienceInMonths;

    public int getExperienceInMonths() {
        return experienceInMonths;
    }
}
Sometimes, we might want to extract a certain piece of code inside our method to a different method to keep our code clean and easy to maintain.
Let’s say, for example, that we have a for loop embedded in our method:
public class Test {
    public static void main(String[] args) {
        for (int i = 0; i < args.length; i++) {
            System.out.println(args[i]);
        }
    }
}
To invoke the Extract Method wizard, we need to perform the following steps:
- Select the lines of code we want to extract
- Right-click the selected area
- Click the Refactor > Extract Method option
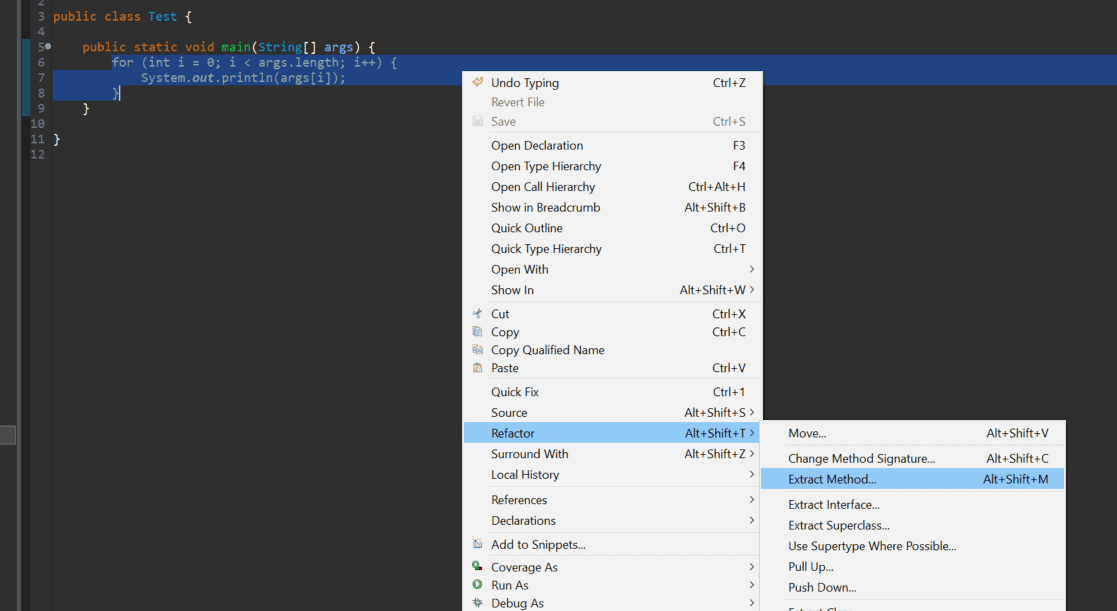
The last two steps can also be achieved by keyboard shortcut Alt+Shift+M. Let’s see the Extract Method dialog:

This will refactor our code to:
public class Test {

    public static void main(String[] args) {
        printArgs(args);
    }

    private static void printArgs(String[] args) {
        for (int i = 0; i < args.length; i++) {
            System.out.println(args[i]);
        }
    }
}
We can extract certain items as local variables to make our code more readable.
This is handy when we have a String literal:
public class Test {

    public static void main(String[] args) {
        System.out.println("Number of Arguments passed =" + args.length);
    }
}
and we want to extract it to a local variable.
To do this, we need to:
- Select the item
- Right-click and choose Refactor > Extract Local Variable
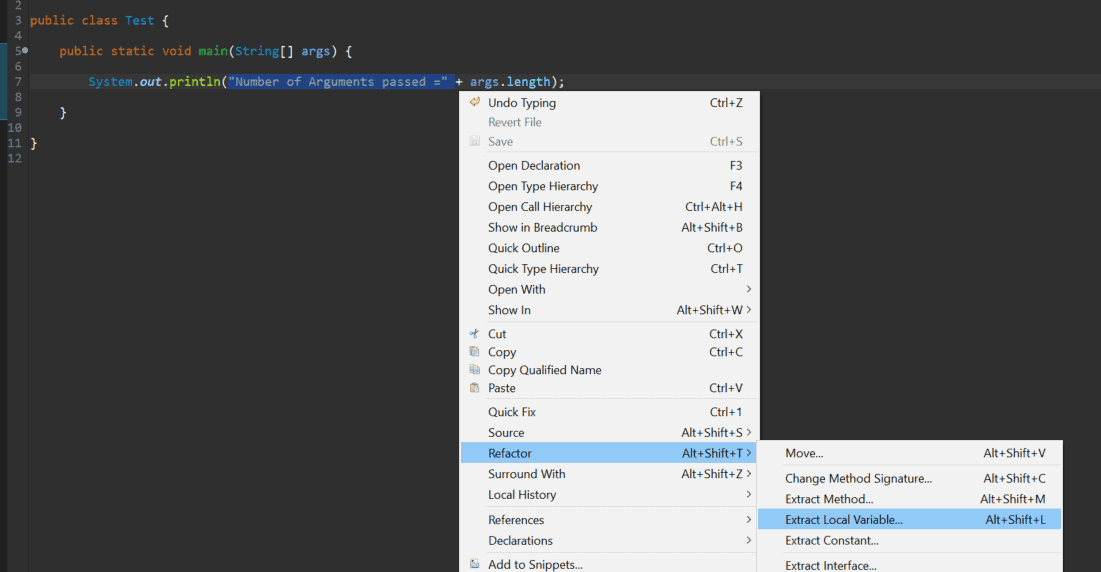
The last step can also be achieved by the keyboard shortcut Alt+Shift+L. Now, we can extract our local variable:
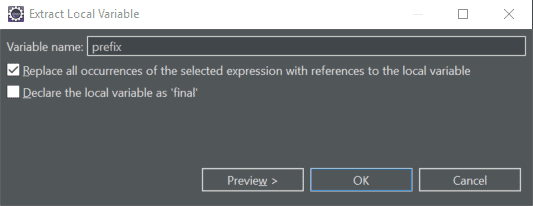
And here’s the result of this refactoring:
public class Test {

    public static void main(String[] args) {
        final String prefix = "Number of Arguments passed =";
        System.out.println(prefix + args.length);
    }
}
Or, we can extract expressions and literal values to static final class attributes.
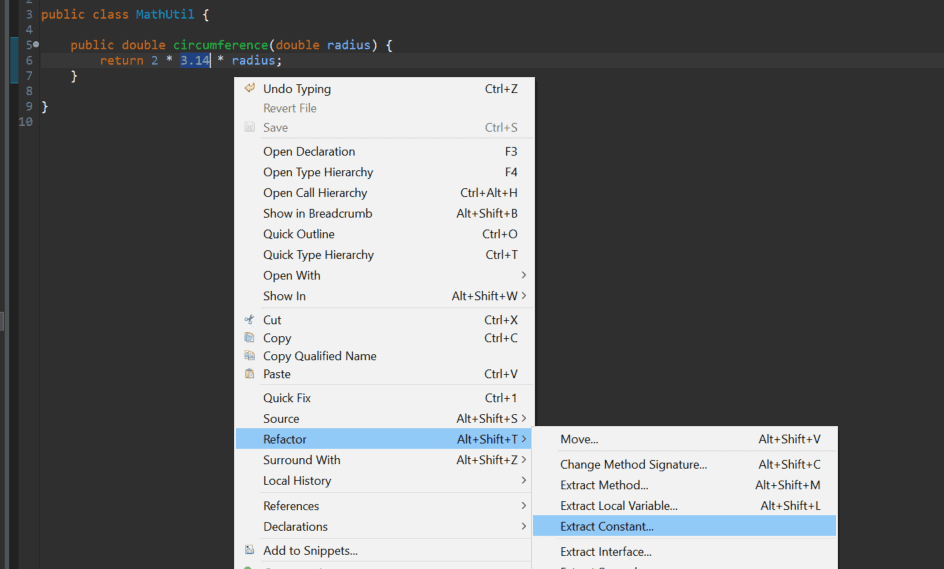
We could extract the 3.14 value into a local variable, as we just saw:
public class MathUtil {

    public double circumference(double radius) {
        return 2 * 3.14 * radius;
    }
}
But, it might be better to extract it as a constant, for which we need to:
- Select the item
- Right-click and choose Refactor > Extract Constant
This will open a dialog where we can give the constant a name and set its visibility, along with a couple of other options:
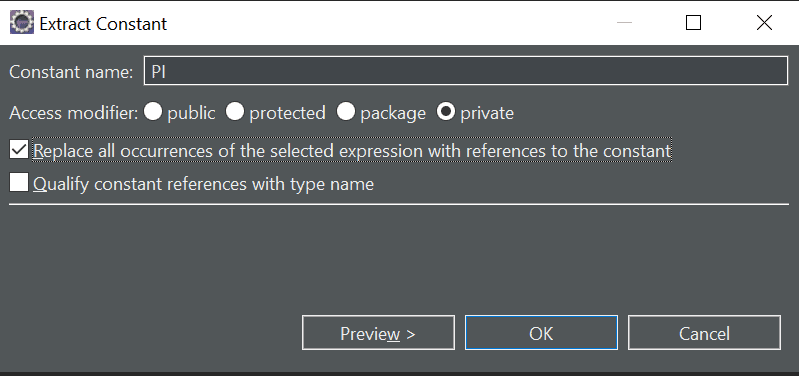
Now, our code looks a little more readable:
public class MathUtil {

    private static final double PI = 3.14;

    public double circumference(double radius) {
        return 2 * PI * radius;
    }
}
4. Inlining
We can also go the other way and inline code.
Consider a Util class that has a local variable that’s only used once:
public class Util {

    public void isNumberPrime(int num) {
        boolean result = isPrime(num);
        if (result) {
            System.out.println("Number is Prime");
        } else {
            System.out.println("Number is Not Prime");
        }
    }

    // isPrime method
}
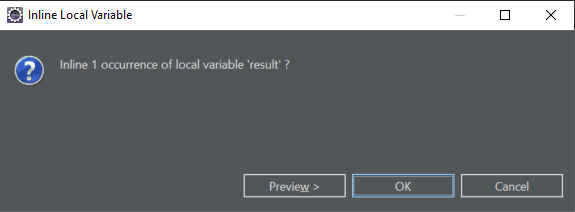
We want to remove the result local variable and inline the isPrime method call. To do this, we follow these steps:
- Select the item we want to inline
- Right-click and choose the Refactor > Inline option
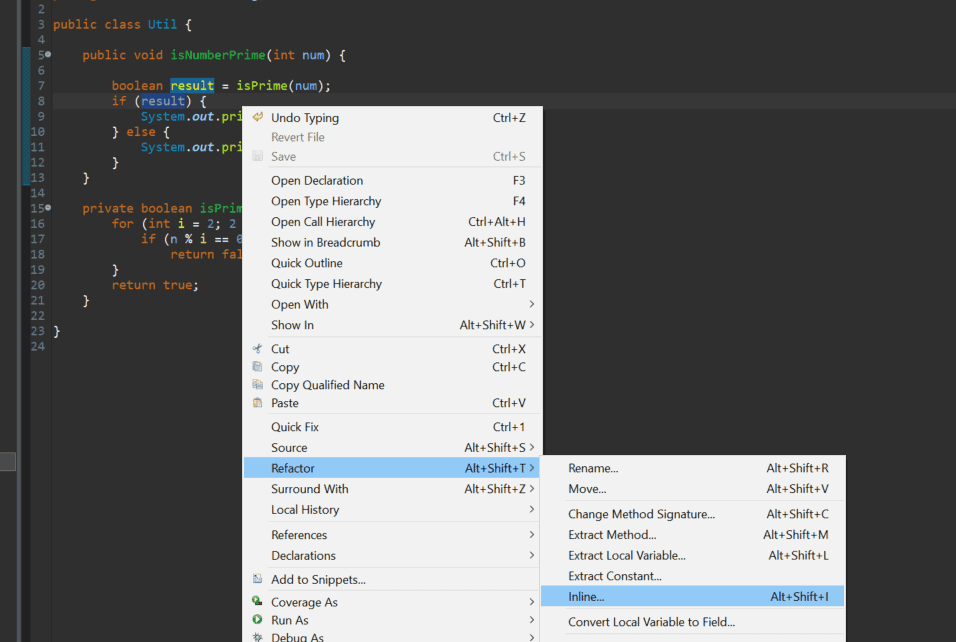
The last step can also be achieved by keyboard shortcut Alt+Shift+I:
Afterward, we have one less variable to keep track of:
public class Util {

    public void isNumberPrime(int num) {
        if (isPrime(num)) {
            System.out.println("Number is Prime");
        } else {
            System.out.println("Number is Not Prime");
        }
    }

    // isPrime method
}
5. Push Down and Pull Up
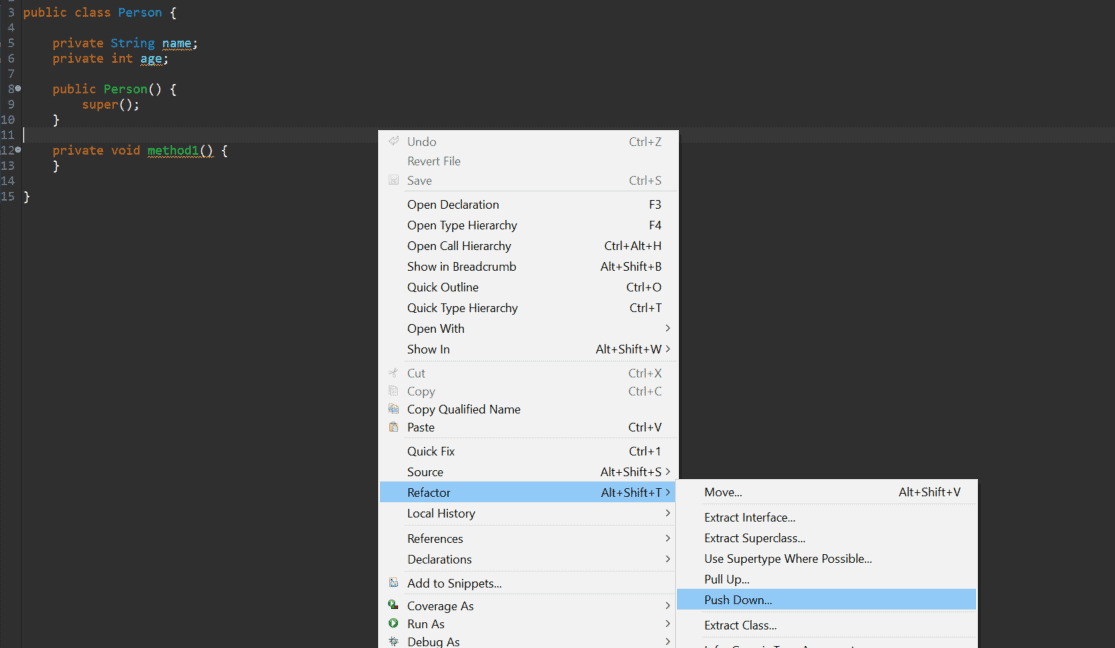
If we have a parent-child relationship (like our previous Employee and Person example) between our classes, and we want to move certain methods or variables among them, we can use the push/pull options provided by Eclipse.
As the name suggests, the Push Down option moves methods and fields from a parent class to all child classes, while Pull Up moves methods and fields from a particular child class to parent, thus making that method available to all the child classes.
For moving methods down to child classes, we need to right-click anywhere in the class and choose the Refactor > Push Down option:
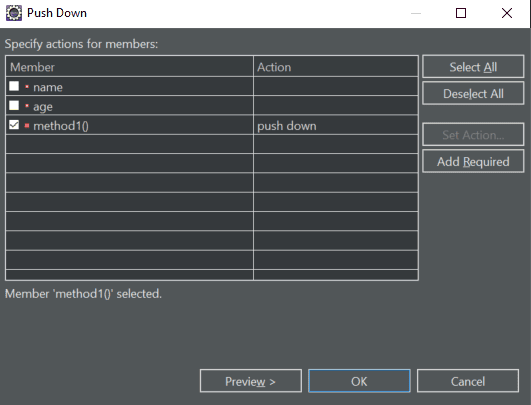
This will open up a wizard where we can select items to push down:
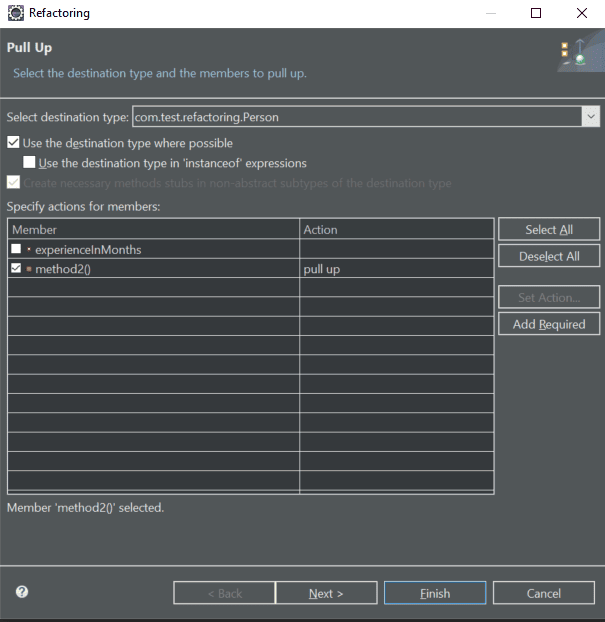
Similarly, for moving methods from a child class to parent class, we need to right-click anywhere in the class and choose Refactor > Pull Up:
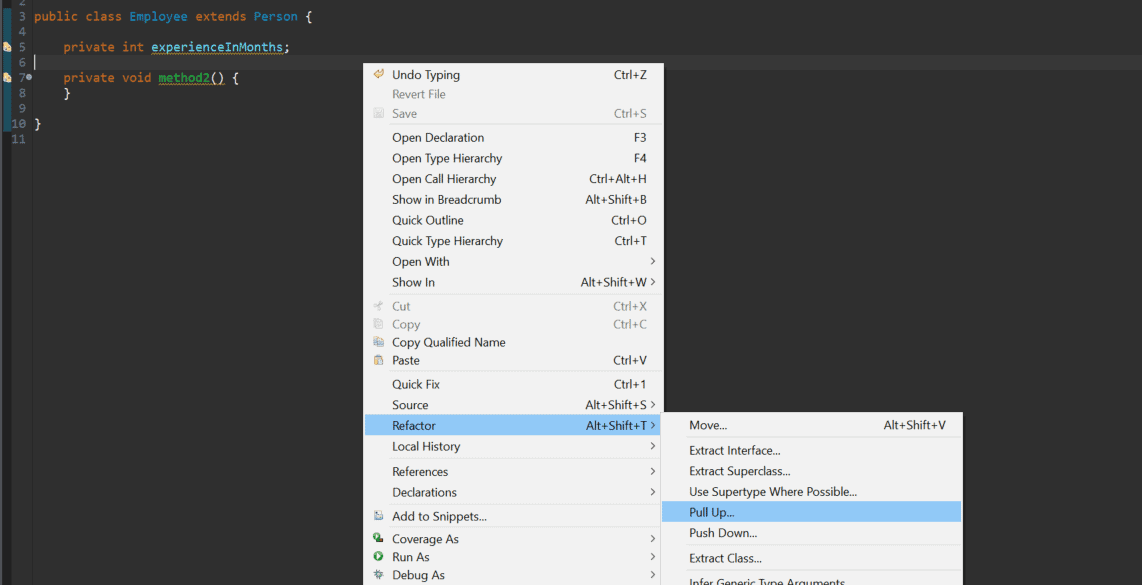
This will open up a similar wizard where we can select items to pull up:
6. Changing a Method Signature
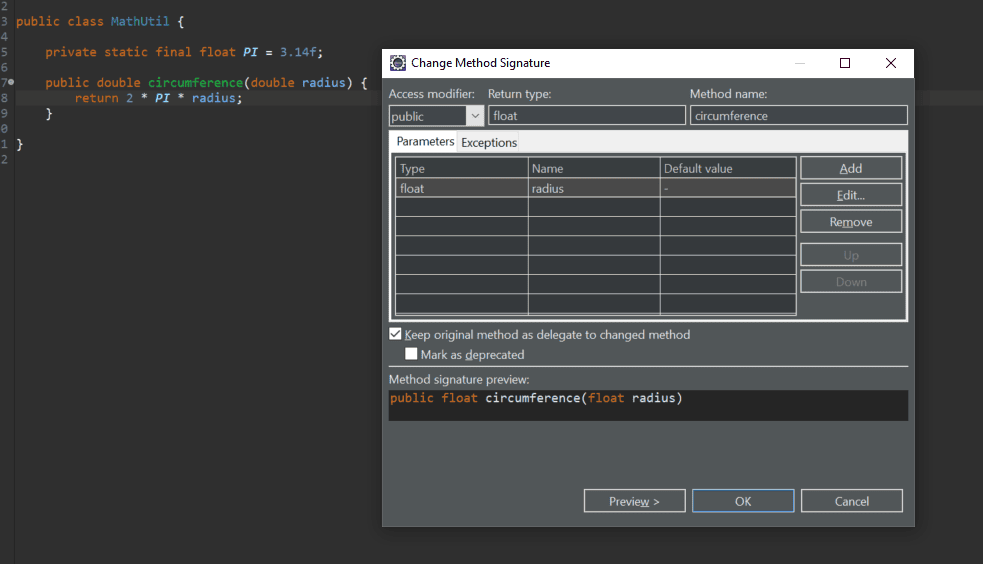
To change the method signature of an existing method, we can follow a few simple steps:
- Select the method or place the cursor somewhere inside
- Right-click and choose Refactor > Change Method Signature
The last step can also be achieved by keyboard shortcut Alt+Shift+C.
This will open a popup where you can change the method signature accordingly:
7. Moving
Sometimes, we simply want to move methods to another existing class to make our code more object-oriented.
Consider the scenario where we have a Movie class:
public class Movie {

    private String title;
    private double price;
    private MovieType type;

    // other methods
}
And MovieType is a simple enum:
public enum MovieType {
    NEW, REGULAR
}
Suppose also that we have a requirement that if a Customer rents a movie that is NEW, it will be charged two dollars more, and that our Customer class has the following logic to calculate the totalCost():
public class Customer {

    private String name;
    private String address;
    private List<Movie> movies;

    public double totalCost() {
        double result = 0;
        for (Movie movie : movies) {
            result += movieCost(movie);
        }
        return result;
    }

    private double movieCost(Movie movie) {
        if (movie.getType()
            .equals(MovieType.NEW)) {
            return 2 + movie.getPrice();
        }
        return movie.getPrice();
    }

    // other methods
}
Clearly, the calculation of the movie cost based on the MovieType would be more appropriately placed in the Movie class and not the Customer class. We can easily move this calculation logic in Eclipse:
- Select the lines you want to move
- Right-click and choose the Refactor > Move option
The last step can also be achieved by keyboard shortcut Alt+Shift+V:
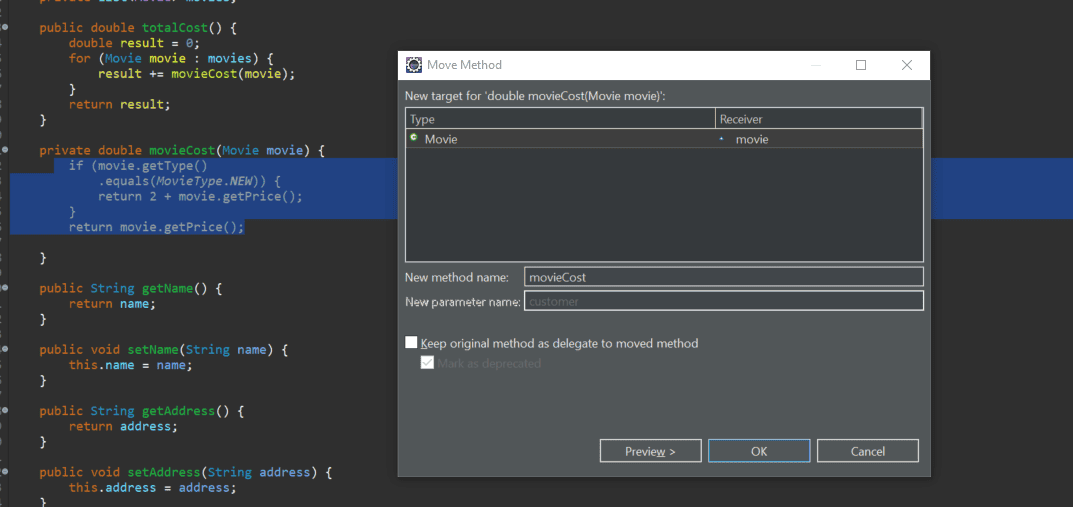
Eclipse is smart enough to realize that this logic should be in our Movie class. We can change the method name if we want, along with other advanced options.
The final Customer class code will be refactored to:
public class Customer {

    private String name;
    private String address;
    private List<Movie> movies;

    public double totalCost() {
        double result = 0;
        for (Movie movie : movies) {
            result += movie.movieCost();
        }
        return result;
    }

    // other methods
}
As we can see, the movieCost method has been moved to our Movie class and is being used in the refactored Customer class.
8. Conclusion
In this tutorial, we looked into some of the main refactoring techniques provided by Eclipse. We started with some basic refactoring like renaming and extracting. Later on, we saw moving methods and fields around different classes.
To learn more, we can always refer to the official Eclipse documentation on refactoring.


