

Learn through the super-clean Baeldung Pro experience:
>> Membership and Baeldung Pro.
No ads, dark-mode and 6 months free of IntelliJ Idea Ultimate to start with.
Learn through the super-clean Baeldung Pro experience:
>> Membership and Baeldung Pro.
No ads, dark-mode and 6 months free of IntelliJ Idea Ultimate to start with.
Kubernetes, also known as K8s, is a natural progression of the containerization trend. Although containers can be created from scratch, we usually employ software solutions like Docker. Similarly, Dockerfile and DockerHub images automate configuration and deployment. Kubernetes sits atop similar processes and ensures they happen when and as expected with potential redundancies and higher-level configurations taking place automatically.
These operations run within a cluster, the organizational unit of Kubernetes. A cluster comprises the control and worker nodes that manage and execute applications as pods, i.e., container wrappers. For proper organization and simpler management, clusters are broken down into different components.
In this tutorial, we explore the basic components that a sample Kubernetes cluster comprises. First, we go through basic deployment steps. After that, we get an overview of a Kubernetes cluster. Next, we check the container runtime component as the base for all others. Then, we thoroughly understand the control plane components. Later, the fairly simpler node components take the spotlight. Finally, we conclude with an overview of Kubernetes addons.
We tested the code in this tutorial on Debian 12 (Bookworm) with GNU Bash 5.2.15. Unless otherwise specified, it should work in most POSIX-compliant environments.
Before delving into the cluster ecosystem, let’s install Kubernetes and create a basic cluster.
Although work is underway to change that, Kubernetes currently doesn’t work well with swap. In fact, due to the paging and potential size of the swap, both predictability and performance are drastically reduced if the feature is enabled.
So, let’s permanently disable swap. To do so, we first check whether there are any allocated swap files or partitions:
$ cat /proc/swaps
Filename   Type       Size     Used   Priority
/dev/sda6  partition  6664301  66601  0
In this case, /dev/sda6 is a swap partition. Another mechanism can be a file, commonly /swapfile.
Either way, we first turn off –all swap:
$ swapoff --allAfter that, we can unmount and delete related objects:
$ umount /dev/sda6
$ rm --force /swapfile
Finally, to prevent remounts after a reboot, we should also edit the /etc/fstab file.
Since Kubernetes is based on different kernel and environment features, we should ensure they are part of our environment.
First, we configure automatic module loading via a new file under /etc/modules-load.d/:
$ cat <<EOI > /etc/modules-load.d/88-kuber.conf
overlay
br_netfilter
EOI
Specifically, overlay enables OverlayFS, while br_netfilter turns on bridge network traffic filtering.
Further, we support these settings with sysctl configurations related to forwarding and bridge filters:
$ cat <<EOI > /etc/sysctl.d/88-k8s.conf
# kubernetes bridge
net.bridge.bridge-nf-call-ip6tables = 1
net.ipv4.ip_forward                 = 1
net.bridge.bridge-nf-call-iptables  = 1
EOI
Finally, let’s ensure no firewall rules are in place:
$ iptables -L
Chain INPUT (policy ACCEPT)
target     prot opt source               destination

Chain FORWARD (policy ACCEPT)
target     prot opt source               destination

Chain OUTPUT (policy ACCEPT)
target     prot opt source               destination
This is important due to potential conflicts with other applications such as Docker.
At this point, we can install containerd:
$ apt-get update && apt-get install containerdNext, let’s ensure our settings are in sync with Kubernetes:
$ cp /etc/containerd/config.toml /etc/containerd/config.toml.org
$ containerd config default > /etc/containerd/config.toml
$ sed --in-place 's/registry.k8s.io\/pause:3.6/registry.k8s.io\/pause:3.9/' /etc/containerd/config.toml
$ sed --in-place 's/SystemdCgroup = false/SystemdCgroup = true/' /etc/containerd/config.toml
$ systemctl daemon-reload
$ systemctl restart containerd
Sometimes, mismatches between containerd and Kubernetes can cause the important pause image to have different versions.
The pause container initializes a namespace for a pod and holds the door for other containers within the same pod in case all of them fail at the same time.
Next, we prepare to install Kubernetes by adding the necessary packages and repository configuration:
$ apt-get update && apt-get install apt-transport-https curl gnupg2
$ curl https://packages.cloud.google.com/apt/doc/apt-key.gpg | sudo apt-key --keyring /usr/share/keyrings/kubernetes-archive-keyring.gpg add -
$ cat <<EOI > /etc/apt/sources.list.d/kubernetes.list
deb [signed-by=/usr/share/keyrings/kubernetes-archive-keyring.gpg] https://apt.kubernetes.io/ kubernetes-xenial main
EOI
After setting up the repository and key, we can install all components as usual:
$ apt-get update && apt-get install kubelet kubeadm kubectlTo prevent disruptions, it’s usually a good idea to hold the current version of each Kubernetes package:
$ apt-mark hold kubelet kubeadm kubectlThis way, we ensure stability and control.
At this point, we should be read to [init]ialize a cluster:
$ kubeadm init --pod-network-cidr=10.244.0.0/16Notably, we supply –pod-network-cidr with the default network CIDR for Flannel.
After some processing, we should see instructions on how to continue depending on the current context. Critically, we need to follow the instructions for each environment that we want to control our cluster from, not only other cluster nodes.
This section is exclusively for deployments with only one node.
If we plan to use a one-node deployment, we must ensure that we can schedule and run pods on that node. To do so, we turn our controller system into a worker as well:
$ kubectl taint nodes --all node-role.kubernetes.io/control-plane-By removing the control-plane [taint]s for –all nodes via the – suffix, we permit the scheduling of regular workload pods on our only node.
When it comes to the network fabric, we use the relatively basic Flannel addon:
$ kubectl apply -f https://github.com/flannel-io/flannel/releases/latest/download/kube-flannel.ymlShould we want to, we can download the Flannel YAML file first and modify settings like the CIDR, in case we don’t use the default above.
So, after deploying Kubernetes and creating a simple one-node cluster, we can explore our kube-system namespace environment via the get all command:
$ kubectl get all --namespace=kube-system
NAME                               READY   STATUS    RESTARTS   AGE
pod/coredns-76f75df574-w62vl       1/1     Running   0          15m
pod/coredns-76f75df574-zqx8w       1/1     Running   0          15m
pod/etcd-xost                      1/1     Running   0          15m
pod/kube-apiserver-xost            1/1     Running   0          15m
pod/kube-controller-manager-xost   1/1     Running   0          15m
pod/kube-proxy-mvcfp               1/1     Running   0          15m
pod/kube-scheduler-xost            1/1     Running   0          15m

NAME               TYPE        CLUSTER-IP   EXTERNAL-IP   PORT(S)                  AGE
service/kube-dns   ClusterIP   10.96.0.10           53/UDP,53/TCP,9153/TCP   15m

NAME                        DESIRED   CURRENT   READY   UP-TO-DATE   AVAILABLE   NODE SELECTOR            AGE
daemonset.apps/kube-proxy   1         1         1       1            1           kubernetes.io/os=linux   15m

NAME                      READY   UP-TO-DATE   AVAILABLE   AGE
deployment.apps/coredns   2/2     2            2           15m

NAME                                 DESIRED   CURRENT   READY   AGE
replicaset.apps/coredns-76f75df574   2         2         2       15m
Already, we can appreciate how many components go into a fairly basic and seemingly empty Kubernetes cluster to just support itself. They are split between the control plane and nodes, i.e., the main parts of a cluster.
Let’s see an overview of how these components interact:
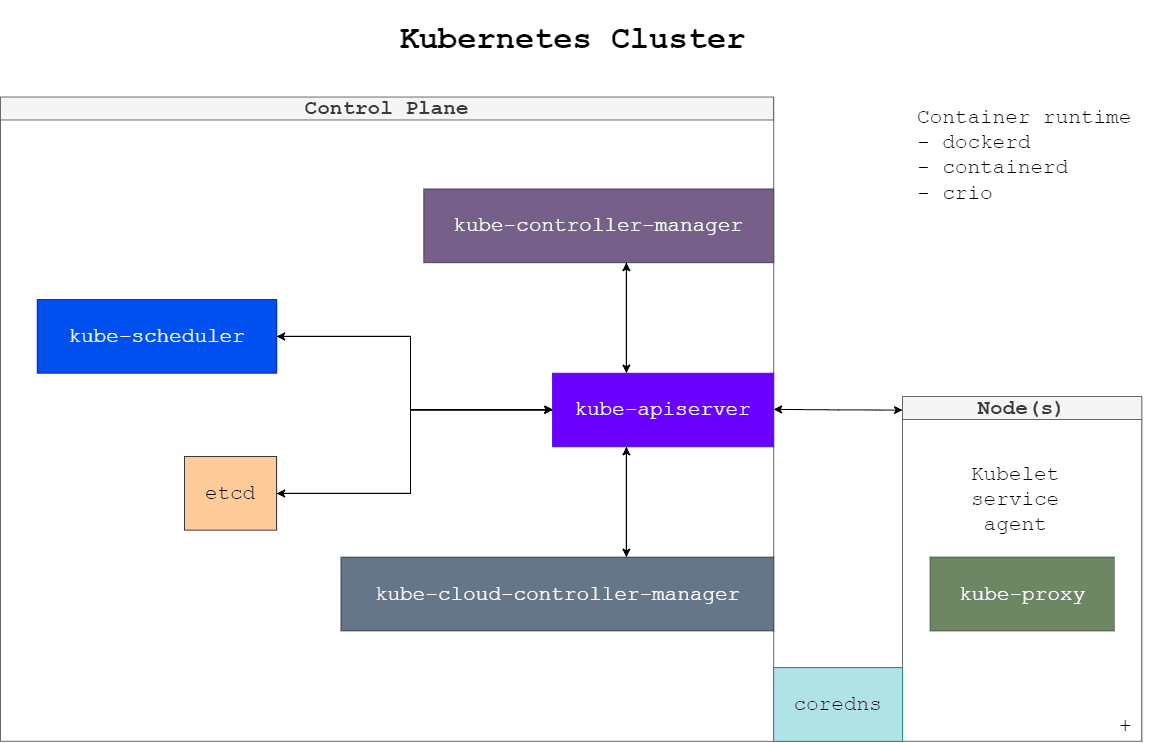
As we can already tell, the control plane and nodes are connected through the API. Notably, each rectangle above represents either a machine in the cluster (Control Plane, regular worker Node) or a Kubernetes system pod. Critically, system pods can scale horizontally, having many instances depending on the size of the cluster.
Let’s explore the components in a bit more detail.
One of the most critical components of any Kubernetes deployment and cluster is the container runtime and the container runtime interface (CRI).
Container runtimes are the way that a given system runs and manages containers on a lower level. In the case of Kubernetes, there are several main choices:
Of course, any container runtime that adheres to the Kubernetes CRI can be used.
Essentially, the control plane is the brain behind the system, representing the main way Kubernetes performs its tasks. By default, only a single machine runs all of the control plane components as pods and it’s not permitted to run regular workloads by default.
Perhaps one of the most important and central components, the API server, is also fairly easy to comprehend:
+--------------------+
|   Control Plane    |
|--------------------|
|                    |
|   +----------------+   +---------+
|   | kube-apiserver |<->| Node(s) |
|   +----------------+   |---------|
|                    |   |         |
+--------------------+   +---------+
Essentially, kube-apiserver provides the front-end of the Kubernetes Control Plane to all components that require and have access to it. In fact, this includes the kubectl command-line interface application: the main way to interact with Kubernetes as an administrator.
Since containers and, by extension, pods, are ephemeral, Kubernetes requires a way to store cluster data.
The etcd distributed storage system is a key-value organization similar to GSettings. It enables Kubernetes to preserve and manage cluster configuration, state data, and metadata.
For this purpose, the separate etcd pod provides attached mounts:
$ kubectl describe pods/etcd-xost --namespace=kube-system
[...]
    Mounts:
      /etc/kubernetes/pki/etcd from etcd-certs (rw)
      /var/lib/etcd from etcd-data (rw)
[...]
Here, we use the kubectl command to describe the etcd pod of node xost. As a result, we can see two Mounts with the relevant storage data that persist between pod restarts.
At first glance, the task of kube-scheduler is relatively basic. Essentially, kube-scheduler assigns new pods to nodes and automatically performs the necessary actions to run them there:
+-----------------------+   +--------+
|     Control Plane     |   |  Node  |--------+
|-----------------------|   |--------|  Node  |--------+
|                       |   | pod-a  |--------|  Node  |
|  +----------------+   |   | pod-d  | pod-b  |--------|
|  | kube-scheduler |   |   +--------+ pod-e  | pod-c  |
|  +----------------+   |            +--------+ pod-f  |
|                       |                     +---------
+-----------------------+
However, the criteria for making scheduling decisions can be quite complex. Factors can vary from physical or virtual resource constraints, through policies and hardware limitations, data storage and distribution, service interference, and many others.
There are many types of Kubernetes controllers.
They range from node controllers monitoring and acting on status changes, through job and pod controllers, which ensure proper task completion, to specific links between different components such as services and pods.
Let’s list some main controllers:
Notably, every controller is a different process. However, the executable binary that spawns them is monolithic.
In general, all controllers answer to the kube-controller-manager to ensure they are up and to account for their actions.
The cloud-controller-manager is a cloud-specific component for interaction with the control framework of cloud infrastructure:
+---------------------------------------------------------------+
|                         Cloud Provider                        |
|---------------------------------------------------------------|
|                                                               |
|  +-----------------------------------+                        |
|  |           Control Plane           |                        |
|  |-----------------------------------|                        |
|  |                                   |                        |
|  |   +-------------------------------+   +--------------------+
|  |   | kube-cloud-controller-manager |<->| Cloud Provider API |
|  |   +-------------------------------+   +--------------------+
|  |                                   |                        |
|  +-----------------------------------+                        |
|                                                               |
+---------------------------------------------------------------+
In other words, the cloud-controller-manager links the cluster and cloud provider API. Thus, if we run Kubernetes on private infrastructure such as a personal computer, laptop, or on-premises, this pod shouldn’t exist.
Similar to local and global DNS servers, Kubernetes can maintain and serve a separate implementation with an internal DNS server implementation in coredns pods. It maps the internal names of pods and similar objects to their relevant addresses and identifiers.
Although it’s an addon and not part of the Kubernetes core, coredns is a requirement for even the most basic operations. Thus, clusters include at least one and more often several pods for DNS.
Unlike components in the control plane, node components usually exist in namespaces separate from kube-system. They maintain pods and ensure communication with the control plane.
Since nodes are more or less interchangeable workers, once a node is joined, it’s good but rarely necessary to know their architecture.
The kubelet is at the base of any regular cluster node. It’s the component that ensures pods and containers are running as expected.
It uses the provided specifications to know what the current state of scheduled pods should be.
The kube-proxy pod runs on each cluster node.
Basically, kube-proxy is responsible for network communication:
Notably, this isn’t related to the network addon options.
Outside of the Kubernetes core system, we can have multiple auxiliary components. Addons are non-mandatory implementations that provide additional features to the Kubernetes deployment.
There are many addon examples:
By far the biggest category of addons is networking. The reason for this is that the interconnection between containers, pods, clusters, and the environment is perhaps one of the most complex Kubernetes challenges.
In this article, we deployed and explored a basic Kubernetes cluster with each of its components.
In conclusion, even simple Kubernetes environments comprise multiple system pods and elements with different functions that interact with each other to provide ways to manage workloads efficiently.