

Learn through the super-clean Baeldung Pro experience:
>> Membership and Baeldung Pro.
No ads, dark-mode and 6 months free of IntelliJ Idea Ultimate to start with.
Learn through the super-clean Baeldung Pro experience:
>> Membership and Baeldung Pro.
No ads, dark-mode and 6 months free of IntelliJ Idea Ultimate to start with.
In this tutorial, we’ll show how to use Sentry with Java-based server-side applications.
Sentry is an error-tracking platform that helps developers monitor live applications. It can be used with a Java application to automatically track and report any errors or exceptions. Those reports capture comprehensive details about the context where it occurred, thus making it easier to reproduce, find its cause, and, most importantly, fix it.
This platform comes in two basic flavors:
For small projects and evaluation purposes, such as this tutorial, the best way to start with Sentry is using the SaaS model. There’s a free-forever tier with limited features (e.g., 24-only alarm retention), which is enough to get us acquainted with the platform, along with a trial of the full product.
Sentry supports several languages and frameworks. Regardless of which one we choose, the required steps are the same:
Besides those required steps, there are optional ones we may want to adopt
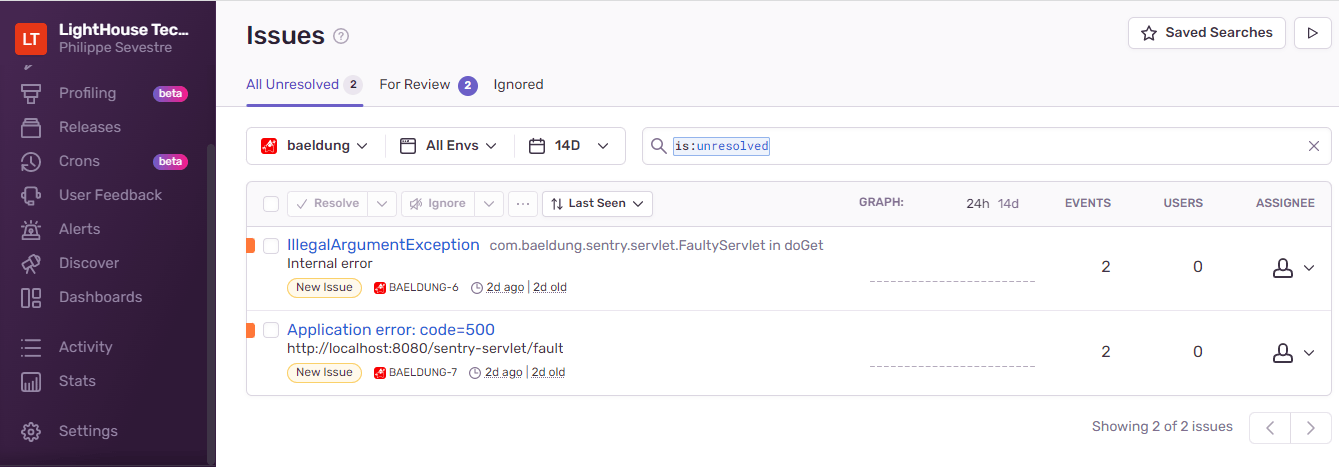
Once the integration is up and running, we’ll be able to see errors in Sentry’s dashboard. This is how a typical project looks:
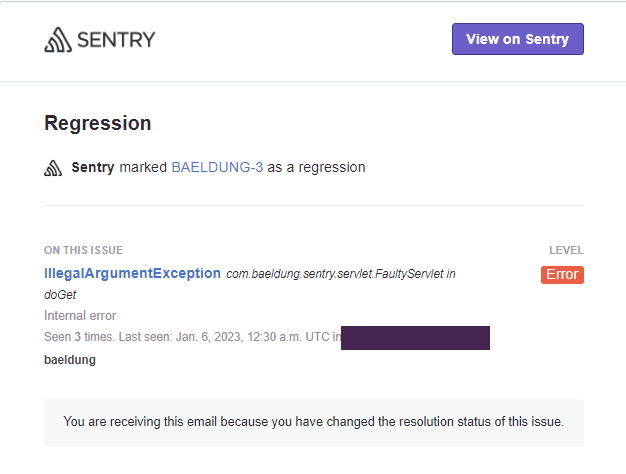
We can also configure alerts and associated actions. For example, we can define a rule to send an email for new errors, which produces a nicely formatted message:
For our tutorial, we’ll add Sentry to a Standard servlet-based application. Please note that there’s also a SpringBoot-specific integration, but we’ll not cover it here.
Let’s get into it!
Adding Sentry support for a standard Maven war application requires a single dependency:
<dependency>
    <groupId>io.sentry</groupId>
    <artifactId>sentry-servlet</artifactId>
    <version>6.11.0</version>
</dependency>
The latest version of this dependency is available on Maven Central.
Out test application has a single servlet that handles GET requests to /faulty according to the value of the op query parameter:
The servlet code is quite trivial:
@WebServlet(urlPatterns = "/fault", loadOnStartup = 1)
public class FaultyServlet extends HttpServlet {
    @Override
    protected void doGet(HttpServletRequest req, HttpServletResponse resp)
      throws ServletException, IOException {

        String op = req.getParameter("op");
        if("fault".equals(op)) {
            resp.sendError(500, "Something bad happened!");
        }
        else if ("exception".equals(op)) {
            throw new IllegalArgumentException("Internal error");
        }
        else {
            resp.setStatus(200);
            resp.setContentType("text/plain");
            resp.getWriter().println("OK");
        }
    }
}
Notice this code is completely unaware of Sentry. We did this on purpose to emulate scenarios where we’ll add Sentry to an existing codebase.
Sentry’s servlet support library includes a ServletContainerInitializer that is automatically picked by any recent container. This initializer, however, does not include logic to capture events. In fact, all it does is add a RequestListener that enriches captured events with information extracted from the current request.
Furthermore, and somewhat oddly, this initializer does not initialize the SDK itself. As stated in the documentation, the application must call one of the Sentry.init() method variants to start sending events.
The main piece of information that the SDK needs for its initialization is the DSN, a project-specific identifier generated by Sentry that acts both as the event destination and API Key. This is what a typical DSN looks like:
https://[email protected]/161906We’ll see how to get the DSN for a project in a minute, so let’s put that aside for now. A straightforward way to initialize the SDK is to create a ServletContextListener for this:
@WebListener
public class SentryContextListener implements ServletContextListener {
    @Override
    public void contextInitialized(ServletContextEvent sce) {
        Sentry.init();
    }

    @Override
    public void contextDestroyed(ServletContextEvent sce) {
        Sentry.close();
    }
}
The init() method, when called without any arguments, configures the SDK with default values and values pulled from one of those sources:
Furthermore, the filename used for the two last sources can also be specified through the sentry.properties.file system property or the SENTRY_PROPERTIES_FILE environment variable.
The full range of configuration options is available online.
Now that Sentry’s setup is done, we need to add logic in our application to capture events we’re interested in. Usually, this means reporting failed requests, which fall into two categories:
For servlet-based applications, a natural way to capture those failed requests is to add a request filter with the required logic:
@WebFilter(urlPatterns = "/*" )
public class SentryFilter implements Filter {

    @Override
    public void doFilter(ServletRequest request, ServletResponse response, FilterChain chain)
      throws IOException, ServletException {
        try {
            chain.doFilter(request, response);
            int rc = ((HttpServletResponse)response).getStatus();
            if (rc/100 == 5) {
                Sentry.captureMessage("Application error: code=" + rc, SentryLevel.ERROR);
            }
        }
        catch(Throwable t) {
            Sentry.captureException(t);
            throw t;
        }
    }
}
In this case, the filter will intercept only synchronous requests, which is fine for our test servlet. The key point in this code is that we need to handle two possible return paths. The first one is the “happy path”, where the doChain() method returns normally. If the status code present in the response is anything from 500 to 599, we’ll assume the application logic is about to return an error. In this case, we create a message that includes the error code and use captureMessage() to send it to Sentry.
The second path happens when the upstream code throws an exception. We use a catch statement to capture it and report it to Sentry using captureException(). An important detail here is to rethrow this exception so we don’t disturb any existing error processing logic.
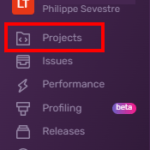
The next task is to generate the project’s DSN so our application can send events to Sentry. Firstly, we need to sign into Sentry’s console and select Projects on the left-side menu:
Next, we can either use an existing project or create a new one. In this tutorial, we’ll create a new one by pressing the “Create Project” button:
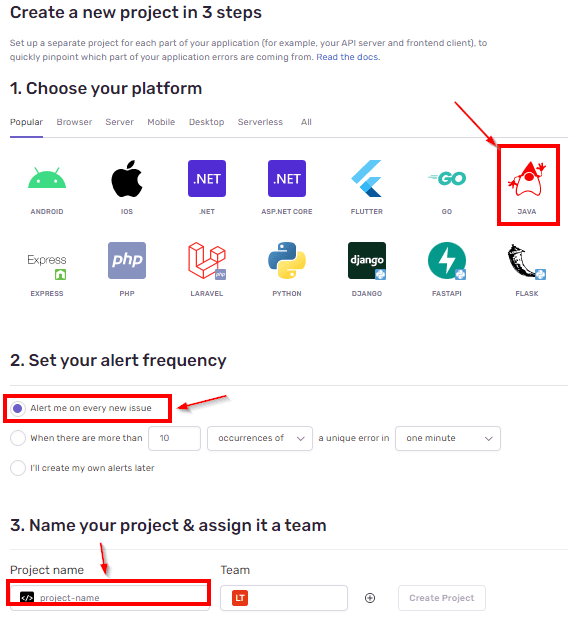
Now, we must input three pieces of information:
Once we push the “Create Project” button, we’ll be redirected to a page full of useful information, including the DSN. Alternatively, we can skip this info and go back to the projects page. The newly created should now be available in this area.
To access its DSN, we’ll click on the project and then go to the project settings page by clicking on the small gear-like icon on the top right:

Finally, we’ll find the DSN value under SDK Instrumentation/Client Keys (DSN):
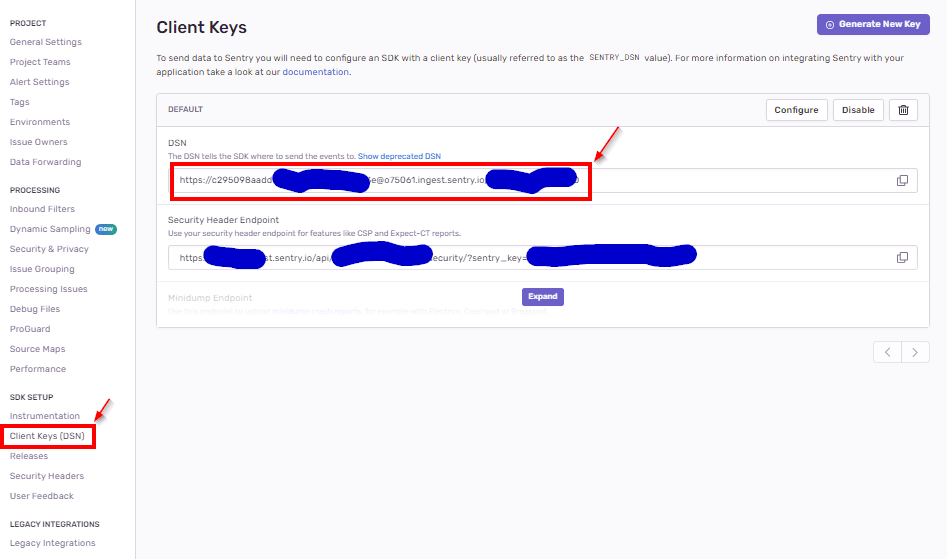
With the DSN in our hands, we can now test if the integration code we’ve added to the application is working. For testing purposes only, we’ll create a sentry.properties file in the project’s resource folder and add create a single dsn property in it with the corresponding value:
# Sentry configuration file
dsn=https://[email protected]/161906
The sample maven project has the required configuration to run it directly from Maven using cargo and an embedded Tomcat 9 server:
$ mvn package cargo:run
... many messages omitted
[INFO] [beddedLocalContainer] Tomcat 9.x Embedded started on port [8080]
[INFO] Press Ctrl-C to stop the container...
We can now use a browser or a command line utility like curl to test each scenario. Firstly, let’s try a “happy path” request:
$ curl http://localhost:8080/sentry-servlet/fault
... request headers omitted
< HTTP/1.1 200
... other response headers omitted
<
OK
* Connection #0 to host localhost left intact
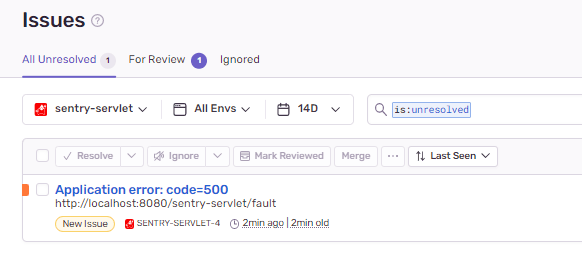
As expected, we’ve got a 200 status code and “OK” as the response body. Secondly, let’s try a 500 response:
$ curl -v "http://localhost:8080/sentry-servlet/fault?op=fault"
... requests headers omitted
< HTTP/1.1 500
... other response headers and body omitted
We can now go to the project’s page on Sentry to confirm that it has captured it:
Clicking on the issue, we can see that all the captured information, along with the message we’ve passed to captureMessage():
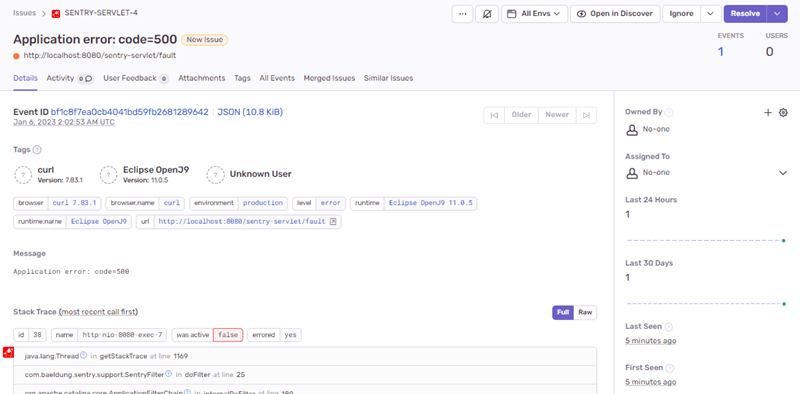
Scrolling through the issue details page, we can find a lot of interesting information related to the request:
Finally, let’s test the unhandled exception scenario:
$ curl -v "http://localhost:8080/sentry-servlet/fault?op=exception"
... request headers omitted
< HTTP/1.1 500
... response headers and body omitted
As before, we get a 500 response, but, in this case, the body contains a stack trace, so we know it came from the other path. The captured Sentry event also looks a bit different:
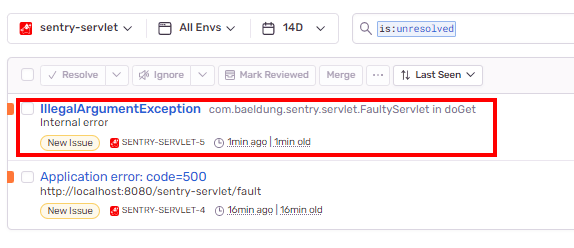
We can see that the stack trace matches the point where the exception was thrown inside the application’s code.
In this quick tutorial, we’ve shown how to integrate Sentry’s SDK into a servlet-based application and use its SaaS version to get detailed error reports. Despite using only basic integration features, the kind of reports we’ve got can improve the error analysis experience for developers.
As usual, the full code is available over on GitHub.