

1. Overview
Filesystems describe our data. With filesystems, we have folders, access control, and named files. Without them, our disk would be just a soup of bits. We wouldn’t know where anything was stored, where things start or end, or any external information (metadata).
A filesystem’s number one job is to keep our data safe. We want our data quick to access, easy to manage, and above all, it must be correct and in the place where we put it. Storage hardware failure (hard drive crashes) are all too common, statistically. This means that we need to look deeper into storage management if our data is valuable to us.
It’s easy to ignore filesystems and go with defaults. In today’s Linux, that means the ext4 or XFS filesystems. But we have other, more advanced options: brtfs and ZFS. These “next-generation” filesystems let us work more flexibly and safely with larger amounts of storage.
In this article, we’ll look into some of what we get from default filesystems, as well as what the next generation of filesystems offers.
2. Defaults: ext4 and XFS
Over time, these two filesystems have grown to serve very similar needs. They’re fast and reliable journaled filesystems. Ubuntu has used ext4 by default since 2009’s Karmic Koala release. 2010’s Red Hat Enterprise Linux 6.0 also used ext4. RHEL 7.0 moved to XFS in 2014.
A filesystem is such a fundamental piece of our stable system that kernel and distribution maintainers move slowly and carefully in adopting changes.
If we install Ubuntu or Debian today, our storage will use ext4. If we install Red Hat Enterprise Linux or SuSE, we’ll get XFS.
2.1. Yesterday’s High Tech: Journals, Extents, and Limited Checksums
Since their introduction to Linux, these two filesystems have grown closer and closer in feature parity. XFS started out more advanced, and it continues to work well. However, ext4 now successfully adds on much of what once differentiated XFS:
- Journals: A filesystem “journal” writes a duplicate log of all changes to the filesystem. If a write to the filesystem is interrupted (power outage), the system examines the journal and “plays it back” to minimize data loss and file corruption. (Previously, filesystem correctness relied on “checker” tools like fsck.)
- Extents: Traditionally, filesystems would maintain a “map” of their contents, block by block. A default block is usually 4,096 bytes, so as storage has increased, we can imagine how large these maps have become. Instead, XFS and ext4 map out pieces of data in larger chunks called “extents”. Specifically, an extent map is two numbers: the starting block address and the length of the extent (in blocks). This works well for large volumes and large files, removing the need to track the file membership of each block.
- Checksums: How do we know our data has not become corrupted? One way is by calculating a checksum — a shorter “magic number” that changes when our larger data changes. We used to do this by running a check-and-repair program: the difficult-to-pronounce fsck. XFS and ext4 now calculate a checksum on metadata and their journal files. This is useful, though far less complete than the block-by-block checksums of btrfs and ZFS.
Although both ext4 and XFS are excellent at what they do, neither are suited to some of today’s more complex storage challenges.
2.2. The ext Filesystems
The “extended filesystem” remains the most popular filesystem in use with Linux. Starting with ext in 1992, the filesystem quickly moved to ext2 in 1993, grew to add a journal with ext3 in 2001, and got a future-proofing tune-up in 2008 with ext4.
The ext4 filesystem continues the philosophy of its predecessors: be fast and fix it if it breaks. However, ext3 and ext4 add data safety features like a journal and limited checksums.
ext4 also makes possible larger volumes and files (up from ext3’s 16 terabyte maximum). Its adoption of extents further helps with larger files, like media and some databases.
But ext4 also works well with collections of many smaller files. It removes ext3’s previous cap on subdirectories (ext3 topped out at an admittedly generous 32,000).
There is a reason the ext series of filesystems has lasted so long as the default for Linux: It’s the well-tested workhorse that prioritizes speed and “good-enough” data validation.
2.3. XFS: 90s for “Big Iron”
Silicon Graphics, Inc., created XFS in 1993 for their IRIX Unix OS. SGI famously pushed the limits of computer graphics production. They relied on their own custom high-end and highly parallel hardware to achieve this.
As a result, SGI required a filesystem that could reliably address huge files using multiple CPUs and drive controllers. Reliability meant keeping a journal to avoid file corruption. Addressing large files meant making XFS 64-bit (back before 64-bit was cool). And allowing multiple CPUs to read and write these giant files meant the developers of XFS needed to remove the standard practices of placing a lock around an i-node during access.
We can imagine the additional complexity of allowing simultaneous access by potentially hundreds of CPU cores! But designing a software system this fine-grained paid off for their highly parallel hardware. Like macOS and iOS fits Apple hardware, XFS fit SGI’s ecosystem.
XFS was ported to Linux and entered the kernel in 2001. It’s now available and reliable on just about every Linux distribution.
If we’re building a system with large storage requirements, large files, and multi-threaded I/O, we should consider XFS. But for smaller and lighter loads, ext4 may suit us better.
Will our system be grinding through media files or big data? If so, we should look into XFS or one of the next-generation filesystems.
Will we be running a microservice? If that’s the case, we may want to stick to ext4.
2.4. Trying It Out
Finally! Let’s get our hands dirty! The simplest way to experience different filesystems is a fresh install of Linux. But if we want to experiment on existing systems, that’s an option, too.
The ext4 filesystem is already everywhere. Let’s look in the /sbin directory:
$ ls -l /sbin/mkfs.ext*
lrwxrwxrwx 1 root root 6 Feb 21 23:30 /sbin/mkfs.ext2 -> mke2fs
lrwxrwxrwx 1 root root 6 Feb 21 23:30 /sbin/mkfs.ext3 -> mke2fs
lrwxrwxrwx 1 root root 6 Feb 21 23:30 /sbin/mkfs.ext4 -> mke2fs
These links conveniently run the binary mke2fs, although we can also run it directly and specify the filesystem type with the -t option.
First, we’ll double-check that we’re not accidentally clobbering a filesystem we want to keep. We can look at the available block devices with lsblk and compare the mounted devices using df.
Then, it’s as easy as pointing the mkfs program at the device:
$ sudo /sbin/mkfs.ex4 /dev/sdcThen we create a directory to serve as a mount point and run mount. If we want our new filesystem to mount every time we reboot, we’ll add a line in fstab.
If we want to do that with XFS, we may have to install userland tools first. (Support for the filesystem is already built into most kernels. We just need the programs that let us create and manipulate it.)
On Debian and Ubuntu, we install the xfsprogs package with apt:
$ sudo apt install xfsprogsThen run the matching command to initialize our block device with XFS:
$ sudo /sbin/mkfs.xfs /dev/sdcOnce mounted, we can experiment and see how it suits our needs!
2.5. RAID and Logical Volume Managers
Although a detailed examination of RAID and logical volume options is a matter for a separate article, we need to understand how they interact with filesystems.
A RAID and a Logical Volume Manager do different things, but both allow us to think of multiple physical disks as one abstract volume.
Instead of creating our filesystem directly on the block device, we add the disks to a collection, then think of the collection as one device with one filesystem.
For example, we may have two disks (physical volumes, in LVM2’s terminology) joined into one virtual volume:
$ lsblk -f -e7 -o NAME,FSTYPE,FSVER,FSAVAIL,MOUNTPOINT
NAME                   FSTYPE      FSVER    FSAVAIL MOUNTPOINT
sda
├─sda1                 ext2        1.0        63.9M /boot
├─sda2
└─sda5                 LVM2_member LVM2 001
  ├─salvage--vg-root   ext4        1.0       388.7G /
  ├─salvage--vg-swap_1 swap        1                [SWAP]
  └─salvage--vg-home   ext4        1.0       274.2G /home
sdb                    LVM2_member LVM2 001
└─salvage--vg-root     ext4        1.0       388.7G /
Here, both the sda5 partition and the sdb drive are physical drives (check using pvdisplay) collected into a single volume group (check using vgdisplay) and allocated into logical volumes, where the filesystems live (check using lvdisplay).
Notice how the root mount point (salvage–vg-root) uses space from two different physical drives (sda5 and sdb)? Modern Linux has been doing this for years with lvm, allowing us to use all of the space available or to set some aside as a live mirrored copy.
We can also add new physical disks and resize our volumes and filesystems. It’s handy to be flexible!
How we choose to spread out our data carries both risks and rewards. If one disk dies, will we lose data? How about if we use 10 disks and two die?
These are important questions for long-term data storage, but they are answered very differently by the “old way” solutions of RAIDs and LVMs. ZFS and btrfs bring more integrated approaches to these problems, as we’ll see later in this article.
3. Next-Generation Filesystems: What and Why
The old-fashioned and battle-tested filesystems have all these great features! Why would we ever need anything more?
And indeed, some use cases are very well served by traditional and trusted solutions.
But newer filesystems solve and consolidate storage issues. ZFS combines a RAID controller, a volume manager, and a filesystem. But it also does more, rethinking how filesystems are mounted and shared. And btrfs achieves several similar feature goals while avoiding having to rework our basic assumptions about storage.
3.1. The New Hotness: Copy-on-Write, Error Detection, Snapshots, and Replication
Both btrfs and ZFS emphasize three particular design and feature changes from previous filesystems.
Copy-on-write (COW) works by never over-writing data in place. We no longer have to worry about a file or filesystem getting into an inconsistent state. In an older filesystem, we can be in the middle of saving a file when something goes wrong (power outage, bits flipped due to hardware error, cosmic rays), and that file may now be corrupted.
Instead, with a COW filesystem, the data changes in memory are written to a new area of the disk. Once that is complete, anything that refers to the file is changed to point to the new file location on the disk.
For example, a directory entry keeps a list of all files within it and their block addresses. Once the new copy is complete – and not before – the directory entry is changed to refer to the new block address. Metadata changes work via a similar process.
Another key element of COW is that it doesn’t need to be copied if the file does not change. Instead, “shallow copies” work a bit like a symbolic link, only duplicating data when something actually changes.
Error detection is now done by the filesystem, block by block. In the bad old days, we’d have to run fsck to fix any possible data errors. Using ext4 or XFS, we still have to wait for the journal to be replayed. An old-style RAID takes a long time to rebuild, as it must check all the other disks.
But worse: We now know that as drives get larger, more and more silent data corruption errors go undetected. Having block-level checksums allows us to rely on the filesystem to fix these errors.
For example, ZFS may have a file spread across multiple drives, its individual blocks mirrored and duplicated. If one of these blocks becomes corrupted, its checksum changes.
ZFS calculates that checksum and the checksum of its mirrored block. It compares these to the stored checksum from when the block was last updated. If the file is good, these should all be identical. But if one is bad, we know it got corrupted. ZFS can then automatically “heal” the corrupt block using the block with the known-good checksum.
Snapshots of a volume’s current state allow rollbacks and replication. We understand how Copy-on-write means we can have light-impact “shallow” copies, which only take up new space as data is added or changed. This allows us – similar to how we might snapshot a VM before making a risky change – to take a snapshot of our computer’s state.
We can also use send and receive commands to transmit snapshots and the diffs between two snapshots. These commands exist on both btrfs and ZFS. (There are even cloud replication services out there!)
4. A Better/Butter Filesystem
The btrfs, or “B-Tree” filesystem, attempts to bring many of ZFS’s advances to Linux in a simpler way (and one with fewer licensing issues). It’s been in the Linux kernel since 2009 but remains under active development.
It’s seen some adoption in large data centers but doesn’t enjoy ZFS’s reputation for rock-solid stability.
4.1. btrfs Hands-On
One of the easiest ways to experience btrfs is with a fresh install of Fedora 33 or above. It is simple to ease our way into btrfs without having to understand its more complex abilities. Here’s what a Fedora installation looks like:
$ lsblk -f -o NAME,FSTYPE,LABEL,MOUNTPOINT
NAME   FSTYPE LABEL                 MOUNTPOINT
sr0
zram0                               [SWAP]
vda
├─vda1 ext4                         /boot
└─vda2 btrfs  fedora_localhost-live /home
We see that ext4 lives on in Fedora’s choice for a boot partition.
If we want to experiment with it on Ubuntu or Debian, we need some additional tools. Much like we did with XFS, we’ll install them with apt:
$ sudo apt install btrfs-progsFrom there, we can use mkfs.btrfs to create new volumes and btrfs device add to extend volumes:
$ sudo mkfs.btrfs -L media -d raid1 /dev/vdb /dev/vdc
btrfs-progs v5.13
See http://btrfs.wiki.kernel.org for more information.

Label:              media
UUID:               0ec28d06-b5a1-46f3-b628-30d04aeaaef3
Node size:          16384
Sector size:        4096
Filesystem size:    20.00GiB
Block group profiles:
  Data:             RAID1             1.00GiB
  Metadata:         RAID1           256.00MiB
  System:           RAID1             8.00MiB
SSD detected:       no
Zoned device:       no
Incompat features:  extref, skinny-metadata
Runtime features:
Checksum:           crc32c
Number of devices:  2
Devices:
   ID        SIZE  PATH
    1    10.00GiB  /dev/vdb
    2    10.00GiB  /dev/vdc
This output provides a lot of details and some new terminology, like “sector size”. We won’t go into these here, but they are interesting jumping-off points.
Unlike ZFS, we’ll have to mount our new btrfs volume. An easy way to use it with the mount command or in fstab is to refer to it by its label:
# ls /dev/disk/by-label/
fedora_localhost-live  media
# mkdir /big-media; mount /dev/disk/by-label/media /big-media
4.2. Advanced Features and Risks
In short, btrfs can be used as a simple filesystem or as a RAID controller and a filesystem. Its developers warn against using RAID5 in production, however.
As we get used to it, we can explore more complex features with the btrfs commands, such as:
- btrfs subvolume to divide up our volume and apply specific settings
- btrfs subvolume snapshot to create a light “shadow” copy of a subvolume for backup or configuration management
- btrfs balance to redistribute used blocks across all storage
- btrfs send and btrfs receive to transmit snapshots between machines
btrfs is a filesystem in flux, and any serious investment in its use must be accompanied by frequent references to its FAQ.
5. ZFS: Our All-in-One Storage Solution
ZFS originated in OpenSolaris in 2005. It was quickly adopted by Solaris 10 and the open-source BSD OSes, becoming officially supported in 2014’s FreeBSD 10.
ZFS lets us pool our storage like a logical volume manager. It provides data and hardware redundancy like a RAID (although it’s much more like a funky and smart JBOD).
Let’s try it out.
5.1. ZFS in Practice
The history of ZFS with Linux is more complicated due to licensing issues. The most straightforward way to use ZFS on Linux at this date is by using Ubuntu. We can install the zfsutils-linux package. Or, Canonical bundles it in their installer image by default.
It’s an “Advanced Feature”, but we can both install to and boot from ZFS. Here, we’re installing onto a virtual test system:
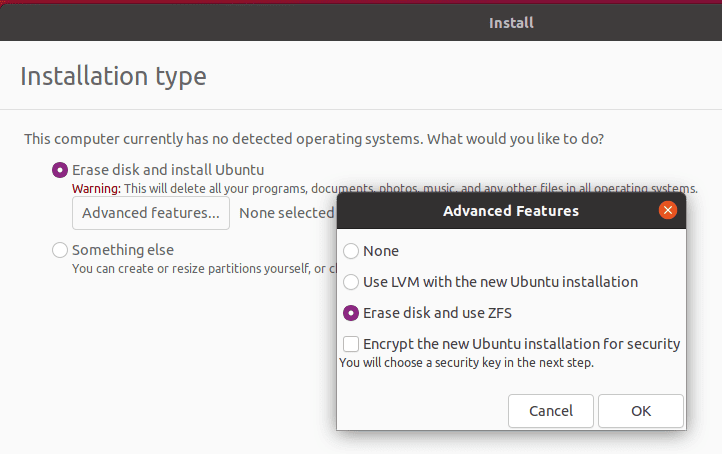
After we select “use ZFS”, everything else is transparent. Way to take out the complexity and get us to the useful stuff, Canonical!
5.2. ZFS Pools
Experimenting with our virtual Ubuntu ZFS installation, we see these block devices:
$ lsblk -e7 -f -o NAME,FSTYPE,LABEL,FSUSE%,MOUNTPOINT
NAME   FSTYPE     LABEL FSUSE% MOUNTPOINT
sr0
vda
├─vda1
├─vda2 vfat                 3% /boot/efi
├─vda3 swap                    [SWAP]
├─vda4 zfs_member bpool
└─vda5 zfs_member rpool
So what are bpool and rpool? We can check with the zpool command:
$ zpool list
NAME    SIZE  ALLOC   FREE  CKPOINT  EXPANDSZ   FRAG    CAP  DEDUP    HEALTH  ALTROOT
bpool  1.12G   148M  1004M        -         -     0%    12%  1.00x    ONLINE  -
rpool    22G  3.52G  18.5G        -         -     3%    16%  1.00x    ONLINE  -
Hmm. We see that bpool is the smaller of the two. We’ll find that Ubuntu has decided to split installations into “boot” and “root” pools if we look it up. If we compare these to the partitioning methods in our LVM example, we remember the non-ZFS Ubuntu layout keeps /boot on a dedicated ext2 partition and /home and / (root) on different logical volumes.
Let’s look at how Ubuntu organizes our ZFS pools:
$ zfs list
NAME                                               USED  AVAIL     REFER  MOUNTPOINT
bpool                                              147M   876M       96K  /boot
bpool/BOOT                                         147M   876M       96K  none
bpool/BOOT/ubuntu_70wzaj                           147M   876M     81.7M  /boot
rpool                                             3.52G  17.8G       96K  /
rpool/ROOT                                        3.51G  17.8G       96K  none
rpool/ROOT/ubuntu_70wzaj                          3.51G  17.8G     2.44G  /
rpool/ROOT/ubuntu_70wzaj/srv                        96K  17.8G       96K  /srv
rpool/ROOT/ubuntu_70wzaj/usr                       336K  17.8G       96K  /usr
rpool/ROOT/ubuntu_70wzaj/usr/local                 240K  17.8G      128K  /usr/local
rpool/ROOT/ubuntu_70wzaj/var                       993M  17.8G       96K  /var
rpool/ROOT/ubuntu_70wzaj/var/games                  96K  17.8G       96K  /var/games
rpool/ROOT/ubuntu_70wzaj/var/lib                   983M  17.8G      862M  /var/lib
rpool/ROOT/ubuntu_70wzaj/var/lib/AccountsService   168K  17.8G      104K  /var/lib/AccountsService
rpool/ROOT/ubuntu_70wzaj/var/lib/NetworkManager    404K  17.8G      140K  /var/lib/NetworkManager
rpool/ROOT/ubuntu_70wzaj/var/lib/apt              79.5M  17.8G     79.2M  /var/lib/apt
rpool/ROOT/ubuntu_70wzaj/var/lib/dpkg             40.2M  17.8G     31.2M  /var/lib/dpkg
rpool/ROOT/ubuntu_70wzaj/var/log                  8.41M  17.8G     3.19M  /var/log
rpool/ROOT/ubuntu_70wzaj/var/mail                   96K  17.8G       96K  /var/mail
rpool/ROOT/ubuntu_70wzaj/var/snap                  532K  17.8G      532K  /var/snap
rpool/ROOT/ubuntu_70wzaj/var/spool                 280K  17.8G      112K  /var/spool
rpool/ROOT/ubuntu_70wzaj/var/www                    96K  17.8G       96K  /var/www
rpool/USERDATA                                    4.99M  17.8G       96K  /
rpool/USERDATA/a_40qa3s                           4.73M  17.8G     2.43M  /home/a
rpool/USERDATA/root_40qa3s                         168K  17.8G      112K  /root
Wow! Canonical has set up a lot of child filesystems in rpool. So, we have very fine-grained control over the sections of our storage pools. If we add a disk or disk set to rpool, we can use that new space anywhere or everywhere. (There are some tricky elements to adding storage to an existing pool, so research before buying.)
And each mountpoint we see here can have its own settings — quotas, compression, and IO tuning changes. And what’s even better: By default, they inherit settings from their parent. If we use the zfs command to set /var to use automatic compression:
$ sudo zfs set compression=lz4 rpool/ROOT/ubuntu_70wzaj/varNow, everything underneath /var will also use lz4 compression.
This might not matter much on a smaller system, but if we ever need to scale up our size, we’ll be happy ZFS works this way.
5.3. Creating Our Own Pools
To start, we just need a simple command.
Well, before we do that, we need to identify our disks. Let’s add two small storage devices to our virtual machine. Ubuntu’s bpool and rpool are installed on /dev/vda, so these two will be /dev/vdb and /dev/vdc.
zpool has many options. zpool create assembles drives into vdevs (virtual devices) and vdevs into a pool:
# zpool create mpool /dev/vdb /dev/vdcOr, it can create a single mirrored vdev consisting of the two storage devices:
# zpool create mpool mirror /dev/vdb /dev/vdcThis command asks ZFS to create a new storage pool. The pool will be named “mpool”, although we call it whatever we choose. It will consist of a mirrored vdev, which in turn consists of the vdb and vdc devices.
Once we’ve created mpool, we use zpool status to check its details:
# zpool status mpool
  pool: mpool
 state: ONLINE
config:

	NAME        STATE     READ WRITE CKSUM
	mpool       ONLINE       0     0     0
	  mirror-0  ONLINE       0     0     0
	    vdb     ONLINE       0     0     0
	    vdc     ONLINE       0     0     0

errors: No known data errors
And we notice it’s automatically mounted:
# df /mpool
Filesystem     1K-blocks  Used Available Use% Mounted on
mpool            9650176   128   9650048   1% /mpool
We can change the mountpoint easily, but we don’t have to touch /etc/fstab. ZFS stores all mountpoints as metadata.
5.4. ZFS Subvolumes
What if we want to organize our media pool? Perhaps we want each to use different quotas or to compress part of our pool transparently.
We do that by returning to the zfs create command:
# zfs create mpool/Movies
# zfs create mpool/Television
# zfs list -r mpool
NAME               USED  AVAIL     REFER  MOUNTPOINT
mpool              184K  9.20G       25K  /mpool
mpool/Movies        24K  9.20G       24K  /mpool/Movies
mpool/Television    24K  9.20G       24K  /mpool/Television
And if we want to get rid of our “practice” pool, it’s as simple as:
zpool destroy mpoolOther commands to explore include using:
- zpool checkpoint to save a pool’s current status
- zpool import to allow an OS to use existing pools or checkpoints
- zpool scrub, which verifies checksums and automatically repairs any errors
- zfs snapshot and zfs rollback to manage changes to the entire ZFS system
5.5. ZFS Design
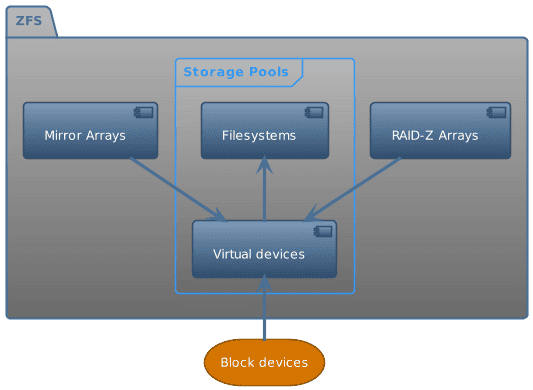
This framework shows us how ZFS handles storage. Here’s where we get our Logical Volume Manager and RAID functions:
- Storage Devices: the physical disks and/or partitions
- Virtual Devices: abstract storage, a single disk, a mirrored collection, or a RAID-Z array; built out of storage devices
- Storage Pools: the zpools we see when we run zpool list. This is where our files and directories live.
ZFS distributes our storage pools’ data across all of the pools’ devices. In that way, it resembles Linux’s Logical Volume Manager. If we’ve included mirrored or RAID-Z vdevs, we’ll also have data redundancy and be able to recover from disk failure without restoring from a full backup.
It’s important to note that while adding more vdevs to a zpool, it’s difficult to change the devices that make up a vdev. We cannot simply change our hardware configuration and have the filesystem handle it. Unlike btrfs, which handles this scenario quite smoothly, ZFS changes can require more planning and sometimes even starting from scratch. An upcoming feature, draid, helps overcome this awkwardness.
6. Other Filesystems
Linux has support for many filesystems for historical or compatibility reasons. In addition, we’ll often want to share or access volumes over networks.
6.1. Somewhere Over the Network: NFS and SMB
NFS (Network File System) originated in Unix, while SMB is commonly used on Windows and macOS. We don’t have to run mkfs when our Linux machine accesses these filesystems, but after they’re mounted, they should be just as transparent to use as any local filesystem.
We may also see a NAS, which is simply a dedicated fileserver machine sharing space via NFS, SMB, or another network file protocol.
On the other hand, a SAN uses a protocol like iSCSI or FibreChannel to connect storage over the network on a block level. From Linux’s point of view, it’s just another block device like a hard drive. It can be formatted or added to a ZFS pool.
6.2. Amazon’s Elastic Block Store (EBS)
Again, this topic is beyond the scope of this article, but note that cloud providers offer long-term storage, which can be treated as a block-level device.
AWS EBS solves the problem of ephemeral cloud instances transparently. We can use any of the filesystems we’ve talked about on EBS.
Next-generation filesystems are still uncommon when used with cloud instances. For example, DigitalOcean will automatically set up block storage for use using ext4 or XFS. ZFS or btrfs will work if we’re willing to do it ourselves.
One reason for this slowness to adopt comes from ZFS’s high need for memory. We may be trying to save money by using a smaller instance. We’d have to monitor an environment like that closely.
6.3. Of Further Interest
Once we develop an interest in filesystems, it’s amazing how much there is to investigate:
- Dominic Giampaolo’s book Practical File System Design with the Be File System provides a detailed snapshot of the state of the filesystem art circa 1999.
- APFS, the filesystem used on iOS devices and modern macOS: Their seamless conversion of millions of active devices was an engineering marvel.
- Clever design choices in Microsoft’s NTFS.
- Jim Salter’s blog and presentations on next-generation filesystems are full of nitty-gritty details.
7. Conclusion
In this article, we’ve examined the major current filesystem choices we have on Linux.
The next generation of filesystems solves many storage problems, but they also come with learning curves.
As our storage needs grow, the new features and organization of these newer filesystems become more and more useful and necessary.
In summary:
- ext4 is the standard and a safe choice.
- XFS is also quite stable and great for large files and heavy multiprocessing.
- btrfs is flexible and powerful but still something of a moving target.
- ZFS is well-tested and quite reliable, but more complex. In exchange for complexity, it solves storage problems on a larger scale.
Even if we aren’t ready to put our crown jewels onto btrfs or ZFS, it makes sense to explore their costs and benefits now.