

1. Overview
In the venerable Unix command dd, the disk/data duplicator (or, sometimes, disk destroyer) allows us to copy raw data from one source to another. It’s not used to copy individual files like cp. Instead, it lets us read from and write to block devices — for example, physical hard drives.
It’s also an unusual part of the Unix/Linux toolkit in regards to its interface. Most commands specify options with something like –blocksize 1M, but dd prefers the key=value style, as in bs=1M.
dd got a lot of use in the earlier days of Unix in such tasks as:
- working with tape backups
- converting between systems that used different byte orders
- backing up boot sectors
- reading data off of inaccessible or crashed filesystems.
In this tutorial, we’ll walk through some of the reasons we might still use dd today, such as:
- copying an image file to a USB boot drive
- creating disk image files to use as a sandbox.
2. dd and Unix’s “Everything Is a File”
Like many Unix and Linux commands, dd reads in from standard input and writes out to the standard output.
It also relies on the Unix model that most things can be treated as files; that is, they need to be opened, can be read from, written to, and then closed.
This concept gives birth to the /dev/ directory’s sd* files, which represent our raw disks. Programs can write and read to them, given sufficient permissions. Of course, we usually want to leave that to our filesystem.
If we want dd to get its input or output from a disk device or special device (such as /dev/urandom or /dev/zero), we use the options if and of (input and output files, respectively). We could duplicate everything from one disk to another, including the partition table, the boot sector, and the access times of files in the filesystem — in fact, everything on a raw data level.
If we had two identical disks that Linux referred to as /dev/sda and /dev/sdb, we could make sdb a duplicate of sda using the command:
dd if=/dev/sda of=/dev/sdbThis would slowly transfer everything from one disk to another, obliterating everything on the out file disk sdb. Everything there would be gone, replaced by what was on sda.
Note that if sdb was a larger disk than sba, our filesystem would not resize. It would remain an exact raw binary duplicate, so it would look like the smaller source disk.
3. When NOT to Use dd
Let’s remember that just because we can use a tool does not mean we ought to use it. Perhaps we are on Windows and want to create a bootable Linux USB drive. We could use dd, but we might be better off using something like Rufus.
Or perhaps we want to back up our files. dd can do it all in a big lump, but something like rsync or even tar might be closer to what we need.
Maybe we want to copy an entire block device from one to another or back it up as an image file. It might be faster and safer to use something like Clonezilla.
Likewise, perhaps we want to securely erase all sensitive contents of a drive, beyond any ability of forensics to recover it. We could use dd to write zeros to each block. But it might be quicker and more secure to use a hard drive manufacturer’s utility meant for just that.
But there remain some circumstances where dd is the right tool for the job.
4. Copying an Image File to a USB Drive
When we install a new OS to a physical machine, we’ll likely use a bootable USB disk. We can download a disk image from our distribution vendor. (These work when installing virtual machines, too.) Using a disk image saves us the hassle of partitioning and making our USB installer disk bootable by hand.
4.1. Identifying Our USB Drive Device in /dev/
If our system has automatically mounted our USB drive, we’ll see it with df:
$ df -h
Filesystem      Size  Used Avail Use% Mounted on
tmpfs           1.4G  2.4M  1.4G   1% /run
/dev/sda2       228G  193G   24G  90% /
tmpfs           6.9G   62M  6.8G   1% /dev/shm
tmpfs           5.0M  4.0K  5.0M   1% /run/lock
tmpfs           4.0M     0  4.0M   0% /sys/fs/cgroup
/dev/sda1       511M  6.3M  505M   2% /boot/efi
tmpfs           1.4G  6.3M  1.4G   1% /run/user/1000
/dev/sdb1       466G  426G   41G  92% /media/a/9EE8E134E8E10AFB1
/dev/sdc1        15G  5.1G  9.9G  34% /media/a/ESD-USB
Here, we see that our USB drive is device /dev/sdc, and its first partition is currently mounted under /media/a/ESD-USB/.
If it’s not mounted but has been successfully plugged in, lsblk will show us the block devices:
$ lsblk -e7
NAME   MAJ:MIN RM   SIZE RO TYPE MOUNTPOINT
sda      8:0    0 232.9G  0 disk
├─sda1   8:1    0   512M  0 part /boot/efi
└─sda2   8:2    0 232.4G  0 part /
sdb      8:16   1 465.8G  0 disk
├─sdb1   8:17   1 465.3G  0 part /media/a/9EE8E134E8E10AFB1
└─sdb2   8:18   1   480M  0 part
sdc      8:32   1  14.9G  0 disk
└─sdc1   8:33   1  14.9G  0 part
Or if it’s available, we can use the gnome-disks tool. (In the GNOME GUI, it’s simply referred to as Disks):
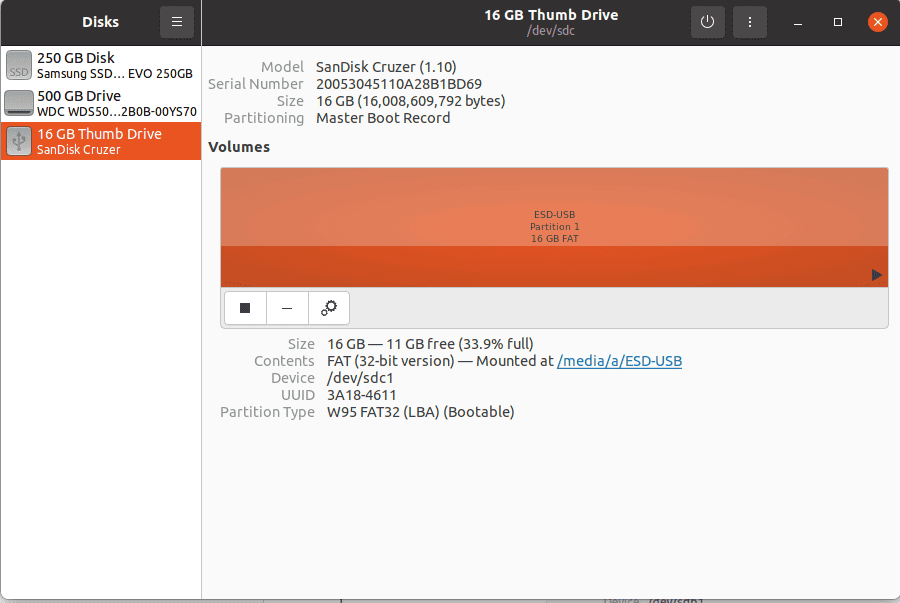
So, we know we want to write our disk image over /dev/sdc. (/dev/sdc1 refers to the first partition, but we want to take over the whole disk.)
Remember that this will completely wipe out our USB disk! So, let’s first double-check that we’ve backed up anything we want to keep from there.
Then, it’s time to run dd!
4.2. Copying the File Image
Next, we get the ISO disk image file we want to copy. This might be Linux or FreeBSD or even something else.
We run the dd command to copy raw data from our image file to the block device. To be sure we’re not writing all over something we would not want to lose, we’ll double and triple-check that we have the correct device for the “of” option:
# dd if=FreeBSD-12.1-RELEASE-amd64-memstick.img of=/dev/sdc bs=1M conv=syncPiece by piece, here is what we’re doing with that command:
- We’re running dd
- with the input file if option pointing to the disk image file we’ve downloaded (FreeBSD 12.1)
- and the output file of the option pointing to our disk block device. Again, we make sure this is correct, or we could knock out our system!
- The block size bs option copies in one-megabyte chunks. If we omit this, it will default to 512 bytes and take significantly longer.
- Finally, conv=sync tells dd that it must synchronize the data and metadata reads and writes when it completes. We could also do this with the sync command.
Another popular option is status=progress, which provides visual progress updates as the disk image is copied. Without it, dd sits there silently as it copies (sometimes, for many minutes).
After this completes, we have a USB drive we can boot and install from!
5. Creating Our Own Disk Image Files
We can also use dd when experimenting with filesystems. Similar to how virtual machines can use virtual disk files, we can create empty files and use them to try out filesystems and RAID configurations.
Let’s create two 10-gigabyte files and tell ZFS to use them like mirrored disk drives. This is a great way to practice before we make irrevocable changes to real systems.
First, we use dd to copy one gigabyte of zeros ten times to our files:
$ dd if=/dev/zero of=first.img bs=1G count=10
$ dd if=/dev/zero of=second.img bs=1G count=10
100+0 records in
100+0 records out
104857600 bytes (105 MB, 100 MiB) copied, 0.219776 s, 477 MB/s
The new option, count, does just what we expect: it repeats the copy operation that many times. Without it, dd will keep going until it reaches the end of the file. But /dev/zero is a never-ending fountain of ‘0’, so we need to specify.
Now, we can use these big but empty files as block devices—format them with mkfs and mount them, for example.
In our ZFS experiment, we could create a new zpool:
# zpool create demo mirror ~/first.img ~/second.imgAnd voila, we’d have an experimental ZFS storage pool mounted on /demo.
6. Historical Background
In its simplest form, dd is indeed a data duplicator. It receives data to standard input and duplicates to standard output:
$ echo "test" | dd
test
0+1 records in
0+1 records out
5 bytes copied, 4.6881e-05 s, 107 kB/s
In this case, it duplicates the four characters in test, plus the newline character. As a C programmer will tell us, a char is one byte long.
But in the tradition of Unix piping and transforming, we can ask dd to convert the bytes it duplicates. Here are some examples:
$ echo "test" | dd conv=swab
etts
0+1 records in
0+1 records out
5 bytes copied, 5.9189e-05 s, 84.5 kB/s
If we tell dd to use the swab conversion, it will swap bytes. We send in “test” and get out “etts”. This might be useful if we had files or raw data in a different endian format. But these are less common than they once were.
We can also translate between the ASCII text encoding that forms the first part of now-standard Unicode. ASCII once had a common competing standard from IBM, which bears the difficult-to-pronounce moniker, EBCDIC.
dd allows us to easily translate back and forth between the secret language of IBM mainframes and the tongue of the common people:
$ echo "test" | dd conv=ibm > ebcdic.txt
0+1 records in
0+1 records out
5 bytes copied, 0.00010055 s, 49.7 kB/s
$ cat ebcdic.txt
����%
$ cat ebcdic.txt | dd conv=ascii
test
0+1 records in
0+1 records out
5 bytes copied, 5.65e-05 s, 88.5 kB/s
But these are mostly historical curiosities.
7. Conclusion
In this tutorial, we’ve discussed some of the historical reasons for the dd command. We’ve also looked at two possible contemporary uses for it.
dd remains a dangerous command, as it will happily wipe out the content of entire disks. Although other tools have replaced some of their original uses, there are times we may still want to have dd in our toolbelt.