1. Overview
Apache Kafka is a scalable, high performance, low latency platform that allows reading and writing streams of data like a messaging system. We can start with Kafka in Java fairly easily.
Spark Streaming is part of the Apache Spark platform that enables scalable, high throughput, fault tolerant processing of data streams. Although written in Scala, Spark offers Java APIs to work with.
Apache Cassandra is a distributed and wide-column NoSQL data store. More details on Cassandra is available in our previous article.
In this tutorial, we’ll combine these to create a highly scalable and fault tolerant data pipeline for a real-time data stream.
Learn how to build a dashboard using DataStax Astra, a database-as-a-service powered by Apache Cassandra and Stargate APIs.
An example of using Cassandra to store time-series data.
Learn how to display events on an interactive map, based on data stored in an Astra database.
2. Installations
To start, we’ll need Kafka, Spark and Cassandra installed locally on our machine to run the application. We’ll see how to develop a data pipeline using these platforms as we go along.
However, we’ll leave all default configurations including ports for all installations which will help in getting the tutorial to run smoothly.
2.1. Kafka
Installing Kafka on our local machine is fairly straightforward and can be found as part of the official documentation. We’ll be using the 2.1.0 release of Kafka.
In addition, Kafka requires Apache Zookeeper to run but for the purpose of this tutorial, we’ll leverage the single node Zookeeper instance packaged with Kafka.
Once we’ve managed to start Zookeeper and Kafka locally following the official guide, we can proceed to create our topic, named “messages”:
 $KAFKA_HOME$\bin\windows\kafka-topics.bat --create \
  --zookeeper localhost:2181 \
  --replication-factor 1 --partitions 1 \
  --topic messages
Note that the above script is for Windows platform, but there are similar scripts available for Unix-like platforms as well.
2.2. Spark
Spark uses Hadoop’s client libraries for HDFS and YARN. Consequently, it can be very tricky to assemble the compatible versions of all of these. However, the official download of Spark comes pre-packaged with popular versions of Hadoop. For this tutorial, we’ll be using version 2.3.0 package “pre-built for Apache Hadoop 2.7 and later”.
Once the right package of Spark is unpacked, the available scripts can be used to submit applications. We’ll see this later when we develop our application in Spring Boot.
2.3. Cassandra
DataStax makes available a community edition of Cassandra for different platforms including Windows. We can download and install this on our local machine very easily following the official documentation. We’ll be using version 3.9.0.
Once we’ve managed to install and start Cassandra on our local machine, we can proceed to create our keyspace and table. This can be done using the CQL Shell which ships with our installation:
CREATE KEYSPACE vocabulary
    WITH REPLICATION = {
        'class' : 'SimpleStrategy',
        'replication_factor' : 1
    };
USE vocabulary;
CREATE TABLE words (word text PRIMARY KEY, count int);
Note that we’ve created a namespace called vocabulary and a table therein called words with two columns, word, and count.
3. Dependencies
We can integrate Kafka and Spark dependencies into our application through Maven. We’ll pull these dependencies from Maven Central:
And we can add them to our pom accordingly:
<dependency>
    <groupId>org.apache.spark</groupId>
    <artifactId>spark-core_2.11</artifactId>
    <version>2.3.0</version>
    <scope>provided</scope>
</dependency>
<dependency>
    <groupId>org.apache.spark</groupId>
    <artifactId>spark-sql_2.11</artifactId>
    <version>2.3.0</version>
    <scope>provided</scope>
</dependency>
<dependency>
    <groupId>org.apache.spark</groupId>
    <artifactId>spark-streaming_2.11</artifactId>
    <version>2.3.0</version>
    <scope>provided</scope>
</dependency>
<dependency>
    <groupId>org.apache.spark</groupId>
    <artifactId>spark-streaming-kafka-0-10_2.11</artifactId>
    <version>2.3.0</version>
</dependency>
<dependency>
    <groupId>com.datastax.spark</groupId>
    <artifactId>spark-cassandra-connector_2.11</artifactId>
    <version>2.3.0</version>
</dependency>
<dependency>
    <groupId>com.datastax.spark</groupId>
    <artifactId>spark-cassandra-connector-java_2.11</artifactId>
    <version>1.5.2</version>
</dependency>
Note that some these dependencies are marked as provided in scope. This is because these will be made available by the Spark installation where we’ll submit the application for execution using spark-submit.
4. Spark Streaming – Kafka Integration Strategies
At this point, it is worthwhile to talk briefly about the integration strategies for Spark and Kafka.
Kafka introduced new consumer API between versions 0.8 and 0.10. Hence, the corresponding Spark Streaming packages are available for both the broker versions. It’s important to choose the right package depending upon the broker available and features desired.
4.1. Spark Streaming Kafka 0.8
The 0.8 version is the stable integration API with options of using the Receiver-based or the Direct Approach. We’ll not go into the details of these approaches which we can find in the official documentation. An important point to note here is that this package is compatible with Kafka Broker versions 0.8.2.1 or higher.
4.2. Spark Streaming Kafka 0.10
This is currently in an experimental state and is compatible with Kafka Broker versions 0.10.0 or higher only. This package offers the Direct Approach only, now making use of the new Kafka consumer API. We can find more details about this in the official documentation. Importantly, it is not backward compatible with older Kafka Broker versions.
Please note that for this tutorial, we’ll make use of the 0.10 package. The dependency mentioned in the previous section refers to this only.
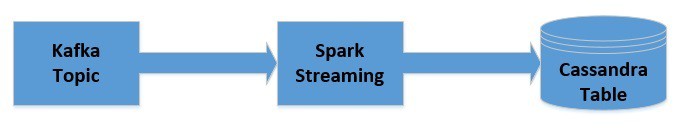
5. Developing a Data Pipeline
We’ll create a simple application in Java using Spark which will integrate with the Kafka topic we created earlier. The application will read the messages as posted and count the frequency of words in every message. This will then be updated in the Cassandra table we created earlier.
Let’s quickly visualize how the data will flow:
5.1. Getting JavaStreamingContext
Firstly, we’ll begin by initializing the JavaStreamingContext which is the entry point for all Spark Streaming applications:
SparkConf sparkConf = new SparkConf();
sparkConf.setAppName("WordCountingApp");
sparkConf.set("spark.cassandra.connection.host", "127.0.0.1");

JavaStreamingContext streamingContext = new JavaStreamingContext(
  sparkConf, Durations.seconds(1));
5.2. Getting DStream from Kafka
Now, we can connect to the Kafka topic from the JavaStreamingContext:
Map<String, Object> kafkaParams = new HashMap<>();
kafkaParams.put("bootstrap.servers", "localhost:9092");
kafkaParams.put("key.deserializer", StringDeserializer.class);
kafkaParams.put("value.deserializer", StringDeserializer.class);
kafkaParams.put("group.id", "use_a_separate_group_id_for_each_stream");
kafkaParams.put("auto.offset.reset", "latest");
kafkaParams.put("enable.auto.commit", false);
Collection<String> topics = Arrays.asList("messages");

JavaInputDStream<ConsumerRecord<String, String>> messages =
  KafkaUtils.createDirectStream(
    streamingContext,
    LocationStrategies.PreferConsistent(),
    ConsumerStrategies.<String, String> Subscribe(topics, kafkaParams));
Please note that we’ve to provide deserializers for key and value here. For common data types like String, the deserializer is available by default. However, if we wish to retrieve custom data types, we’ll have to provide custom deserializers.
Here, we’ve obtained JavaInputDStream which is an implementation of Discretized Streams or DStreams, the basic abstraction provided by Spark Streaming. Internally DStreams is nothing but a continuous series of RDDs.
5.3. Processing Obtained DStream
We’ll now perform a series of operations on the JavaInputDStream to obtain word frequencies in the messages:
JavaPairDStream<String, String> results = messages
  .mapToPair(
      record -> new Tuple2<>(record.key(), record.value())
  );
JavaDStream<String> lines = results
  .map(
      tuple2 -> tuple2._2()
  );
JavaDStream<String> words = lines
  .flatMap(
      x -> Arrays.asList(x.split("\\s+")).iterator()
  );
JavaPairDStream<String, Integer> wordCounts = words
  .mapToPair(
      s -> new Tuple2<>(s, 1)
  ).reduceByKey(
      (i1, i2) -> i1 + i2
    );
5.4. Persisting Processed DStream into Cassandra
Finally, we can iterate over the processed JavaPairDStream to insert them into our Cassandra table:
wordCounts.foreachRDD(
    javaRdd -> {
      Map<String, Integer> wordCountMap = javaRdd.collectAsMap();
      for (String key : wordCountMap.keySet()) {
        List<Word> wordList = Arrays.asList(new Word(key, wordCountMap.get(key)));
        JavaRDD<Word> rdd = streamingContext.sparkContext().parallelize(wordList);
        javaFunctions(rdd).writerBuilder(
          "vocabulary", "words", mapToRow(Word.class)).saveToCassandra();
      }
    }
  );
5.5. Running the Application
As this is a stream processing application, we would want to keep this running:
streamingContext.start();
streamingContext.awaitTermination();
6. Leveraging Checkpoints
In a stream processing application, it’s often useful to retain state between batches of data being processed.
For example, in our previous attempt, we are only able to store the current frequency of the words. What if we want to store the cumulative frequency instead? Spark Streaming makes it possible through a concept called checkpoints.
We’ll now modify the pipeline we created earlier to leverage checkpoints:
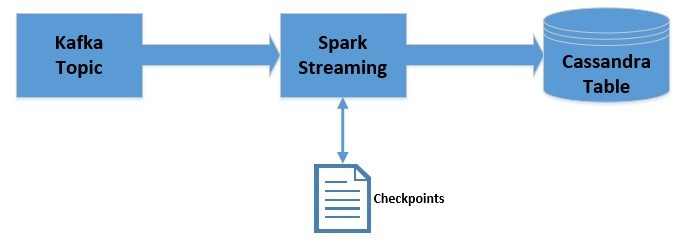
Please note that we’ll be using checkpoints only for the session of data processing. This does not provide fault-tolerance. However, checkpointing can be used for fault tolerance as well.
There are a few changes we’ll have to make in our application to leverage checkpoints. This includes providing the JavaStreamingContext with a checkpoint location:
streamingContext.checkpoint("./.checkpoint");
Here, we are using the local filesystem to store checkpoints. However, for robustness, this should be stored in a location like HDFS, S3 or Kafka. More on this is available in the official documentation.
Next, we’ll have to fetch the checkpoint and create a cumulative count of words while processing every partition using a mapping function:
JavaMapWithStateDStream<String, Integer, Integer, Tuple2<String, Integer>> cumulativeWordCounts = wordCounts
  .mapWithState(
    StateSpec.function(
        (word, one, state) -> {
          int sum = one.orElse(0) + (state.exists() ? state.get() : 0);
          Tuple2<String, Integer> output = new Tuple2<>(word, sum);
          state.update(sum);
          return output;
        }
      )
    );
Once we get the cumulative word counts, we can proceed to iterate and save them in Cassandra as before.
Please note that while data checkpointing is useful for stateful processing, it comes with a latency cost. Hence, it’s necessary to use this wisely along with an optimal checkpointing interval.
7. Understanding Offsets
If we recall some of the Kafka parameters we set earlier:
kafkaParams.put("auto.offset.reset", "latest");
kafkaParams.put("enable.auto.commit", false);
These basically mean that we don’t want to auto-commit for the offset and would like to pick the latest offset every time a consumer group is initialized. Consequently, our application will only be able to consume messages posted during the period it is running.
If we want to consume all messages posted irrespective of whether the application was running or not and also want to keep track of the messages already posted, we’ll have to configure the offset appropriately along with saving the offset state, though this is a bit out of scope for this tutorial.
This is also a way in which Spark Streaming offers a particular level of guarantee like “exactly once”. This basically means that each message posted on Kafka topic will only be processed exactly once by Spark Streaming.
8. Deploying Application
We can deploy our application using the Spark-submit script which comes pre-packed with the Spark installation:
$SPARK_HOME$\bin\spark-submit \
  --class com.baeldung.data.pipeline.WordCountingAppWithCheckpoint \
  --master local[2]
  \target\spark-streaming-app-0.0.1-SNAPSHOT-jar-with-dependencies.jar
Please note that the jar we create using Maven should contain the dependencies that are not marked as provided in scope.
Once we submit this application and post some messages in the Kafka topic we created earlier, we should see the cumulative word counts being posted in the Cassandra table we created earlier.
9. Conclusion
To sum up, in this tutorial, we learned how to create a simple data pipeline using Kafka, Spark Streaming and Cassandra. We also learned how to leverage checkpoints in Spark Streaming to maintain state between batches.
As always, the code for the examples is available over on GitHub.