1. Introduction
GWT or Google Web Toolkit is a framework for building high-performance web applications in Java.
In this tutorial, we’re going to focus on and cover some of its key capabilities and functionality.
2. GWT SDK
The SDK contains the Java API libraries, a compiler, and a development server.
2.1. Java API
GWT API has classes for building user interfaces, making server calls, internationalization, performing unit tests. To learn more check the java documentation here.
2.2. Compiler
Simply put, GWT compiler is a source translator from Java code into the Javascript. The result of the compilation is a Javascript application.
The logic of its work includes trimming unused classes, methods, fields from the code and shortening Javascript names.
Because of this advantage, we no longer need to include Ajax libraries in our Javascript project. Of course, it’s also possible to set hints while compiling the code.
Here some useful GWTCompiler parameters:
- -logLevel – to set one of the ERROR, WARN, INFO, TRACE, DEBUG, SPAM, ALL logging levels
- -workdir – compiler’s working directory
- -gen – the directory to write the generated files
- -out – the output files directory
- -optimize – Sets the compiler optimization level from 0 to 9
- -style – the script output style OBF, PRETTY or DETAILED
- -module[s] – the name of the modules to compile
3. Setup
The latest SDK is available over on download page. The rest of the setup is available at getting started page.
3.1. Maven
To set up the project with Maven, we need to add the following dependencies to pom.xml:
<dependency>
    <groupId>com.google.gwt</groupId>
    <artifactId>gwt-servlet</artifactId>
    <scope>runtime</scope>
</dependency>
<dependency>
    <groupId>com.google.gwt</groupId>
    <artifactId>gwt-user</artifactId>
    <scope>provided</scope>
</dependency>
<dependency>
    <groupId>com.google.gwt</groupId>
    <artifactId>gwt-dev</artifactId>
    <scope>provided</scope>
</dependency>
The gwt-servlet library supports the server-side components for invoking a GWT-RPC endpoint. gwt-user contains the Java API which we’ll use to build our web application. gwt-dev has the code for compiler, deployment or hosting the application.
To make sure that all the dependencies use the same version, we need to include the parent GWT dependency:
<dependency>
    <groupId>com.google.gwt</groupId>
    <artifactId>gwt</artifactId>
    <version>2.8.2</version>
    <type>pom</type>
    <scope>import</scope>
</dependency>
All the artifacts are available for the download on Maven Central.
4. Application
Let’s build a simple web application. It will send a message to the server and display the response.
In general, a GWT application consists of the server and the client parts. The client-side makes an HTTP request to connect with the server. To make it possible, GWT uses Remote Procedure Call or simply RPC mechanism.
5. GWT and RPC
Getting back to our application, let’s see how the RPC communication is made. For that purpose, we create a service to receive a message from the server.
Let’s first create an interface:
@RemoteServiceRelativePath("greet")
public interface MessageService extends RemoteService {
    String sendMessage(String message) throws IllegalArgumentException;
}
The @RemoteServiceRelativePath annotation maps the service to the module’s /message relative URL. MessageService should extend from RemoteService marker interface to perform RPC communication.
The implementation of MessageService is on a server side:
public class MessageServiceImpl extends RemoteServiceServlet
  implements MessageService {

    public String sendMessage(String message)
      throws IllegalArgumentException {
        if (message == null) {
            throw new IllegalArgumentException("message is null");
        }

        return "Hello, " + message + "!<br><br> Time received: "
          + LocalDateTime.now();
    }
}
Our server class extends from the RemoteServiceServlet base servlet class. It will automatically deserialize incoming requests from the client and serialize outgoing responses from the server.
Now let’s see how we use it from the client side. The MessageService is only a definitive version of our service.
To perform on the client side, we need to create the asynchronous version of our service:
public interface MessageServiceAsync {
    void sendMessage(String input, AsyncCallback<String> callback)
      throws IllegalArgumentException;
}
Here we can see an extra argument in getMessage() method. We need async to notify the UI when the asynchronous call is complete. This way we prevent blocking the working UI thread.
6. Components and Their Lifecycle
The SDK offers some UI elements and layouts for designing the graphical interfaces.
In general, all the UI components extends from the Widget class. Visually we have the element widgets that we can see, click or move on the screen:
- component widgets – TextBox, TextArea, Button, RadioButton, CheckBox, etc…
and there are layout or panel widgets that compose and organize the screen:
- panel widgets – HorizontalPanel, VerticalPanel, PopupPanel, TabPanel, etc…
Every time we add a widget or any other component to the code, GWT works hard to link the view element with the browser’s DOM.
The constructor always initializes the root DOM element. When we attach a child widget to a parent component, it also causes binding at the DOM level. The entry point class contains the loading function which will be called first. This is where we define our widgets.
7. Entry Point
Let’s have a close look at the main entry point of the application:
public class Google_web_toolkit implements EntryPoint {

    private MessageServiceAsync messageServiceAsync = GWT.create(MessageService.class);

    public void onModuleLoad() {
        Button sendButton = new Button("Submit");
        TextBox nameField = new TextBox();
        nameField.setText("Hi there");

        sendButton.addStyleName("sendButton");

        RootPanel.get("nameFieldContainer").add(nameField);
        RootPanel.get("sendButtonContainer").add(sendButton);
    }
}
Every UI class implements the com.google.gwt.core.client.EntryPoint interface to mark it as a main entry for the module. It connects to the corresponding HTML document, where the java code executes.
We can define GWT UI components and assign then to HTML tags with the same given ID. Entry point class overrides the entry point onModuleLoad() method, which is called automatically when loading the module.
Here we create the UI components, register event handlers, modify the browser DOM.
Now, let’s see how we create our remote server instance. For that purpose, we use GWT.create(MessageService.class) static method.
It determines the requested type at compile-time. Seeing this method, GWT compiler generates many versions of code at compile time, only one of which needs to be loaded by a particular client during bootstrapping at runtime. This feature is widely used in RPC calls.
Here we also define the Button and TextBox widgets. To add attach them into the DOM tree we use the RootPanel class. It is the root panel and returns a singleton value to bind the widget elements:
RootPanel.get("sendButtonContainer").add(sendButton);
First, it gets the root container marked with sendButtonContainer id. After we attach the sendButton to the container.
8. HTML
Inside of the /webapp folder, we have Google_web_toolkit.html file.
We can mark the tag elements with the specific ids so the framework can bind them into Java objects:
<body>
    <h1>Sample GWT Application</h1>
    <table align="center">
        <tr>
            <td colspan="2" style="font-weight:bold;">Please enter your message:</td>
        </tr>
        <tr>
            <td id="nameFieldContainer"></td>
            <td id="sendButtonContainer"></td>
        </tr>
    </table>
</body>
The <td> tags with nameFieldContainer and sendButtonContainer ids will be mapped to the Button and TextBox components.
9. Main Module Descriptor
Let’s have a look at the typical configuration of the Google_web_toolkit.gwt.xml main module descriptor file:
<module rename-to='google_web_toolkit'>
    <inherits name='com.google.gwt.user.User'/>
    <inherits name='com.google.gwt.user.theme.clean.Clean'/>
    <entry-point class='com.baeldung.client.Google_web_toolkit'/>
</module>
We make core GWT stuff accessible by including the com.google.gwt.user.User interface. Also, we can choose a default style sheet for our application. In this case, it is *.clean.Clean.
The other available styling options are *.dark.Dark, *.standard.Standard, *.chrome.Chrome. The com.baeldung.client.Google_web_toolkit is also marked here with the <entry-point /> tag.
10. Adding Event Handlers
To manage the mouse or keyboard typing events, GWT will use some handlers. They all extend from EventHandler interface and have a method with the event type argument.
In our example, we register the mouse click event handler.
This will fire the onClick() method every time the button is pushed:
closeButton.addClickHandler(new ClickHandler() {
    public void onClick(ClickEvent event) {
        vPanel.hide();
        sendButton.setEnabled(true);
        sendButton.setFocus(true);
    }
});
Here we can modify the widget state and behavior. In our example, we hide the vPanel and enable the sendButton.
The other way is to define an inner class and implement the necessary interfaces:
class MyHandler implements ClickHandler, KeyUpHandler {

    public void onClick(ClickEvent event) {
        // send message to the server
    }

    public void onKeyUp(KeyUpEvent event) {
        if (event.getNativeKeyCode() == KeyCodes.KEY_ENTER) {
            // send message to the server
        }
    }
}
In addition to ClickHandler, we also include here the KeyUpHandler interface to catch the keypress events. Here, inside of onKeyUp() method we can use the KeyUpEvent to check if the user pressed the Enter key.
And here how we use the MyHandler class to register both event handlers:
MyHandler handler = new MyHandler();
sendButton.addClickHandler(handler);
nameField.addKeyUpHandler(handler);
11. Calling the Server
Now, we’re ready to send the message to the server. We’ll perform a remote procedure call with asynchronous sendMessage() method.
The second parameter of the method is AsyncCallback<String> interface, where the String is the return type of the corresponding synchronous method:
messageServiceAsync.sendMessage(textToServer, new AsyncCallback<String>() {
    public void onFailure(Throwable caught) {
        serverResponseLabel.addStyleName("serverResponseLabelError");
        serverResponseLabel.setHTML("server error occurred");
        closeButton.setFocus(true);
    }

    public void onSuccess(String result) {
        serverResponseLabel.setHTML(result);
        vPanel.setVisible(true);
    }
});
As we can see, the receiver implements onSuccess(String result) and onFailure(Throwable) method for each response type.
Depending on response result, we either set an error message “server error occurred” or display the result value in the container.
12. CSS Styling
When creating the project with the eclipse plugin, it will automatically generate the Google_web_toolkit.css file under the /webapp directory and link it to the main HTML file.
<link type="text/css" rel="stylesheet" href="Google_web_toolkit.css">
Of course, we can define custom styles for the specific UI components programmatically:
sendButton.addStyleName("sendButton");
Here we assign a CSS style with the class name sendButton to our sendButton component:
.sendButton {
    display: block;
    font-size: 16pt;
}
13. Result
As a result, we have this simple web application:
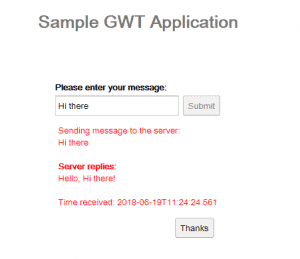
Here we submit a “Hi there” message to the server and print the “Hello, Hi there!” response on the screen.
14. Conclusion
In this quick article, we learned about the basics of GWT Framework. Afterward, we discussed the architecture, lifecycle, capabilities and different components of Its SDK.
As a result, we learned how to create a simple web application.
And, as always, the full source code of the tutorial is available over on GitHub.


