1. Overview
In this tutorial – we’re continuing the ongoing Registration with Spring Security series with a look at the basic “I forgot my password” feature – so that the user can safely reset their own password when they need to.
2. Request the Reset of Your Password
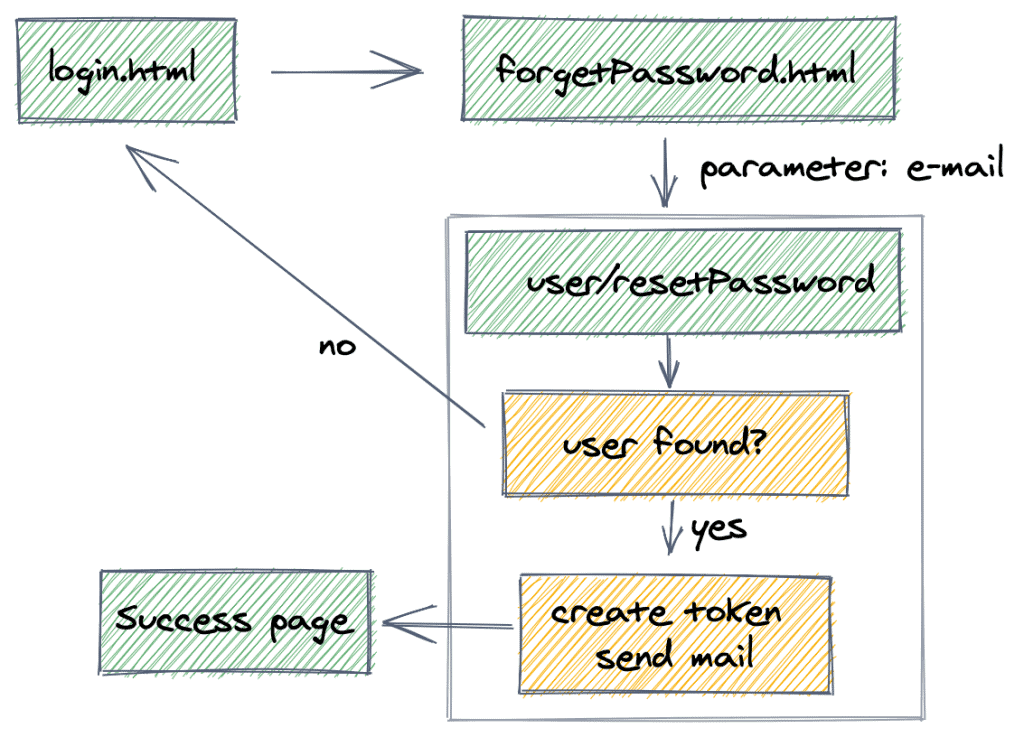
A password reset flow typically starts when the user clicks some kind of “reset” button on the Login page. Then, we can ask the user for their email address or other identifying information. Once confirmed, we can generate a token and send an email to the user.
The following diagram visualizes the flow that we’ll implement in this article:
3. The Password Reset Token
Let’s start by creating a PasswordResetToken entity to use it for resetting the user’s password:
@Entity
public class PasswordResetToken {

    private static final int EXPIRATION = 60 * 24;

    @Id
    @GeneratedValue(strategy = GenerationType.AUTO)
    private Long id;

    private String token;

    @OneToOne(targetEntity = User.class, fetch = FetchType.EAGER)
    @JoinColumn(nullable = false, name = "user_id")
    private User user;

    private Date expiryDate;
}
When a password reset is triggered – a token will be created and a special link containing this token will be emailed to the user.
The token and the link will only be valid for a set period of time (24 hours in this example).
4. forgotPassword.html
The first page in the process is the “I forgot my password” page – where the user is prompted for their email address in order for the actual reset process to start.
So – let’s craft a simple forgotPassword.html asking the user for an email address:
<html>
<body>
    <h1 th:text="#{message.resetPassword}">reset</h1>

    <label th:text="#{label.user.email}">email</label>
    <input id="email" name="email" type="email" value="" />
    <button type="submit" onclick="resetPass()"
      th:text="#{message.resetPassword}">reset</button>

<a th:href="@{/registration.html}" th:text="#{label.form.loginSignUp}">
    registration
</a>
<a th:href="@{/login}" th:text="#{label.form.loginLink}">login</a>

<script src="jquery.min.js"></script>
<script th:inline="javascript">
var serverContext = [[@{/}]];
function resetPass(){
    var email = $("#email").val();
    $.post(serverContext + "user/resetPassword",{email: email} ,
      function(data){
          window.location.href =
           serverContext + "login?message=" + data.message;
    })
    .fail(function(data) {
    	if(data.responseJSON.error.indexOf("MailError") > -1)
        {
            window.location.href = serverContext + "emailError.html";
        }
        else{
            window.location.href =
              serverContext + "login?message=" + data.responseJSON.message;
        }
    });
}

</script>
</body>

</html>
We now need to link to this new “reset password” page from the login page:
<a th:href="@{/forgetPassword.html}"
  th:text="#{message.resetPassword}">reset</a>
5. Create the PasswordResetToken
Let’s start by creating the new PasswordResetToken and send it via email to the user:
@PostMapping("/user/resetPassword")
public GenericResponse resetPassword(HttpServletRequest request,
  @RequestParam("email") String userEmail) {
    User user = userService.findUserByEmail(userEmail);
    if (user == null) {
        throw new UserNotFoundException();
    }
    String token = UUID.randomUUID().toString();
    userService.createPasswordResetTokenForUser(user, token);
    mailSender.send(constructResetTokenEmail(getAppUrl(request),
      request.getLocale(), token, user));
    return new GenericResponse(
      messages.getMessage("message.resetPasswordEmail", null,
      request.getLocale()));
}
And here is the createPasswordResetTokenForUser() method:
public void createPasswordResetTokenForUser(User user, String token) {
    PasswordResetToken myToken = new PasswordResetToken(token, user);
    passwordTokenRepository.save(myToken);
}
And here is method constructResetTokenEmail() – used to send an email with the reset token:
private SimpleMailMessage constructResetTokenEmail(
  String contextPath, Locale locale, String token, User user) {
    String url = contextPath + "/user/changePassword?token=" + token;
    String message = messages.getMessage("message.resetPassword",
      null, locale);
    return constructEmail("Reset Password", message + " \r\n" + url, user);
}

private SimpleMailMessage constructEmail(String subject, String body,
  User user) {
    SimpleMailMessage email = new SimpleMailMessage();
    email.setSubject(subject);
    email.setText(body);
    email.setTo(user.getEmail());
    email.setFrom(env.getProperty("support.email"));
    return email;
}
Note how we used a simple object GenericResponse to represent our response to the client:
public class GenericResponse {
    private String message;
    private String error;

    public GenericResponse(String message) {
        super();
        this.message = message;
    }

    public GenericResponse(String message, String error) {
        super();
        this.message = message;
        this.error = error;
    }
}
6. Check the PasswordResetToken
Once the user clicks on the link in their email, the user/changePassword endpoint:
- verifies that the token is valid and
- presents the user with the updatePassword page, where he can enter a new password
The new password and the token are then passed to the user/savePassword endpoint:
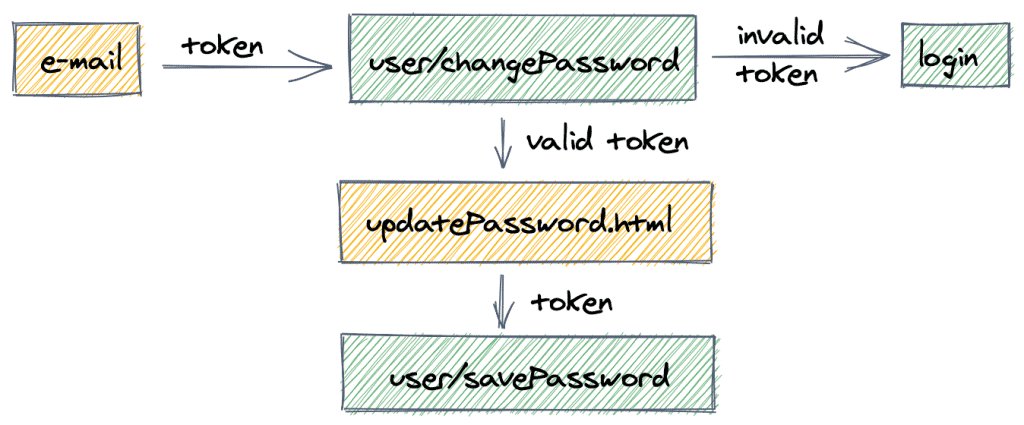
The user gets the email with the unique link for resetting their password, and clicks the link:
@GetMapping("/user/changePassword")
public String showChangePasswordPage(Locale locale, Model model,
  @RequestParam("token") String token) {
    String result = securityService.validatePasswordResetToken(token);
    if(result != null) {
        String message = messages.getMessage("auth.message." + result, null, locale);
        return "redirect:/login.html?lang="
            + locale.getLanguage() + "&message=" + message;
    } else {
        model.addAttribute("token", token);
        return "redirect:/updatePassword.html?lang=" + locale.getLanguage();
    }
}
And here is the validatePasswordResetToken() method:
public String validatePasswordResetToken(String token) {
    final PasswordResetToken passToken = passwordTokenRepository.findByToken(token);

    return !isTokenFound(passToken) ? "invalidToken"
            : isTokenExpired(passToken) ? "expired"
            : null;
}

private boolean isTokenFound(PasswordResetToken passToken) {
    return passToken != null;
}

private boolean isTokenExpired(PasswordResetToken passToken) {
    final Calendar cal = Calendar.getInstance();
    return passToken.getExpiryDate().before(cal.getTime());
}
7. Change the Password
At this point, the user sees the simple Password Reset page – where the only possible option is to provide a new password:
7.1. updatePassword.html
<html>
<body>
<div sec:authorize="hasAuthority('CHANGE_PASSWORD_PRIVILEGE')">
    <h1 th:text="#{message.resetYourPassword}">reset</h1>
    <form>
        <label th:text="#{label.user.password}">password</label>
        <input id="password" name="newPassword" type="password" value="" />

        <label th:text="#{label.user.confirmPass}">confirm</label>
        <input id="matchPassword" type="password" value="" />

        <label th:text="#{token.message}">token</label>
        <input id="token" name="token" value="" />

        <div id="globalError" style="display:none"
          th:text="#{PasswordMatches.user}">error</div>
        <button type="submit" onclick="savePass()"
          th:text="#{message.updatePassword}">submit</button>
    </form>

<script th:inline="javascript">
var serverContext = [[@{/}]];
$(document).ready(function () {
    $('form').submit(function(event) {
        savePass(event);
    });

    $(":password").keyup(function(){
        if($("#password").val() != $("#matchPassword").val()){
            $("#globalError").show().html(/*[[#{PasswordMatches.user}]]*/);
        }else{
            $("#globalError").html("").hide();
        }
    });
});

function savePass(event){
    event.preventDefault();
    if($("#password").val() != $("#matchPassword").val()){
        $("#globalError").show().html(/*[[#{PasswordMatches.user}]]*/);
        return;
    }
    var formData= $('form').serialize();
    $.post(serverContext + "user/savePassword",formData ,function(data){
        window.location.href = serverContext + "login?message="+data.message;
    })
    .fail(function(data) {
        if(data.responseJSON.error.indexOf("InternalError") > -1){
            window.location.href = serverContext + "login?message=" + data.responseJSON.message;
        }
        else{
            var errors = $.parseJSON(data.responseJSON.message);
            $.each( errors, function( index,item ){
                $("#globalError").show().html(item.defaultMessage);
            });
            errors = $.parseJSON(data.responseJSON.error);
            $.each( errors, function( index,item ){
                $("#globalError").show().append(item.defaultMessage+"<br/>");
            });
        }
    });
}
</script>
</div>
</body>
</html>
Note that we show the reset token and pass it as a POST parameter in the following call to save the password.
7.2. Save the Password
Finally, when the previous post request is submitted – the new user password is saved:
@PostMapping("/user/savePassword")
public GenericResponse savePassword(final Locale locale, @Valid PasswordDto passwordDto) {

    String result = securityUserService.validatePasswordResetToken(passwordDto.getToken());

    if(result != null) {
        return new GenericResponse(messages.getMessage(
            "auth.message." + result, null, locale));
    }

    Optional user = userService.getUserByPasswordResetToken(passwordDto.getToken());
    if(user.isPresent()) {
        userService.changeUserPassword(user.get(), passwordDto.getNewPassword());
        return new GenericResponse(messages.getMessage(
            "message.resetPasswordSuc", null, locale));
    } else {
        return new GenericResponse(messages.getMessage(
            "auth.message.invalid", null, locale));
    }
}
And here is the changeUserPassword() method:
public void changeUserPassword(User user, String password) {
    user.setPassword(passwordEncoder.encode(password));
    repository.save(user);
}
And the PasswordDto:
public class PasswordDto {

    private String oldPassword;

    private  String token;

    @ValidPassword
    private String newPassword;
}
8. Conclusion
In this article, we implemented a simple but very useful feature for a mature Authentication process – the option to reset your own password, as a user of the system.
The full implementation of this tutorial can be found in the GitHub project – this is an Eclipse based project, so it should be easy to import and run as it is.