1. Overview
In this article, we will discuss Spring forms and data binding to a controller. Also, we will have a look at one of the main annotations in Spring MVC i.e. @ModelAttribute.
Of course, Spring MVC is a complex topic with lots of things you need to understand to use it to its full potential, so definitely dig deeper into the framework here.
A quick and to the point tutorial about the various tags that Spring MVC provides to help us create and validate forms.
FreeMarker is a Java based template engine from the Apache Software Foundation. This tutorial illustrates how to configure FreeMarker for use in Spring MVC.
Thymeleaf is a templating language with excellent integration with Spring. This article provides an introduction to using Thymeleaf in a Spring MVC application.
2. The Model
First – let’s define a simple entity that we’re going to display and bind to the form:
public class Employee {
    private String name;
    private long id;
    private String contactNumber;

    // standard getters and setters
}
This will be our form-backing object.
3. The View
Next – let’s define the actual form, and of course, the HTML file that contains it. We’re going to be using a page where a new employee is created/registered:
<%@ taglib prefix="form" uri="http://www.springframework.org/tags/form"%>
<html>
    <head>
    </head>
    <body>
        <h3>Welcome, Enter The Employee Details</h3>
        <form:form method="POST"
          action="/spring-mvc-xml/addEmployee" modelAttribute="employee">
             <table>
                <tr>
                    <td><form:label path="name">Name</form:label></td>
                    <td><form:input path="name"/></td>
                </tr>
                <tr>
                    <td><form:label path="id">Id</form:label></td>
                    <td><form:input path="id"/></td>
                </tr>
                <tr>
                    <td><form:label path="contactNumber">
                      Contact Number</form:label></td>
                    <td><form:input path="contactNumber"/></td>
                </tr>
                <tr>
                    <td><input type="submit" value="Submit"/></td>
                </tr>
            </table>
        </form:form>
    </body>
</html>
First – notice that we’re including a tag library into our JSP page – the form taglib – to help with defining our form.
Next – the <form:form> tag plays an important role here; it’s very similar to the regular HTLM <form> tag but the modelAttribute attribute is the key which specifies a name of the model object that backs this form:
<form:form method="POST"
  action="/SpringMVCFormExample/addEmployee" modelAttribute="employee">
This will correspond to the @ModelAttribute later on in the controller.
Next – each input fields is using yet another useful tag from the Spring Form taglib – form: prefix. Each of these fields specifies a path attribute – this must correspond to a getter/setter of the model attribute (in this case, the Employee class). When the page is loaded, the input fields are populated by Spring, which calls the getter of each field bound to an input field. When the form is submitted, the setters are called to save the values of the form to the object.
Finally – when the form is submitted, the POST handler in the controller is invoked and the form is automatically bound to the employee argument that we passed in.
4. The Controller
Now, let’s look at the Controller that’s going to handle the back end:
@Controller
public class EmployeeController {

    @RequestMapping(value = "/employee", method = RequestMethod.GET)
    public ModelAndView showForm() {
        return new ModelAndView("employeeHome", "employee", new Employee());
    }

    @RequestMapping(value = "/addEmployee", method = RequestMethod.POST)
    public String submit(@Valid @ModelAttribute("employee")Employee employee,
      BindingResult result, ModelMap model) {
        if (result.hasErrors()) {
            return "error";
        }
        model.addAttribute("name", employee.getName());
        model.addAttribute("contactNumber", employee.getContactNumber());
        model.addAttribute("id", employee.getId());
        return "employeeView";
    }
}
The controller defines two simple operations – the GET for displaying data in the form, and the POST for the create operation, via form’s submit.
Also note that if the object called “employee” is not added to the model, Spring would complain when we try to access the JSP because the JSP will be set up to bind the form to the “employee” model attribute:
java.lang.IllegalStateException:
  Neither BindingResult nor plain target object
    for bean name 'employee' available as request attribute
  at o.s.w.s.s.BindStatus.<init>(BindStatus.java:141)
To access our form backing object, we need to inject it via the @ModelAttribute annotation.
An @ModelAttribute on a method argument indicates the argument will be retrieved from the model. If not present in the model, the argument will be instantiated first and then added to the model.
5. Handling Bind Errors
By default, Spring MVC throws an exception when errors occur during request binding. This usually not what we want, instead, we should be presenting these errors to the user. We’re going to use a BindingResult by adding one as an argument to our controller method:
public String submit(
  @Valid @ModelAttribute("employee") Employee employee,
  BindingResult result,
  ModelMap model)
The BindingResult argument needs to be positioned right after our form backing object – it’s one of the rare cases where the order of the method arguments matters. Otherwise, we’ll run into the following exception:
java.lang.IllegalStateException:
  Errors/BindingResult argument declared without preceding model attribute.
    Check your handler method signature!
Now – an exception is no longer thrown; instead, errors will be registered on the BindingResult that is passed to the submit method. At this point, we can handle these errors in a variety of ways – for example, the operation can be canceled:
@RequestMapping(value = "/addEmployee", method = RequestMethod.POST)
public String submit(@Valid @ModelAttribute("employee")Employee employee,
  BindingResult result,  ModelMap model) {
    if (result.hasErrors()) {
        return "error";
    }

    //Do Something
    return "employeeView";
}
Notice how, in case the result contains errors, we’re returning another view to the user in order to display these errors correctly. Let’s take a look at that view – error.jsp:
<html>
    <head>
    </head>

    <body>
        <h3>Please enter the correct details</h3>
        <table>
            <tr>
                <td><a href="employee">Retry</a></td>
            </tr>
        </table>
    </body>

</html>
6. Displaying an Employee
Finally, besides creating a new employee, we can also simply display one – here’s the quick view code for that:
<body>
    <h2>Submitted Employee Information</h2>
    <table>
        <tr>
            <td>Name :</td>
            <td>${name}</td>
        </tr>
        <tr>
            <td>ID :</td>
            <td>${id}</td>
        </tr>
        <tr>
            <td>Contact Number :</td>
            <td>${contactNumber}</td>
        </tr>
    </table>
</body>
The JSP page is simply using EL expressions to display values of properties of the Employee object in the model.
7. Testing the Application
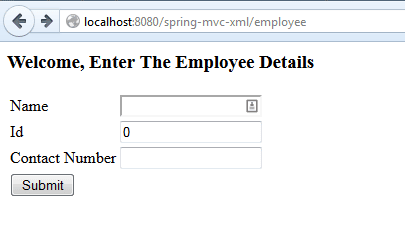
The simple application can be deployed – for example in a Tomcat server – and accessed locally:
http://localhost:8080/spring-mvc-xml/employee
This is the view containing the main form – before the submit operation:
Spring MVC Form example – Submit
After the submit, the data is displayed:
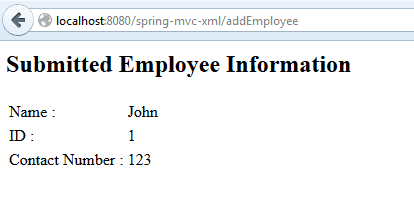
Spring MVC Form example – View
And that’s it – a working example of a simple form with Spring MVC, with validation.
The implementation of this Spring MVC tutorial can be found in the GitHub project – this is a Maven-based project, so it should be easy to import and run as it is.
Finally, as I was saying right at the beginning of the article, you should definitely dig deeper into Spring MVC.


