1. Overview
This tutorial continues the Registration with Spring Security series with a look at how to properly implement Roles and Privileges.
Simple and practical guide to Spring Security Expressions.
A guide to method-level security using the Spring Security framework.
A short example of redirection after login in Spring Security
2. User, Role and Privilege
Let’s start with our entities. We have three main entities:
- The User
- The Role represents the high-level roles of the user in the system. Each role will have a set of low-level privileges.
- The Privilege represents a low-level, granular privilege/authority in the system.
Here’s the user:
@Entity
public class User {

    @Id
    @GeneratedValue(strategy = GenerationType.AUTO)
    private Long id;

    private String firstName;
    private String lastName;
    private String email;
    private String password;
    private boolean enabled;
    private boolean tokenExpired;

    @ManyToMany
    @JoinTable(
        name = "users_roles",
        joinColumns = @JoinColumn(
          name = "user_id", referencedColumnName = "id"),
        inverseJoinColumns = @JoinColumn(
          name = "role_id", referencedColumnName = "id"))
    private Collection<Role> roles;
}
As we can see, the user contains the roles as well as a few additional details that are necessary for a proper registration mechanism.
Next, here’s the role:
@Entity
public class Role {

    @Id
    @GeneratedValue(strategy = GenerationType.AUTO)
    private Long id;

    private String name;
    @ManyToMany(mappedBy = "roles")
    private Collection<User> users;

    @ManyToMany
    @JoinTable(
        name = "roles_privileges",
        joinColumns = @JoinColumn(
          name = "role_id", referencedColumnName = "id"),
        inverseJoinColumns = @JoinColumn(
          name = "privilege_id", referencedColumnName = "id"))
    private Collection<Privilege> privileges;
}
Finally, let’s look at the privilege:
@Entity
public class Privilege {

    @Id
    @GeneratedValue(strategy = GenerationType.AUTO)
    private Long id;

    private String name;

    @ManyToMany(mappedBy = "privileges")
    private Collection<Role> roles;
}
As we can see, we’re considering both the User <-> Role as well as the Role <-> Privilege relationships to be many-to-many bidirectional.
3. Setup Privileges and Roles
Next, let’s focus on doing some early setup of the Privileges and Roles in the system.
We’ll tie this to the startup of the application, and we’ll use an ApplicationListener on ContextRefreshedEvent to load our initial data on server start:
@Component
public class SetupDataLoader implements
  ApplicationListener<ContextRefreshedEvent> {

    boolean alreadySetup = false;

    @Autowired
    private UserRepository userRepository;

    @Autowired
    private RoleRepository roleRepository;

    @Autowired
    private PrivilegeRepository privilegeRepository;

    @Autowired
    private PasswordEncoder passwordEncoder;

    @Override
    @Transactional
    public void onApplicationEvent(ContextRefreshedEvent event) {

        if (alreadySetup)
            return;
        Privilege readPrivilege
          = createPrivilegeIfNotFound("READ_PRIVILEGE");
        Privilege writePrivilege
          = createPrivilegeIfNotFound("WRITE_PRIVILEGE");

        List<Privilege> adminPrivileges = Arrays.asList(
          readPrivilege, writePrivilege);
        createRoleIfNotFound("ROLE_ADMIN", adminPrivileges);
        createRoleIfNotFound("ROLE_USER", Arrays.asList(readPrivilege));

        Role adminRole = roleRepository.findByName("ROLE_ADMIN");
        User user = new User();
        user.setFirstName("Test");
        user.setLastName("Test");
        user.setPassword(passwordEncoder.encode("test"));
        user.setEmail("[email protected]");
        user.setRoles(Arrays.asList(adminRole));
        user.setEnabled(true);
        userRepository.save(user);

        alreadySetup = true;
    }

    @Transactional
    Privilege createPrivilegeIfNotFound(String name) {

        Privilege privilege = privilegeRepository.findByName(name);
        if (privilege == null) {
            privilege = new Privilege(name);
            privilegeRepository.save(privilege);
        }
        return privilege;
    }

    @Transactional
    Role createRoleIfNotFound(
      String name, Collection<Privilege> privileges) {

        Role role = roleRepository.findByName(name);
        if (role == null) {
            role = new Role(name);
            role.setPrivileges(privileges);
            roleRepository.save(role);
        }
        return role;
    }
}
So, what’s happening during this simple setup code? Nothing complicated:
- We’re creating the privileges.
- Then we’re creating the roles and assigning the privileges to them.
- Finally, we’re creating a user and assigning a role to it.
Note how we’re using an alreadySetup flag to determine if the setup needs to run or not. This is simply because the ContextRefreshedEvent may be fired multiple times depending on how many contexts we have configured in our application. And we only want to run the setup once.
Two quick notes here. We’ll first look at terminology. We’re using the Privilege – Role terms here. But in Spring, these are slightly different. In Spring, our Privilege is referred to as Role and also as a (granted) authority, which is slightly confusing.
This is not a problem for the implementation of course, but it’s definitely worth noting.
Second, these Spring Roles (our Privileges) need a prefix. By default, that prefix is “ROLE”, but it can be changed. We’re not using that prefix here, just to keep things simple, but keep in mind that it will be required if we’re not explicitly changing it.
4. Custom UserDetailsService
Now let’s check out the authentication process.
We’re going to see how to retrieve the user within our custom UserDetailsService and how to map the right set of authorities from the roles and privileges the user has assigned:
@Service("userDetailsService")
@Transactional
public class MyUserDetailsService implements UserDetailsService {

    @Autowired
    private UserRepository userRepository;

    @Autowired
    private IUserService service;

    @Autowired
    private MessageSource messages;

    @Autowired
    private RoleRepository roleRepository;

    @Override
    public UserDetails loadUserByUsername(String email)
      throws UsernameNotFoundException {

        User user = userRepository.findByEmail(email);
        if (user == null) {
            return new org.springframework.security.core.userdetails.User(
              " ", " ", true, true, true, true,
              getAuthorities(Arrays.asList(
                roleRepository.findByName("ROLE_USER"))));
        }

        return new org.springframework.security.core.userdetails.User(
          user.getEmail(), user.getPassword(), user.isEnabled(), true, true,
          true, getAuthorities(user.getRoles()));
    }

    private Collection<? extends GrantedAuthority> getAuthorities(
      Collection<Role> roles) {

        return getGrantedAuthorities(getPrivileges(roles));
    }

    private List<String> getPrivileges(Collection<Role> roles) {

        List<String> privileges = new ArrayList<>();
        List<Privilege> collection = new ArrayList<>();
        for (Role role : roles) {
            privileges.add(role.getName());
            collection.addAll(role.getPrivileges());
        }
        for (Privilege item : collection) {
            privileges.add(item.getName());
        }
        return privileges;
    }

    private List<GrantedAuthority> getGrantedAuthorities(List<String> privileges) {
        List<GrantedAuthority> authorities = new ArrayList<>();
        for (String privilege : privileges) {
            authorities.add(new SimpleGrantedAuthority(privilege));
        }
        return authorities;
    }
}
The interesting thing to follow here is how the Privileges (and Roles) are mapped to GrantedAuthority entities.
This mapping makes the entire security configuration highly flexible and powerful. We can mix and match roles and privileges as granular as necessary, and at the end, they’ll be correctly mapped to authorities and returned back to the framework.
5. Role Hierarchy
Additionally, let’s organize our roles into hierarchies.
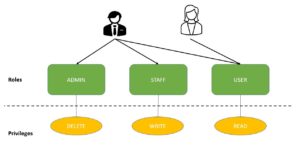
We’ve seen how to implement role-based access control by mapping privileges to roles. This allows us to assign a single role to a user rather than having to assign all the individual privileges.
However, as the number of roles increases, users might require multiple roles, leading to role explosion:

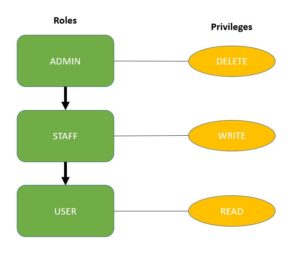
To overcome this, we can use Spring Security’s role hierarchies:

Assigning the role ADMIN automatically gives the user the privileges of both the STAFF and USER roles.
However, a user with the role STAFF can only perform STAFF and USER role actions.
Let’s create this hierarchy in Spring Security by simply exposing a bean of type RoleHierarchy:
@Bean
public RoleHierarchy roleHierarchy() {
    RoleHierarchyImpl roleHierarchy = new RoleHierarchyImpl();
    String hierarchy = "ROLE_ADMIN > ROLE_STAFF \n ROLE_STAFF > ROLE_USER";
    roleHierarchy.setHierarchy(hierarchy);
    return roleHierarchy;
}
We use the > symbol in the expression to define the role hierarchy. Here, we’ve configured the role ADMIN to include the role STAFF, which in turn includes the role USER.
To include this role hierarchy in Spring Web Expressions, we add the roleHierarchy instance to the WebSecurityExpressionHandler:
@Bean
public DefaultWebSecurityExpressionHandler customWebSecurityExpressionHandler() {
    DefaultWebSecurityExpressionHandler expressionHandler = new DefaultWebSecurityExpressionHandler();
    expressionHandler.setRoleHierarchy(roleHierarchy());
    return expressionHandler;
}
Finally, add the expressionHandler into http.authorizeRequests():
@Bean
    public SecurityFilterChain filterChain(HttpSecurity http) throws Exception {
        http.csrf()
            .disable()
            .authorizeRequests()
                .expressionHandler(webSecurityExpressionHandler())
                .antMatchers(HttpMethod.GET, "/roleHierarchy")
                .hasRole("STAFF")
    ...
}
The endpoint /roleHierarchy is protected with ROLE_STAFF in order to prove that the webSecurityExpressionHandler is working.
As we can see, role hierarchies are a great way to reduce the number of roles and authorities we need to add to a user.
6. User Registration
Finally, let’s take a look at registration for a new user.
We’ve seen how setup goes about creating the User and assigning Roles (and Privileges) to it.
Let’s now take a look at how this needs to be done during registration of a new user:
@Override
public User registerNewUserAccount(UserDto accountDto) throws EmailExistsException {

    if (emailExist(accountDto.getEmail())) {
        throw new EmailExistsException
          ("There is an account with that email adress: " + accountDto.getEmail());
    }
    User user = new User();

    user.setFirstName(accountDto.getFirstName());
    user.setLastName(accountDto.getLastName());
    user.setPassword(passwordEncoder.encode(accountDto.getPassword()));
    user.setEmail(accountDto.getEmail());

    user.setRoles(Arrays.asList(roleRepository.findByName("ROLE_USER")));
    return repository.save(user);
}
In this simple implementation, since we’re assuming that a standard user is being registered, we’re assigning it the ROLE_USER role.
Of course, more complex logic can easily be implemented in the same way, either by having multiple, hard-coded registration methods or by allowing the client to send the type of user that’s being registered.
7. Conclusion
In this article, we illustrated how to implement Roles and Privileges with JPA, for a Spring Security-backed system.
We also configured a role hierarchy to simplify our access control configuration.
The full implementation of this Registration with Spring Security tutorial can be found over on GitHub.


