

Mocking is an essential part of unit testing, and the Mockito library makes it easy to write clean and intuitive unit tests for your Java code.
Get started with mocking and improve your application tests using our Mockito guide:
Handling concurrency in an application can be a tricky process with many potential pitfalls. A solid grasp of the fundamentals will go a long way to help minimize these issues.
Get started with understanding multi-threaded applications with our Java Concurrency guide:
Spring 5 added support for reactive programming with the Spring WebFlux module, which has been improved upon ever since. Get started with the Reactor project basics and reactive programming in Spring Boot:
Since its introduction in Java 8, the Stream API has become a staple of Java development. The basic operations like iterating, filtering, mapping sequences of elements are deceptively simple to use.
But these can also be overused and fall into some common pitfalls.
To get a better understanding on how Streams work and how to combine them with other language features, check out our guide to Java Streams:
Explore Spring Boot 3 and Spring 6 in-depth through building a full REST API with the framework:
Yes, Spring Security can be complex, from the more advanced functionality within the Core to the deep OAuth support in the framework.
I built the security material as two full courses - Core and OAuth, to get practical with these more complex scenarios. We explore when and how to use each feature and code through it on the backing project.
You can explore the course here:
Spring Data JPA is a great way to handle the complexity of JPA with the powerful simplicity of Spring Boot.
Get started with Spring Data JPA through the guided reference course:
Refactor Java code safely — and automatically — with OpenRewrite.
Refactoring big codebases by hand is slow, risky, and easy to put off. That’s where OpenRewrite comes in. The open-source framework for large-scale, automated code transformations helps teams modernize safely and consistently.
Each month, the creators and maintainers of OpenRewrite at Moderne run live, hands-on training sessions — one for newcomers and one for experienced users. You’ll see how recipes work, how to apply them across projects, and how to modernize code with confidence.
Join the next session, bring your questions, and learn how to automate the kind of work that usually eats your sprint time.
In distributed systems, managing multi-step processes (e.g., validating a driver, calculating fares, notifying users) can be difficult. We need to manage state, scattered retry logic, and maintain context when services fail.
Dapr Workflows solves this via Durable Execution which includes automatic state persistence, replaying workflows after failures and built-in resilience through retries, timeouts and error handling.
In this tutorial, we'll see how to orchestrate a multi-step flow for a ride-hailing application by integrating Dapr Workflows and Spring Boot:
1. Introduction
This article will give you a quick overview of JHipster, show you how to create a simple monolithic application and custom entities using command line tools.
We will also examine the generated code during every step, and also cover the build commands and automated tests.
2. What Is Jhipster
JHipster is, in a nutshell, a high-level code generator built upon an extensive list of cutting-edge development tools and platforms.
The main components of the tool are:
- Yeoman, a front-end scaffolding tool
- Good old Spring Boot
- AngularJS, the prominent Javascript framework. JHipster also works with AngularJS 2
JHipster creates, with just a few shell commands, a full-fledged Java web project with a friendly, responsive front-end, documented REST API, comprehensive test coverage, basic security and database integration! The resulting code is well commented and follows industries best practices.
Other key technologies leveraged by it are:
- Swagger, for API documentation
- Maven, Npm, Yarn, Gulp and Bower as dependency managers and build tools
- Jasmine, Protractor, Cucumber and Gatling as test frameworks
- Liquibase for database versioning
We are not required to use all those items on our generated application. The optional items are selected during project creation.

A beautiful JHipster-generated application. This is the result of the work we’ll be doing throughout this article.
3. Installation
To install JHipster, we’ll first need to install all of its dependencies:
That’s enough dependencies if you decide to use AngularJS 2. However, if you prefer to go with AngularJS 1 instead, you would also need to install Bower and Gulp.
Now, to finish up, we just need to install JHipster itself. That is the easiest part. Since JHipster is a Yeoman generator, which in turn is a Javascript package, installing is as simple as running a simple shell command:
yarn global add [email protected]That’s it! We’ve used Yarn package manager to install the JHipster generator.
4. Creating a Project
To create a JHipster project essentially is to build a Yeoman project. Everything starts with the yo command:
mkdir baeldung-app && cd baeldung-app
yo jhipster
This will create our project folder, named baeldung-app, and start up Yeoman’s command line interface that will walk us through creating the project.
The process involves 15 steps. I encourage you to explore the available options on each step. In the scope of this article, we’ll create a simple, Monolithic application, without deviating too much from the default options.
Here are the steps that are most relevant to this article:
- Type of application – Choose Monolithic application (recommended for simple projects)
- Installation of other generators from the JHipster Marketplace – Type N. In this step we could want to install cool add-ons. Some popular ones are entity-audit that enables data tracing; bootstrap-material-design, that uses the trendy Material Design components, and angular-datatables
- Maven or Gradle – Choose Maven
- Other technologies – Do not select any options, just press Enter to move to the next step. Here we can choose to plug in Social login with Google, Facebook, and Twitter, which is a very nice feature.
- Client framework – Choose Angular 17
- Enable internationalization – Type Y, then choose English as the native language. We can choose as many languages as we want as the second language
- Test frameworks – Select Gatling and Protractor

JHipster will create the project files and will then start to install the dependencies. The following message will be shown in the output:
I'm all done. Running npm install for you to install the required
   dependencies. If this fails, try running the command yourself.
The dependencies installation can take a little while. Once it finishes it will display:
Server application generated successfully.

Run your Spring Boot application:
 ./mvnw

Client application generated successfully.

Start your Webpack development server with:
npm start
Our project is now created. We can run the main commands on our project root folder:
./mvnw #starts Spring Boot, on port 8080
./mvnw clean test #runs the application's tests
yarn test #runs the client tests
JHipster generates a README file, placed right in the root folder of our project. That file contains instructions to run many other useful commands related to our project.
5. Overview of Generated Code
Take a look at the files automatically generated. You’ll notice that the project looks quite a bit like a standard Java/Spring project, but with a lot of extras.
Since JHipster takes care of creating the front-end code as well, you’ll find a package.json file, a webpack folder, and some other web related stuff.
Let’s quickly explore some of the critical files.
5.1. Back-end Files
- As expected, the Java code is contained in the src/main/java folder
- The src/main/resources folder has some of the static content used by the Java code. Here we’ll find the internationalization files (in the i18n folder), email templates and some configuration files
- Unit and integration tests are located in the src/test/java folder
- Performance (Gatling) tests are in src/test/gatling. However, at this point, there won’t be much content in this folder. Once we have created some entities, the performance tests for those objects will be located here
5.2. Front-end
- The root front end folder is src/main/webapp
- The app folder contains much of the AngularJS modules
- i18n contains the internationalization files for the front end part
- Unit tests (Karma) are in the src/test/javascript/spec folder
- End-to-end tests (Protractor) are in the src/test/javascript/e2e folder
6. Creating Custom Entities
Entities are the building blocks of our JHipster application. They represent the business objects, like a User, a Task, a Post, a Comment, etc.
Creating entities with JHipster it’s a painless process. We can create an object using command line tools, similarly to how we’ve created the project itself, or via JDL-Studio, an online tool that generates a JSON representation of the entities that can later be imported into our project.
In this article, let’s use the command line tools to create two entities: Post and Comment.
A Post should have a title, a text content and a creation date. It should also be related to a user, who is the creator of the Post. A User can have many Posts associated with them.
A Post can also have zero or many Comments. Each Comment has a text and creation date.
To fire up the creation process of our Post entity, go to the root folder of our project and type:
yo jhipster:entity postNow follow the steps presented by the interface.
- Add a field named title of type String and add some validation rules to the field (Required, Minimum length and Maximum length)
- Add another a field called content of type String and make it also Required
- Add a third field named creationDate, of type LocalDate
- Now let’s add the relationship with User. Notice that the entity User already exists. It’s created during the conception of the project. The name of the other entity is user, the relationship name is creator, and the type is many-to-one, the display field is name, and it’s better to make the relationship required
- Do not choose to use a DTO, go with Direct entity instead
- Choose to inject the repository directly into the service class. Notice that, in a real world application, it would probably be more reasonable to separate the REST controller from the service class
- To finish up, select infinite scroll as the pagination type
- Give JHipster permission to overwrite existent files if required
Repeat the process above to create an entity named comment, with two fields, text, of type String, and creationDate of type LocalDate. Comment should also have a required many-to-one relationship with Post.
That’s it! There are many steps to the process, but you’ll see that it doesn’t take that much time to complete them.
You will notice that JHipster creates a bunch of new files, and modifies a few others, as part of the process of creating the entities:
- A .jhipster folder is created, containing a JSON file for each object. Those files describe the structure of the entities
- The actual @Entity annotated classes are in the domain package
- Repositories are created in the repository package
- REST controllers go in the web.rest package
- Liquibase changelogs for each table creation are in the resources/config/liquibase/changelog folder
- In the front-end part, a folder for each entity is created in the entities directory
- Internationalization files are set up in the i18n folder (feel free to modify those if you want to)
- Several tests, front-end, and back-end are created in the src/test folder
That’s quite a lot of code!
Feel free to run the tests and double check that all are passing. Now we can also run performance tests with Gatling, using the command (the application has to be running for these tests to pass):
mvnw gatling:executeIf you want to check the front-end in action, start up the application with ./mvnw, navigate to http://localhost:8080 and log in as the admin user (password is admin).
Choose Post on the top menu, under the Entities menu item. You will be shown an empty list, that will later contain all posts. Click on the Create a new Post button to bring up the inclusion form:
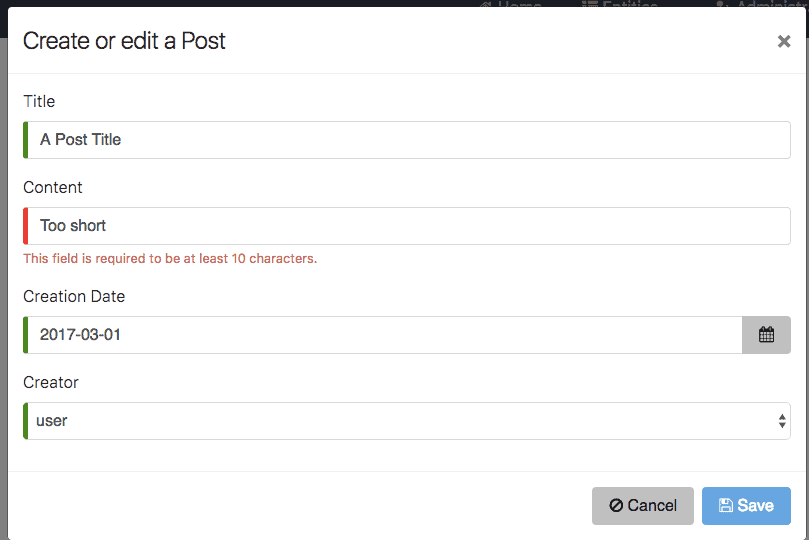
Notice how careful JHipster is on the form components and validation messages. Off course we can modify the front end as much as we want, but the form is very well built as it is.
7. Continuous Integration Support
JHipster can automatically create configuration files for the most used Continuous Integration tools. Just run this command:
yo jhipster:ci-cdAnd answer the questions. Here we can choose which CI tools we want to create config files for, whether we want to use Docker, Sonar and even deploy to Heroku as part of the build process.
The ci-cd command can create configuration files for the following CI tools:
- Jenkins: the file is JenkinsFile
- Travis CI: the file is .travis.yml
- Circle CI: the file is circle.yml
- GitLab: the file is .gitlab-ci.yml
8. Conclusion
This article gave a little bit of the taste of what JHipster is capable of. There of course a lot more to it than we can cover here, so definitely keep exploring the official JHipster website.


