1. Overview
Good API documentation is one of the many factors contributing to the overall success of a software project.
Fortunately, all modern versions of the JDK provide the Javadoc tool for generating API documentation from comments present in the source code.
Prerequisites:
- JDK 1.4 (JDK 7+ is recommended for the latest version of the Maven Javadoc plugin)
- The JDK /bin folder added to the PATH environment variable
- (Optional) an IDE with built-in tools
Let’s start with the comments.
The Javadoc comments structure looks very similar to a regular multi-line comment, but the key difference is the extra asterisk at the beginning:
// This is a single line comment

/*
 * This is a regular multi-line comment
 */

/**
 * This is a Javadoc
 */
Javadoc style comments may contain HTML tags as well.
Javadoc comments may be placed above any class, method, or field which we want to document.
These comments are commonly made up of two sections:
- The description of what we’re commenting on
- The standalone block tags (marked with the “@” symbol), which describe specific meta-data
We’ll be using some of the more common block tags in our example. For a complete list of block tags, visit the reference guide.
2.2. Javadoc at Class Level
Let’s take a look at what a class-level Javadoc comment would look like:
/**
* Hero is the main entity we'll be using to . . .
*
* Please see the {@link com.baeldung.javadoc.Person} class for true identity
* @author Captain America
*
*/
public class SuperHero extends Person {
    // fields and methods
}
We have a short description and two different block tags, standalone and inline:
- Standalone tags appear after the description, with the tag as the first word in a line, e.g., the @author tag
- Inline tags may appear anywhere and are surrounded with curly brackets, e.g., the @link tag in the description
In our example, we can also see two kinds of block tags being used:
- {@link} provides an inline link to a referenced part of our source code
- @author is the name of the author who added the class, method, or field that’s commented
2.3. Javadoc at Field Level
We can also use a description without any block tags like this inside our SuperHero class:
/**
 * The public name of a hero that is common knowledge
 */
private String heroName;
Private fields won’t have Javadoc generated for them unless we explicitly pass the -private option to the Javadoc command.
2.4. Javadoc at Method Level
Methods can contain a variety of Javadoc block tags.
Let’s take a look at a method we’re using:
/**
 * <p>This is a simple description of the method. . .
 * <a href="http://www.supermanisthegreatest.com">Superman!</a>
 * </p>
 * @param incomingDamage the amount of incoming damage
 * @return the amount of health hero has after attack
 * @see <a href="http://www.link_to_jira/HERO-402">HERO-402</a>
 * @since 1.0
 */
public int successfullyAttacked(int incomingDamage) {
    // do things
    return 0;
}
The successfullyAttacked method contains both a description and numerous standalone block tags.
There are many block tags to help generate proper documentation, and we can include all sorts of different information. We can even utilize basic HTML tags in the comments.
Let’s go over the tags we encountered in the example above:
- @param provides any useful description about a method’s parameter or input it should expect
- @return provides a description of what a method will or can return
- @see will generate a link similar to the {@link} tag, but more in the context of a reference and not inline
- @since specifies which version of the class, field, or method was added to the project
- @version specifies the version of the software, commonly used with %I% and %G% macros
- @throws is used to further explain the cases the software would expect an exception
- @deprecated gives an explanation of why code was deprecated, when it may have been deprecated, and what the alternatives are
Although both sections are technically optional, we’ll need at least one for the Javadoc tool to generate anything meaningful.
3. Javadoc Generation
In order to generate our Javadoc pages, we’ll want to take a look at the command line tool that ships with the JDK and Maven plugin.
The Javadoc command line tool is very powerful, but has some complexity attached to it.
Running the command javadoc without any options or parameters will result in an error, and output parameters it expects.
We’ll need to at least specify what package or class we want documentation to be generated for.
Let’s open a command line, and navigate to the project directory.
We’ll assume the classes are all in the src folder in the project directory:
user@baeldung:~$ javadoc -d doc src\*
This will generate documentation in a directory called doc, as specified with the –d flag. If multiple packages or files exist, we’d need to provide all of them.
Utilizing an IDE with the built-in functionality is, of course, easier and generally recommended.
3.2. Javadoc With Maven Plugin
We can also make use of the Maven Javadoc plugin:
<build>
    <plugins>
        <plugin>
            <groupId>org.apache.maven.plugins</groupId>
            <artifactId>maven-javadoc-plugin</artifactId>
            <version>3.6.2</version>
            <configuration>
                <source>1.8</source>
                <target>1.8</target>
            </configuration>
            <tags>
            ...
            </tags>
        </plugin>
    </plugins>
</build>
In the base directory of the project, we’ll run the command to generate our Javadocs to a directory in target\site:
user@baeldung:~$ mvn javadoc:javadoc
The Maven plugin is very powerful, and facilitates complex document generation seamlessly.
Now let’s see what a generated Javadoc page looks like:
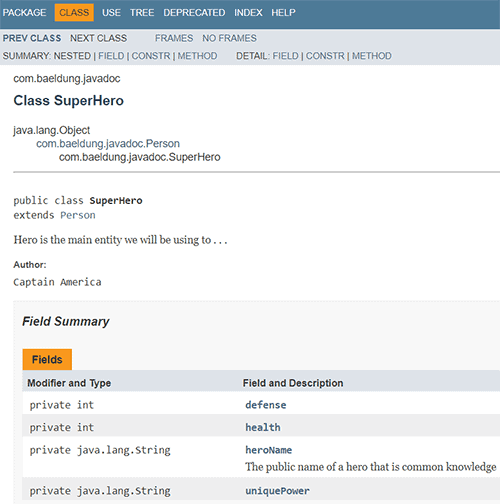
We can see a tree view of the classes our SuperHero class extends. We can see our description, fields, and method, and we can click on links for more information.
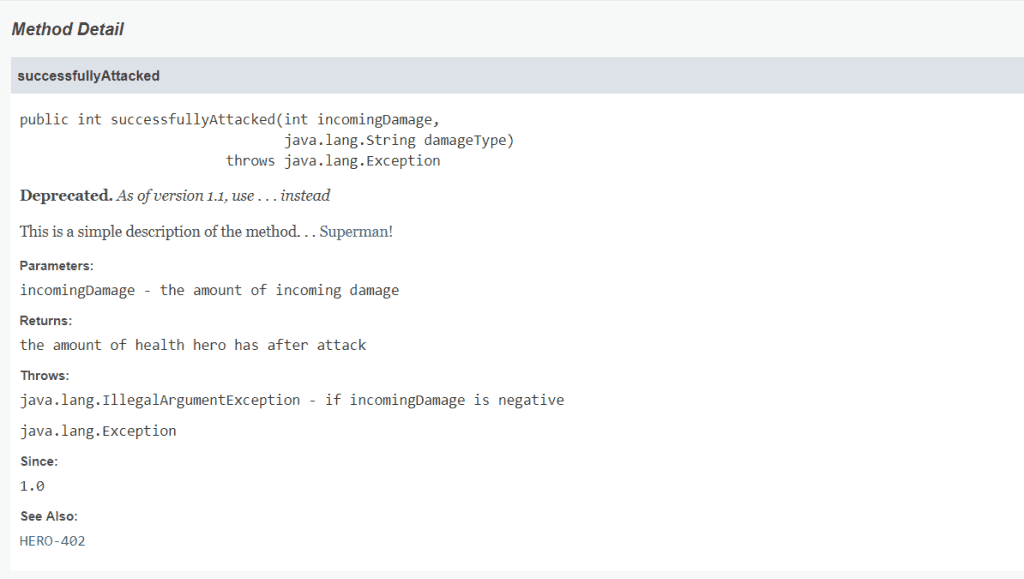
Here’s a detailed view of our method:
In addition to using predefined block tags to format our documentation, we can also create custom block tags. We just need to include a -tag option to our Javadoc command line in the format of <tag-name>:<locations-allowed>:<header>.
In order to create a custom tag called @location allowed anywhere, which is displayed in the “Notable Locations” header in our generated document, we need to run:
user@baeldung:~$ javadoc -tag location:a:"Notable Locations:" -d doc src\*
Then to use this tag, we can add it to the block section of a Javadoc comment:
/**
 * This is an example...
 * @location New York
 * @returns blah blah
 */
The Maven Javadoc plugin is flexible enough to also allow definitions of our custom tags in our pom.xml.
In order to set up the same tag above for our project, we can add the following to the <tags> section of our plugin:
...
<tags>
    <tag>
        <name>location</name>
        <placement>a</placement>
        <head>Notable Places:</head>
    </tag>
</tags>
...
This way allows us to specify the custom tag once, instead of specifying it every time.
4. Conclusion
In this brief article, we covered how to write basic Javadocs, and generate them with the Javadoc command line.
An easier way to generate the documentation would be to use any built-in IDE options, or include the Maven plugin into our pom.xml file and run the appropriate commands.
As always, the code samples can be found over on GitHub.


