1. Overview
Gatling is a load testing tool that comes with excellent support of the HTTP protocol – which makes it a really good choice for load testing any HTTP server.
This quick guide will show you how to setup a simple scenario for load testing an HTTP server.
Gatling simulation scripts are written in Scala, but don’t worry – the tool comes to help us with a GUI allowing us to record the scenario. Once we have finished recording the scenario the GUI create the Scala script representing the simulation.
After running the simulation we have a ready-to-present HTML reports.
Last but not least, Gatling’s architecture is asynchronous. This kind of architecture lets us implement virtual users as messages instead of dedicated threads, making them very resource cheap. Thus, running thousands of concurrent virtual users is not an issue.
It’s also worth noting though that the core engine is actually protocol agnostic, so it’s perfectly possible to implement support for other protocols. For example, Gatling currently also ships JMS support.
2. Creating a Project Using the Archetype
Although we can get Gatling bundles as a .zip we choose to use Gatling’s Maven Archetype. This allows us to integrate Gatling and run it into an IDE and make it easy to maintain the project in a version control system. Be careful as Gatling require a JDK8.
From the command line, type:
mvn archetype:generate
Then, when prompted:
Choose a number or apply filter (format: [groupId:]artifactId, case sensitive contains):
Type:
gatling
You should then see:
Choose archetype:
1: remote ->
  io.gatling.highcharts:gatling-highcharts-maven-archetype (gatling-highcharts-maven-archetype)
Type:
1
to select the archetype, then select the version to use (choose the latest version).
Select the groupId, artifactId, version and package name for the classes before confirming the archetype creation.
Finish by importing the archetype into an IDE – for example into the Scala IDE (based on Eclipse) or into IntelliJ IDEA.
3. Define a Scenario
Before launching the recorder, we need to define a scenario. It will be a representation of what really happens when users navigate a web application.
In this tutorial, we will use the application provided by the Gatling’s team for sample purpose and hosted at the URL http://computer-database.gatling.io.
Our simple scenario could be:
- A user arrives at the application.
- The user searches for ‘amstrad’.
- The user opens one of the related models.
- The user goes back to home page.
- The user iterates through pages.
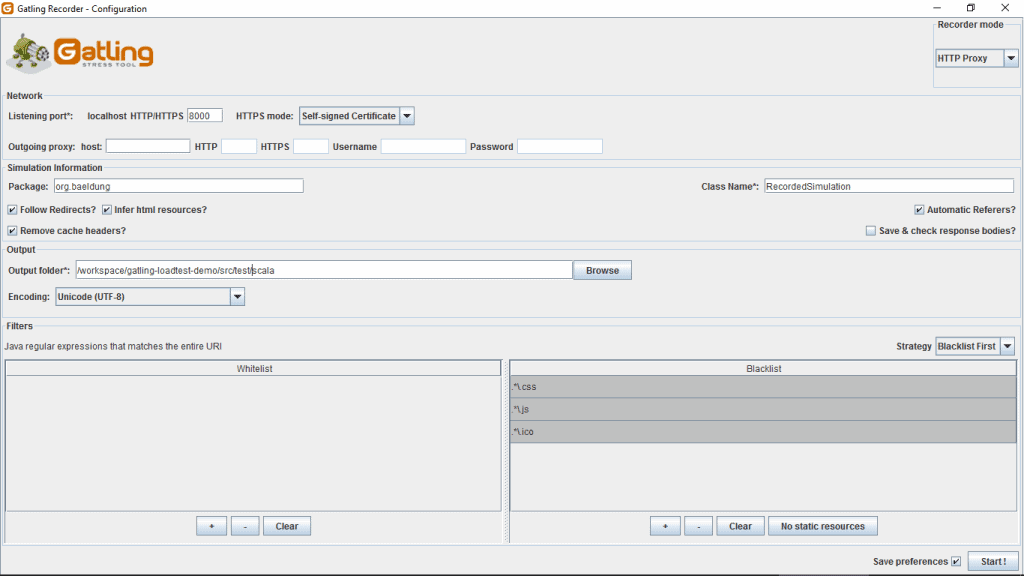
4. Configuring the Recorder
First of all launch the Recorder class from the IDE. Once launched, the GUI lets you configure how requests and responses will be recorded. Choose the following options:
- 8000 as listening port
- org.baeldung.simulation package
- RecordedSimulation class name
- Follow Redirects? checked
- Automatic Referers? checked
- Black list first filter strategy selected
- .*\.css, .*\.js and .*\.ico in the black list filters
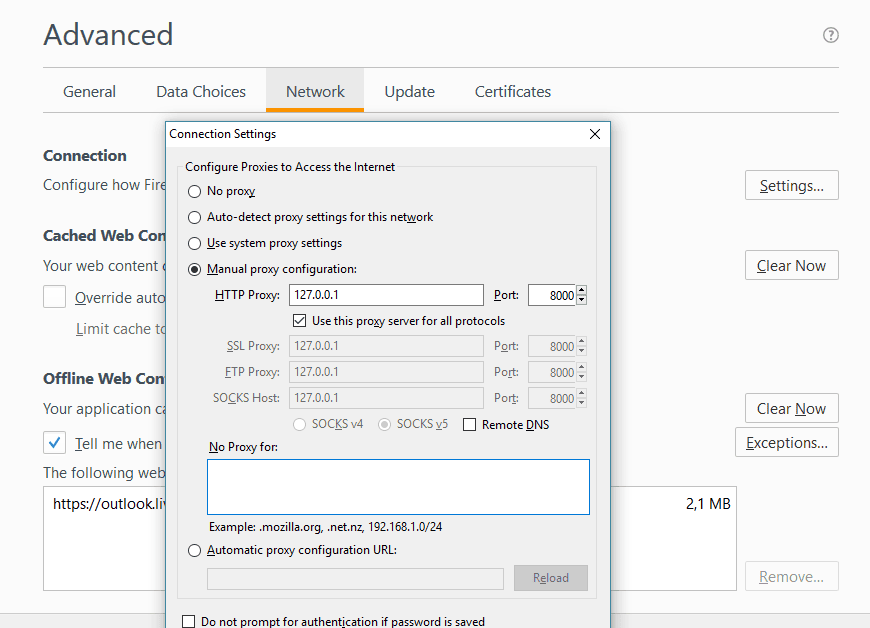
Now we have to configure our browser to use the defined port (8000) chosen during the configuration. This is the port our browser must connect to so that the Recorder is able to capture our navigation.
Here is how to do with Firefox, open the browser Advanced settings, then go to the Network panel and update the connection settings:
5. Recording the Scenario
Now that everything is configured we can record the scenario that we have defined above. The step are the following:
- Initiate the recording by clicking the ‘Start’ button
- Go to the website: http://computer-database.gatling.io
- Search for models with ‘amstrad’ in their name
- Select ‘Amstrad CPC 6128’
- Go back to home page
- Iterates several times through the model pages by clicking on Next button
- Click on ‘Stop & save’ button
The Simulation will be generated in the package org.baeldung defined during the configuration under the name RecordedSimulation.scala
6. Run a Simulation With Maven
To run our recorded simulation we need to update our pom.xml:
<plugin>
    <groupId>io.gatling</groupId>
    <artifactId>gatling-maven-plugin</artifactId>
    <version>2.2.4</version>
    <executions>
        <execution>
            <phase>test</phase>
            <goals><goal>execute</goal></goals>
            <configuration>
                <disableCompiler>true</disableCompiler>
            </configuration>
        </execution>
    </executions>
</plugin>
This let us execute the simulation at test phase. To start the test just run:
mvn test
When the simulation is done, the console will display the path to the HTML reports.
Note: configuration <disableCompiler>true</disableCompiler> is used because we will be using Scala with maven this flag will ensure that we do not end up compiling our simulation twice. More details are available on Gatling docs.
7. Reviewing the Result
If we open the index.html at the suggested location the reports look like as follow:

8. Conclusion
In this tutorial we have explored load testing an HTTP server with Gatling. The tools allows us to record a simulation based on a defined scenario with the help of a GUI interface. After the recording is done we can launch our test. The test report will be in a form of HTML resume.
To build up our example we have chosen to use a maven archetype. This help us to integrate Gatling and run it into an IDE and make it easy to maintain the project in a version control system.
The example code can be found in the GitHub project.


